TL;DR:
- Proper oven installation requires careful measurements, electrical safety checks, and correct leveling to ensure optimal performance from the start. Homeowners should verify cabinet dimensions, turn off power, and secure connections with the help of professionals when necessary, especially for electrical work. Conduct thorough post-installation testing to identify and address issues early, preventing costly repairs and ensuring compliance with local codes.
Installing a new oven should feel like an upgrade, not an ordeal. Yet many homeowners in Orange County and Los Angeles County run into the same problems: the cabinet opening is slightly off, the wiring doesn’t match what they expected, or the oven won’t sit level no matter what they try. A proper step by step oven installation requires more than pulling the old unit out and sliding the new one in. This guide covers everything from pre-installation safety checks and measurements to final testing, so your new oven works correctly from day one without putting your home or family at risk.
Table of Contents
- Preparing for your oven installation: tools, measurements, and safety checks
- Step-by-step oven installation process: from electrical connection to securing the unit
- Ensuring electrical safety and compliance: when to call a professional electrician
- Navigating local permits and ventilation requirements in Orange County and Los Angeles
- Post-installation testing and troubleshooting common issues
- Why many DIY oven installations fall short — and how to avoid common pitfalls
- Professional oven installation services in Orange and Los Angeles Counties
- Frequently asked questions
Key Takeaways
| Point | Details |
|---|---|
| Electrical safety first | Always turn off power and verify with a voltage tester before handling oven wiring. |
| Measure accurately | Confirm cabinet dimensions and clearance twice to ensure your oven fits perfectly. |
| Use a level during installation | Proper leveling prevents cooking performance issues and door misalignment. |
| Hire a professional when needed | For hardwired ovens, an electrician ensures safety, code compliance, and preserves warranties. |
| Check local permits for ventilation | California requires permits if ventilation or ducting is changed during oven installation. |
Preparing for your oven installation: tools, measurements, and safety checks
Having the right tools and verified measurements before you touch anything is what separates a smooth installation from one that costs you three trips to the hardware store. Gather everything listed below before unboxing the new appliance.
Essential tools you’ll need:
- Voltage tester (non-contact style preferred)
- Flathead and Phillips screwdrivers
- Tape measure
- Level (at least 24 inches)
- Wire strippers
- Adjustable wrench
- Work gloves and safety glasses
- Flashlight or headlamp
Measurement checklist before anything else:
| Measurement | What to check | Why it matters |
|---|---|---|
| Cabinet opening width | Measure at top, middle, and bottom | Ensures the oven slides in without binding |
| Cabinet opening height | Measure front to back | Confirms door clearance and trim fit |
| Depth of the cavity | Measure from front to rear wall | Prevents the oven from protruding or sitting too deep |
| Electrical junction box position | Note height and side | Allows for proper cable routing |
| Door swing clearance | Measure space in front | Prevents blocked pathways or cabinetry damage |
Compare every measurement against your new oven’s spec sheet before you proceed. Manufacturers list minimum and maximum cavity dimensions in their documentation, and even a quarter-inch difference can matter with built-in models.
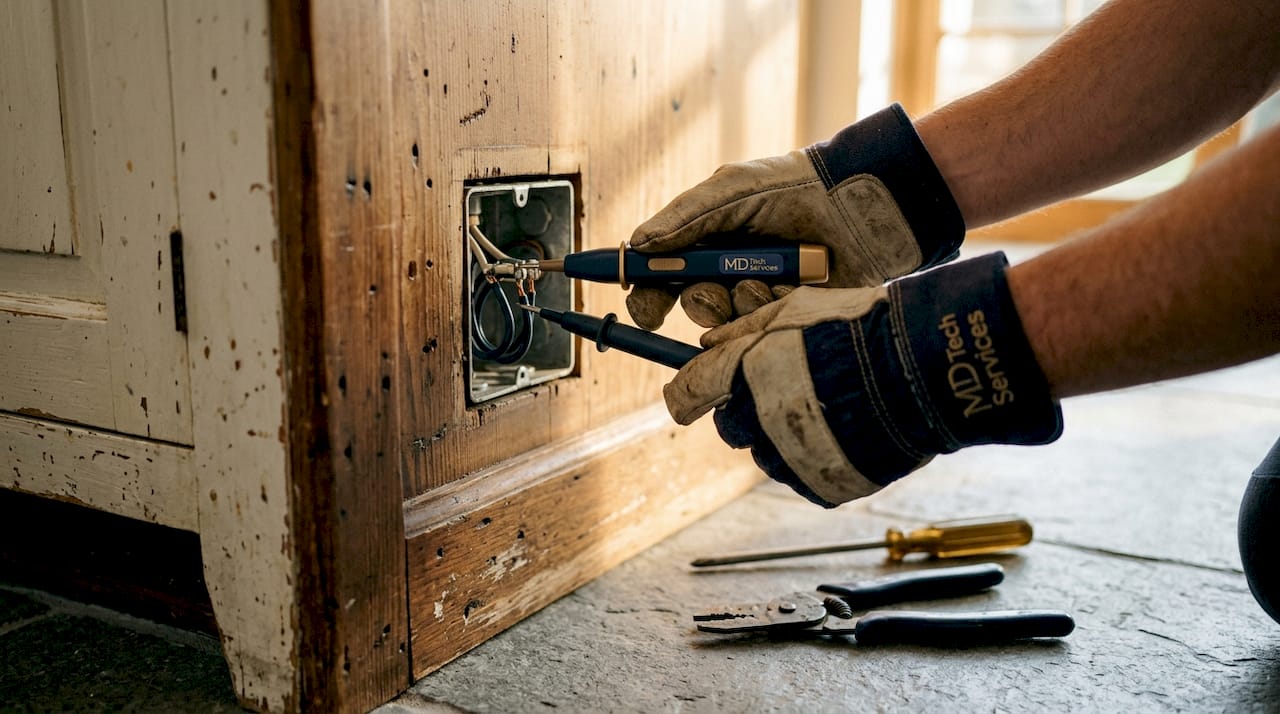
Once your measurements confirm a good fit, the most critical next step is electrical safety. Your single oven installation guide has additional prep steps specific to different oven types. As part of a step-by-step wall oven installation, you should turn off power at the breaker and then use a voltage tester directly at the cabinet junction box to confirm zero power before you handle any wiring. Flipping the breaker is not enough on its own. Verify it.
Pro Tip: Measure your cabinet opening twice on different days if possible. Temperature and humidity can cause slight changes in wood cabinets, and confirming twice catches measurement errors before the oven is already unboxed and sitting in your kitchen.
Step-by-step oven installation process: from electrical connection to securing the unit
With preparations complete, now let’s walk through the detailed physical installation steps. This is where most errors happen, and rushing through any one step can create problems that are difficult to diagnose later.
Step-by-step installation process:
-
Clear and protect the area. Lay down cardboard or moving blankets on the floor in front of the cabinet. This protects your flooring and gives you a staging area for the oven.
-
Confirm power is off. Even if you did this during prep, verify again with your voltage tester at the junction box. This step is non-negotiable every single time.
-
Prepare the wiring connections. Match the oven’s flexible conduit wires to your home’s wiring using the manufacturer’s color codes. Typically: black to black (hot), white to white (neutral), and green or bare copper to ground. Secure each connection with approved wire nuts and tug each one to confirm it’s tight.
-
Have a helper ready before lifting. Built-in ovens are heavier than they look, often 100 to 150 pounds for a full-size model. One person guides the wiring while the other manages the oven’s weight.
-
Slide the oven into the cabinet slowly. Guide the electrical cables through the designated opening as you push the unit in. Check behind the unit periodically to confirm no wires are being pinched between the oven and the cabinet wall.
-
Check the level in both directions. Place your level across the oven floor inside, front to back, then side to side. The level confirms proper baking performance by ensuring even heat distribution and correct door alignment. Shim as needed before fastening.
-
Secure with manufacturer screws. Drive the mounting screws through the oven’s trim into the cabinet frame. Tighten them snugly but stop before the wood compresses. Overtightening can crack the cabinet frame or warp the trim.
-
Recheck the fit. Open and close the oven door several times. It should move smoothly, close flush, and show no gaps around the trim.
These oven installation essentials apply whether you’re replacing an older model or installing a brand new unit in a remodeled kitchen. For additional guidance specific to single-unit models, review these single oven installation tips before you begin.
Pro Tip: Slide the oven in only halfway, then pause to look behind it with your flashlight. If you see any wire dragging or bunching, pull the unit back out and reroute before continuing. Catching a pinched wire at this stage takes two minutes. Catching it after final fastening can take hours.
Ensuring electrical safety and compliance: when to call a professional electrician
Understanding the physical installation steps matters, but electrical safety and compliance are what determine whether your installation is genuinely done right. This is not an area where guessing is acceptable.
“Electric oven installation should be completed by a licensed electrician to ensure safety and compliance.”
Hardwired ovens are not plug-and-play appliances. They connect directly to your home’s wiring, which means any mistake affects not just the oven but potentially your entire electrical system. Hardwiring requires a qualified electrician in most professional and regulatory contexts, and for good reason.
Key electrical facts every homeowner should know:
- Ovens require dedicated circuits, typically 240 volts and 40 to 50 amps. Sharing a circuit with other appliances causes breaker trips and can be a fire hazard.
- Incorrect wiring does not always fail immediately. It can create intermittent faults that are frustrating and expensive to trace.
- DIY electrical errors frequently void manufacturer warranties, meaning a $1,500 oven repair won’t be covered if improper installation caused the failure.
- Even swapping a like-for-like replacement oven requires you to verify the existing wiring gauge, breaker rating, and grounding connection before connecting the new unit.
- California electrical code requires that dedicated appliance circuits meet specific load and grounding standards. Non-compliance can complicate home sales or insurance claims.
Review our guidance on electrical grounding safety to understand what proper grounding looks like and why it matters for oven installations.
Pro Tip: When in doubt, call a licensed electrician before you start, not after something goes wrong. The cost of a professional consultation is far less than a service call to diagnose a wiring problem or, worse, repair damage from an electrical fault.
Navigating local permits and ventilation requirements in Orange County and Los Angeles
Aside from installation and safety, local code requirements in Orange and Los Angeles counties can directly affect your project scope and timeline. Many homeowners skip this step and pay for it later.
When mechanical permits are required in California:
- New ducting is added or existing ducting is rerouted
- Hood exhaust capacity (CFM) is changed or upgraded
- Makeup air systems are added to compensate for high-CFM hoods
- Ventilation equipment is replaced with a different unit type
According to Title 24 and local LA requirements, mechanical permits are triggered by these specific changes, and inspections follow to verify compliance. Simply replacing your oven without touching ventilation typically does not require a permit, but any modifications to your kitchen’s ventilation system do.
| Scenario | Permit required? | Inspection needed? |
|---|---|---|
| Replacing oven, no ventilation changes | Generally no | No |
| Replacing oven, upgrading range hood CFM | Yes | Yes |
| Adding new ductwork to kitchen | Yes | Yes |
| Installing makeup air for high-CFM hood | Yes | Yes |
| Remodel with new electrical circuit for oven | Yes (electrical permit) | Yes |
Ventilation matters for more than permits. In tightly sealed modern homes in Orange County, poor kitchen ventilation creates indoor air quality problems and can affect oven performance over time. If you’re installing a new oven as part of a broader kitchen remodel, coordinate your electrical and ventilation upgrades together so inspections can be scheduled efficiently.
Review your oven permits and inspections requirements with your local building department before starting work. It’s a short call that can save a costly rework.
Pro Tip: Orange County and LA County building departments have online portals where you can often check permit requirements for your specific project type without waiting on hold. Check those first.
Post-installation testing and troubleshooting common issues
With installation and any permit requirements addressed, the final step is confirming your oven actually works correctly. Testing is not optional. It is how you catch problems before they become expensive.
First-run testing process:
- Restore power at the breaker and watch for the oven’s display to light up within a few seconds. No display at all often indicates a wiring issue.
- Set the oven to around 400°F and run a full 30 to 60 minute heating cycle. Stay in the kitchen during this entire first run.
- Observe for unusual smells. A mild burning smell during the first cycle is normal. It’s factory residue burning off. A strong, persistent, or sharp chemical smell is not normal and signals a potential electrical problem.
- Watch for error codes on the display. Check your owner’s manual for what each code means before assuming the worst.
- Check the heat distribution by placing an oven thermometer inside. The internal temperature should reach your set point within the manufacturer’s specified preheat time.
Common problems and what they usually mean:
- Oven not heating at all: Check wiring connections and confirm the breaker did not trip.
- Erratic controls or display: Often a loose connection at the junction box or a ground fault.
- Oven vibrates or rattles: The unit is not secured properly. Recheck mounting screws.
- Door doesn’t close flush: The oven is not level. Loosen the mounting screws, re-level, and re-fasten.
- Uneven baking: Almost always a leveling issue. Even a slight tilt affects how heat circulates.
For more specific guidance, our oven troubleshooting guide covers the most common post-installation heating and control issues in detail.
Pro Tip: Never leave the oven unattended during its first test run. Sit in the kitchen, stay alert, and treat those 30 to 60 minutes as a final quality check on your work.
Why many DIY oven installations fall short — and how to avoid common pitfalls
After walking through every step, here’s what years of working on appliance installations in Orange and Los Angeles County homes have taught us: the most common failures are not dramatic. They are quiet, gradual, and entirely avoidable.
The issue we see most often is not a botched electrical connection. It’s a cabinet fit problem that nobody caught during installation. An oven that’s slightly crooked in the cavity, or shimmed sloppily at one corner, creates a cascade of performance issues. As one installation guide confirms, cabinet fit and leveling are where most real-world installation failures originate. The electrical work gets the attention, but the mechanical fit is where corners get cut.
The second most common failure is wiring damage from the insertion process. Homeowners slide the oven into a tight cabinet space without anyone watching what’s happening to the cables behind the unit. The oven goes in smoothly, the screws go in, the power comes on, and everything seems fine. Then six months later there’s an intermittent error code, or worse, a heat smell from inside the cabinet that turns out to be a slowly failing pinched wire.
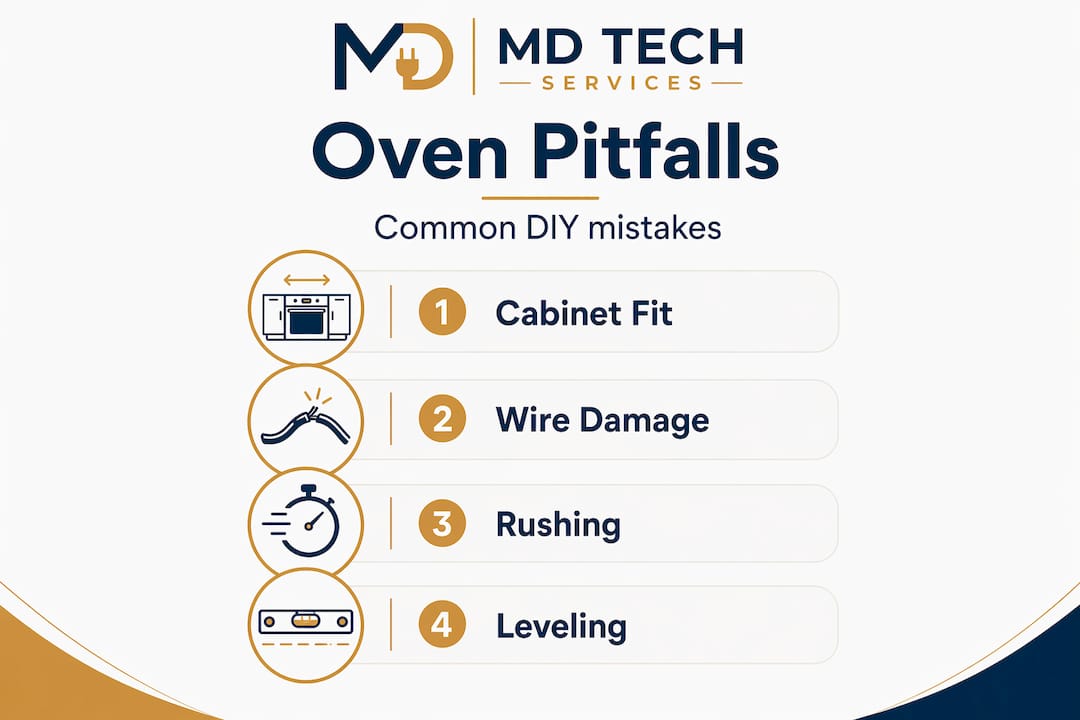
Rushing is the root cause behind both of these failures. Installation feels like it should be fast once you’ve done all the prep work. It shouldn’t be. The physical insertion process deserves the same care as the electrical connections.
Pro Tip: Before tightening any mounting screws, confirm your level reading, confirm no wires are bunched behind the unit, and open and close the door once. Do all three before you commit to the final fastening. Thirty extra seconds at that stage can save hours of troubleshooting later.
For additional expert guidance on avoiding these issues, our oven installation expert tips go deeper on what experienced technicians watch for during the insertion and leveling stages.
Professional oven installation services in Orange and Los Angeles Counties
For homeowners who would rather have a licensed professional handle the process, MDTech Services is here to help across Orange County and Los Angeles County.

Our technicians bring the right tools, code knowledge, and hands-on experience to every job. We handle professional oven installation from start to finish, including electrical verification, precise fitment, leveling, and a thorough post-installation test before we leave. You don’t have to worry about permits, wiring compliance, or whether your oven is sitting level.
Why homeowners choose MDTech Services:
- Licensed technicians familiar with Orange County and LA County electrical codes
- Complete electrical safety verification before and after installation
- Precise fitting and leveling to manufacturer specifications
- Post-installation testing with a full function check
- Warranty protection through proper, code-compliant installation
Our appliance repair services also cover your oven if any issue arises after installation. Learn more about our single oven installation services or book an appointment online today.
Frequently asked questions
Can I install my own electric oven without an electrician?
Only ovens with standard plug-in connections can be installed as a DIY project. Hardwired ovens require a licensed electrician for safety and to stay compliant with electrical codes.
What safety checks should I do before wiring my new oven?
Turn off power at the main breaker, then use a voltage tester directly at the cabinet junction box to confirm there is absolutely no power before you handle any wiring.
Do I need a permit to install a new oven in my California kitchen?
A straight oven swap with no ventilation changes generally does not require a permit, but mechanical permits are required when new ducting is added, makeup air is installed, or hood CFM changes.
What should I look for when testing the oven after installation?
During the first test cycle, watch for unusual smells, error codes on the display, and inconsistent heating or control behavior, which can all signal an installation problem that needs to be addressed before regular use.
How important is leveling the oven during installation?
Very important. Leveling before final fastening prevents poor door alignment and uneven heat distribution, both of which affect cooking results and the long-term life of the appliance.