TL;DR:
- A clogged HVAC filter quietly increases energy costs, strains your system, and decreases indoor air quality without warning.
- Properly replacing filters by following clear steps, choosing the correct size and MERV rating, and regular inspection can prevent these issues and extend your system’s lifespan.
A clogged HVAC filter quietly raises your energy bill, strains your system, and lowers the air quality in your home — often without a single warning sign. The hvac filter replacement process takes less than 15 minutes, but most homeowners either skip steps or make installation errors that cancel out any benefit. Dirty filters can increase energy consumption by 15 to 25% and reduce overall system efficiency by up to 30%. This guide walks you through every step of replacing your HVAC filter correctly, choosing the right filter type, and building a maintenance routine that protects your system long term.
Table of Contents
- Key takeaways
- What you need before starting the HVAC filter replacement process
- Step-by-step instructions for HVAC filter replacement
- Common mistakes to avoid during filter replacement
- Scheduling and ongoing filter maintenance
- Choosing the best HVAC filter types for your home
- My take on what homeowners consistently get wrong
- When to call in a professional
- FAQ
Key takeaways
| Point | Details |
|---|---|
| Turn off the system first | Always shut down your HVAC via the thermostat or breaker before touching the filter compartment. |
| Arrow direction matters | The airflow arrow on every filter must point toward the furnace or blower, not away from it. |
| MERV 11 suits most homes | MERV 11 captures particles effectively without restricting airflow in standard residential systems. |
| Check monthly, replace as needed | Condition-based inspection beats a rigid calendar schedule for extending filter life. |
| Pets and allergies change the timeline | High-need households should replace filters every 30 to 45 days instead of the standard 60 to 90. |
What you need before starting the HVAC filter replacement process
Getting organized before you open the filter compartment saves time and prevents the most common early mistakes. Here is what you need on hand.
Tools and materials:
- Replacement filter in the correct size and MERV rating
- Flathead or Phillips screwdriver (depending on your unit’s access panel)
- Disposable gloves
- Sealed trash bag
- Vacuum with a brush attachment
- Permanent marker (to write the installation date on the new filter frame)
How to find the right filter size
The size is printed on the cardboard frame of your existing filter. It reads as three numbers: length × width × thickness, such as 20×25×1 or 16×20×4. If the print has worn off, measure the slot opening directly. Never estimate. Using the wrong size creates gaps that let unfiltered air bypass the filter entirely.
Understanding MERV ratings
MERV stands for Minimum Efficiency Reporting Value and measures how well a filter captures particles. The table below shows what each rating level means for a typical home.
| MERV Rating | Best for | Particle capture |
|---|---|---|
| MERV 8 | Basic filtration, budget-conscious homeowners | Dust, pollen, mold spores |
| MERV 11 | Most residential homes | Dust, pet dander, fine particles |
| MERV 13 | Allergy or asthma households | Smoke, bacteria, ultrafine particles |
Pro Tip: Check your HVAC system’s owner manual or look up the model number online to confirm the maximum MERV rating your blower motor can handle before you buy a higher-rated filter.
Before replacing the filter, turn off your HVAC system at the thermostat. If you want to be completely safe, flip the circuit breaker for the air handler as well. This prevents the system from pulling in unfiltered air while the compartment is open.
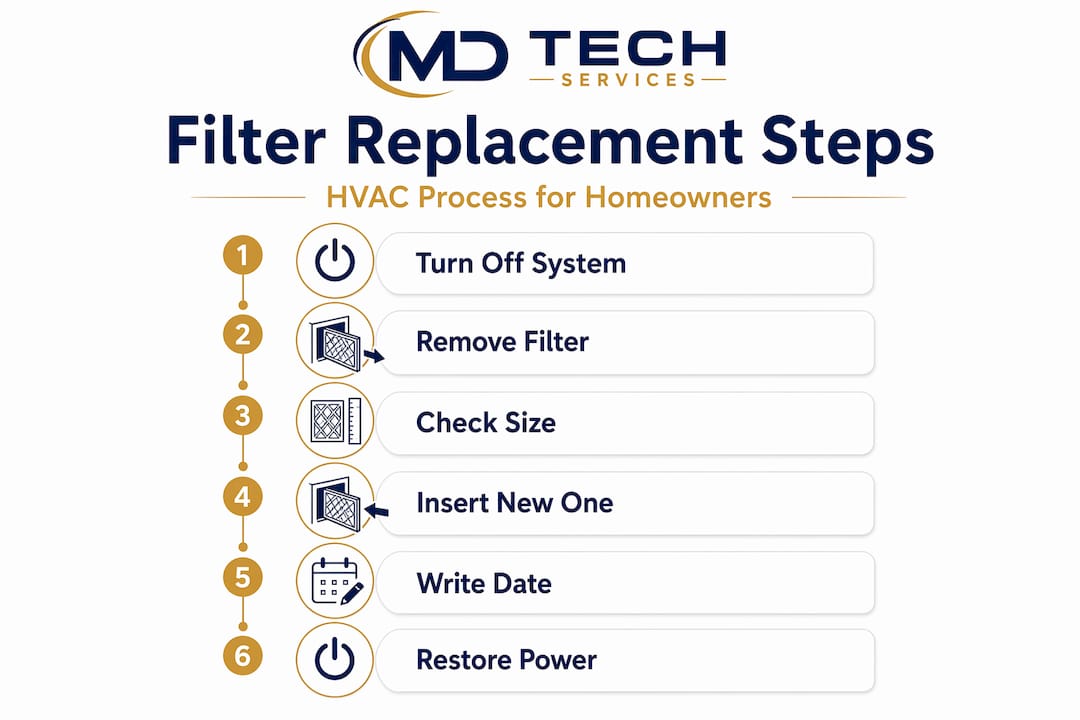
Step-by-step instructions for HVAC filter replacement
Follow these steps in order. Skipping or reversing steps is where most homeowners run into trouble.
-
Turn off the HVAC system. Set the thermostat to “off,” not just to fan mode. Cutting power stops debris from being drawn into the system while you work.
-
Locate the filter. Most residential systems house the filter in one of three places: the return air vent on the wall or ceiling, the air handler cabinet (usually in the attic, basement, or closet), or inside the furnace itself. If you are unsure, follow the large return air duct back toward the unit.
-
Remove the old filter carefully. Slide it straight out without tilting or shaking it. Immediately slide the dirty filter into a sealed trash bag before moving it through the house. Saturated filters release captured dust and debris the moment they are disturbed, and that goes straight back into your air.
-
Check the filter size and condition. Before tossing it, confirm the size printed on the frame matches your replacement filter. Note how gray or brown the filter looks. If it reached this point in under four weeks, your household likely needs a higher replacement frequency.
-
Read the airflow arrow on the new filter. Every filter has an arrow printed on the cardboard frame. The arrow must point toward the furnace or blower motor, not toward the return air duct. Getting this backward is the single most common installation error homeowners make.
-
Slide in the new filter. It should fit snugly with no gaps around the edges. If you feel resistance, check the orientation. If there are gaps, you have the wrong size.
-
Write the date on the filter frame using a permanent marker. This makes your next inspection or replacement decision effortless.
-
Close the access panel securely and turn the system back on. Stand near a return vent and confirm airflow feels normal within a minute or two.
Pro Tip: Take a photo of your old filter before you remove it so you can confirm the correct size, brand, and orientation for your next purchase.
A filter installed backwards increases airflow resistance by approximately 17%, which forces your blower motor to work harder and shortens its lifespan. Correct arrow orientation is not a minor detail. It is the difference between a filter that protects your system and one that quietly damages it.
Common mistakes to avoid during filter replacement
Even straightforward tasks have failure points. These are the ones that show up most often.
-
Installing the filter backwards. Misreading the airflow arrow is the top installation error. The arrow always points in the direction air travels through the filter: toward the furnace or blower, away from the return duct.
-
Using the wrong filter size. Even a quarter-inch gap allows dust to bypass the filter entirely. Dust accumulation on your blower motor or evaporator coil leads to reduced efficiency, frozen coils, and expensive repairs.
-
Not turning off the system first. Running the system while the filter slot is open pulls unfiltered air through at full speed, depositing debris on internal components instantly.
-
Waiting too long to replace. Standard filters need replacement every 60 to 90 days, and households with pets or allergy sufferers should replace every 30 to 45 days. Waiting until a filter looks completely black means your system has been straining for weeks.
-
Struggling with hard-to-reach compartments. If your air handler is in the attic or a tight closet, use a headlamp and have your trash bag open and ready before you pull the old filter. Working blind in a tight space is where filters get dropped and dust gets spread.
Pro Tip: Set a repeating calendar reminder on your phone for your filter check date, not a replacement date. When you check it, you decide whether it needs replacing based on what you see, which is more accurate than any fixed schedule.
- Improper disposal. Do not shake out or knock the old filter against a trash can. Seal it in a bag the moment it clears the housing.
Scheduling and ongoing filter maintenance
The goal is not to replace your filter on a specific day every month. The goal is to never let it get so dirty that your system struggles. Building a condition-based approach into your routine is more reliable than any calendar.
Recommended replacement intervals
| Household type | Recommended interval |
|---|---|
| Single occupant, no pets | Every 90 days |
| Average family home | Every 60 days |
| Home with one pet | Every 45 to 60 days |
| Pets plus allergies or asthma | Every 30 days |
| Vacation home (low use) | Every 6 to 12 months |
Checking your filter monthly and replacing it when visibly dirty is the method experts recommend over rigid schedules. Replace it earlier if you notice reduced airflow from vents, increased dust on surfaces, or visible gray or brown buildup across more than half the filter surface.
Seasonal factors matter too. During peak cooling months in Southern California, your system runs harder and filters load up faster. After home renovations or dusty outdoor events, check your filter regardless of when you last replaced it.
Tracking is simple. Write the installation date on the filter frame in permanent marker, and keep a single sticky note on your HVAC unit with the last three change dates. That record tells you whether your intervals are working.
Consistent filter changes protect your HVAC system’s long-term efficiency and prevent the compounding costs that come from deferred maintenance: higher energy bills, coil cleaning services, and premature blower motor replacements.
Choosing the best HVAC filter types for your home
Not every filter is right for every home or every HVAC system. The right choice depends on three things: your household’s air quality needs, your system’s blower capacity, and your budget.
Here is a breakdown of common filter options:
-
Fiberglass filters (MERV 1 to 4). These are the thin, disposable blue filters you see at hardware stores. They protect the HVAC equipment from large debris but do almost nothing for indoor air quality. Avoid these unless your system specifically requires them.
-
Pleated filters (MERV 8 to 11). These are the standard for most residential homes. They capture dust, pollen, mold spores, and pet dander without restricting airflow significantly. MERV 11 is considered the sweet spot for residential systems, providing 65 to 80% particle capture for particles between 1 and 3 microns.
-
High-efficiency pleated filters (MERV 13). These capture smoke, bacteria, and ultrafine particles. They are appropriate for households with respiratory conditions. The trade-off: MERV 13 filters can reduce airflow by 20% and cause premature failures in older or undersized blower motors.
| Filter type | MERV range | Best use case | Replacement frequency |
|---|---|---|---|
| Fiberglass | 1 to 4 | Equipment-only protection | Monthly |
| Standard pleated | 8 to 11 | Most residential homes | 60 to 90 days |
| High-efficiency pleated | 12 to 13 | Allergy, asthma, pets | 30 to 60 days |
The insight that higher filtration is not always better is one that trips up a lot of homeowners. If your HVAC system was built before 2010 or has a smaller blower motor, pushing air through a dense MERV 13 filter may do more harm than good. When in doubt, start with MERV 11 and confirm your system handles it well before moving up.
![]()
My take on what homeowners consistently get wrong
I have walked through this process with countless homeowners across Orange County and Los Angeles County, and the same patterns show up every time.
The arrow direction problem is more common than people expect. I have seen systems running for months with the filter installed backwards because the homeowner assumed the printing faced outward. It does not. The arrow tells you where air flows, not which side faces you.
What I have also learned is that rigid replacement schedules give homeowners false confidence. Writing “replace every 60 days” on a calendar sounds responsible, but if your neighbor is doing a home remodel or wildfire smoke is rolling through, your filter may need attention in week two. Condition-based checking, once a month with your eyes, is more reliable than any fixed date.
My honest advice: buy a step-by-step HVAC maintenance checklist and treat filter checks as a monthly two-minute habit. Take the cover off. Look at the filter. Put the cover back on if it looks clean. That habit alone will save most homeowners hundreds of dollars a year in energy costs and extend their system’s life by years. The filter is the one part of your HVAC system you can manage without any tools or expertise. Do not let it slip.
— MDTECH
When to call in a professional
DIY filter replacement handles the most frequent HVAC maintenance task you will face. However, there are situations where a filter swap reveals something bigger.

If you notice reduced airflow even with a fresh filter, unusual smells after startup, or your system short-cycling (turning on and off rapidly), those are signs that the problem goes beyond the filter. Mdtechservices provides licensed HVAC repair and inspection services throughout Orange County and Los Angeles County, and their team can assess what a filter change alone cannot fix. For a clear overview of what those services cover, visit their residential HVAC repair guide. If your system is behaving oddly, their HVAC troubleshooting process can help you identify whether a professional visit is the right next step. Scheduling is straightforward through their website, and their technicians are responsive and licensed.
FAQ
How often should I replace my HVAC filter?
Most homes need a filter replacement every 60 to 90 days. Households with pets, allergies, or asthma should replace filters every 30 to 45 days for adequate air quality protection.
Which direction does the HVAC filter arrow point?
The airflow arrow on your filter always points toward the furnace or blower motor. Installing it backwards increases airflow resistance by about 17% and forces your system to work harder.
What MERV rating is best for a residential home?
MERV 11 is the recommended rating for most homes. It captures fine particles including pet dander without restricting airflow, making it the practical choice for standard residential HVAC systems.
Can a dirty filter damage my HVAC system?
Yes. A clogged filter restricts airflow and forces the blower motor to strain, which can lead to frozen evaporator coils, overheating components, and higher energy bills over time.
Do I need to turn off my HVAC before replacing the filter?
Always turn off your system before opening the filter compartment. Running the unit while the slot is open draws unfiltered air and debris directly into the system’s internal components.