
A leaking TPR valve is a safety signal, not just a nuisance drip, since it usually points to excess pressure, overheating, or a worn valve seal. If you notice water at the discharge pipe, shut down the water heater, close the cold water supply, and place a bucket under the discharge line while you assess the situation. A slow drip after a heating cycle can often wait for testing, but a steady stream of hot water means you should stop using the heater and call a licensed plumber immediately.
TL;DR:
- Most TPR valve leaks are caused by thermal expansion, high water pressure, or a worn valve, which require different fixes such as expansion tanks or valve replacement.
- Before replacing the valve, homeowners should check upstream components like pressure-reducing valves and expansion tanks to prevent unnecessary part replacement.
- Quick safety steps include shutting off water, gas or electricity, and relieving pressure by lifting the test lever; dangerous leaks or corrosion require calling a professional immediately.
- Regular maintenance, including tank flushing and valve testing, helps prevent leaks and prolongs the life of the water heater.
- DIY repairs are suitable for minor leaks and valve replacements if the tank is sound, but complex pressure issues or corrosion signs mandate professional service.
Table of Contents
- How to diagnose why the TPR valve is leaking
- Immediate safety steps: shutoffs and when to call for emergency help
- Common causes of TPR valve leaks and how to fix them
- Step-by-step replacement: tools, valve spec, and testing
- Maintenance steps to prevent future TPR valve leaks
- Where DIY ends and a licensed technician should take over
- How MDTech Services handles TPR valve and water heater repairs
- Codes and guidance worth reading further
- Sources
- FAQ
How to diagnose why the TPR valve is leaking
Before you decide on a fix, figure out where the water is actually coming from. Some leaks look like a TPR valve problem but trace back to a loose fitting, a cracked tank seam, or condensation on the tank itself.
Start by checking the location and timing of the leak, since both point toward different causes.
- Leak location: water at the valve body suggests a worn seal, while water only at the discharge tube opening often means the valve did its job during a pressure spike.
- Timing: dripping right after hot water use points to thermal expansion, while a constant leak suggests the valve itself has failed or debris is holding it open.
- Temperature of the discharge: cool or lukewarm water often means residual pressure release, while hot water flowing steadily signals an active overpressure or overheating condition.
- Visible condition: mineral crust, rust streaks, or pitting around the valve body point to corrosion, while a clean valve with a recent drip may just need a lift test.
Before assuming the TPR valve is defective, check the components that control pressure upstream of it. A failed pressure-reducing valve, a waterlogged expansion tank, or a closed isolation valve trapping pressure inside the tank can all force the TPR valve to open when nothing is actually wrong with it. Homeowners on a closed plumbing system, meaning one with a check valve or backflow preventer at the meter, are especially prone to this pattern because thermal expansion has nowhere else to go. Ruling out these upstream parts first saves you from replacing a valve that was only doing its job correctly.
Immediate safety steps: shutoffs and when to call for emergency help
Once you spot a leak, work through a short sequence to reduce risk before you diagnose anything further.
- Shut off the cold water supply valve at the top of the water heater to stop feeding the tank.
- Turn off the gas supply at the shutoff valve or switch off the electrical breaker feeding the unit, depending on your heater type.
- Place a bucket or short hose under the TPR valve discharge pipe to catch any remaining drip.
- If pressure needs relief, lift the valve test lever briefly to release a small amount of water, then let it snap fully closed.
- Watch the discharge for a few minutes: a slow trickle that stops is different from a leak that continues at full flow.
Pro Tip: Never cap, plug, or block a TPR discharge line to stop a drip. That turns the valve into a plugged safety device instead of a working one, and it removes the one safeguard designed to prevent a tank explosion.
Some signs mean you should stop troubleshooting and call for help immediately. A steady stream of hot water, visible corrosion or bulging at the tank seam; or a valve that will not fully close after testing are all reasons to shut off the building’s main water supply and contact an emergency plumber. Our plumbing emergency checklist walks through what to do while you wait for a technician to arrive.
Common causes of TPR valve leaks and how to fix them
Most TPR valve leaks trace back to one of six issues, and each one calls for a different response.
Thermal expansion happens when heated water expands inside a closed system with nowhere to go, so pressure builds until the valve releases it. If your home has a check valve at the meter or a pressure-reducing valve, check for a properly sized and precharged expansion tank near the water heater. A waterlogged or missing expansion tank is one of the most common reasons a TPR valve drips after every heating cycle.
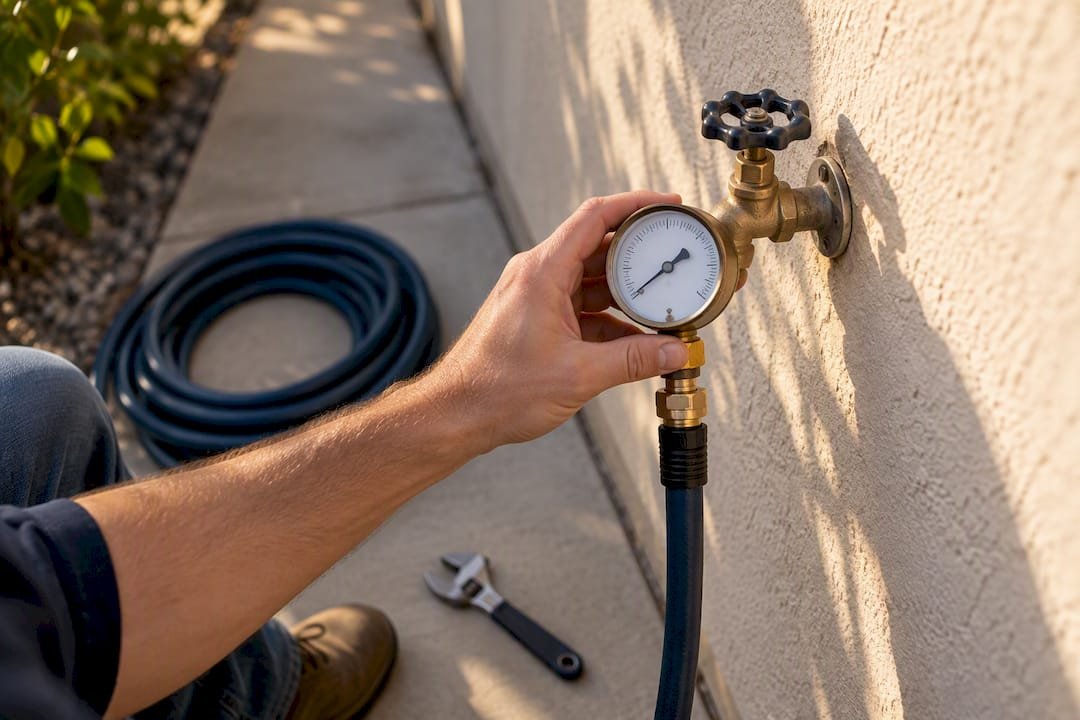
High incoming water pressure puts constant strain on the valve even without thermal expansion involved. You can check static pressure with a simple gauge that threads onto an outdoor spigot; if readings run high, a pressure-reducing valve installed on the main line brings pressure back into a safer range. Our guide to water pressure regulation covers how these valves work and what settings protect your fixtures.
A worn or aging TPR valve eventually loses its ability to seal fully, even at normal pressure and temperature. If the valve drips constantly regardless of usage patterns, and a lift test does not clear the leak, the valve itself likely needs replacement rather than any upstream fix.
Sediment and mineral buildup inside the tank can lodge in the valve seat and hold it slightly open. Sediment is a well documented cause of water heater noise and component stress, and flushing the tank often resolves minor drips tied to debris rather than a failed valve.
A stuck or failing thermostat can push tank temperature past safe limits, which raises pressure and triggers the TPR valve even when the plumbing side is fine. If water at the tap feels scalding or the burner or heating element runs longer than expected, the thermostat and heating controls need a professional inspection rather than a valve swap.
Corrosion or tank damage is the one cause that should stop DIY troubleshooting entirely. Rust stains around fittings, a bulging tank wall, or water pooling at the base of the unit point to a structural problem that a new TPR valve will not fix.
Water heater problems rarely announce themselves with a warning. A gradual buildup of wear, excess pressure, or a stuck T&P valve is a common pattern behind sudden tank failures, which is why a persistent drip is worth investigating instead of ignoring.
Step-by-step replacement: tools, valve spec, and testing
Replacing a TPR valve is a manageable project for a homeowner comfortable with basic plumbing, provided the tank itself is sound and you follow the sequence carefully.
Parts and tools checklist:
- A replacement 3/4 inch NPT T&P valve rated to the correct temperature and pressure for your tank, certified to ANSI Z21.22
- Discharge tube or pipe sized to match the new valve’s outlet
- Pipe thread sealant or PTFE tape rated for potable water
- An adjustable wrench or pipe wrench, a bucket, and a garden hose for draining
- Shut off the cold water supply and the gas or electric power to the heater, then let the tank cool if it has been running recently.
- Connect a hose to the tank’s drain valve and drain enough water to bring the level below the TPR valve opening, usually several gallons.
- Hold the valve body steady with one wrench while you loosen the discharge tube fitting, then unscrew the valve itself from the tank.
- Inspect the opening in the tank for corrosion or damaged threads before installing the replacement; heavy corrosion at this stage means the tank may need professional assessment rather than a simple valve swap.
- Apply thread sealant to the new valve, thread it into the tank opening by hand, then tighten with a wrench until snug and properly oriented.
- Attach the discharge tube so it directs water toward the floor or an approved drain location, never upward or toward foot traffic.
- Restore the water supply, let the tank refill completely, then restore power or gas.
- Test the new valve by lifting the lever briefly to confirm water flows and the valve reseats fully with no continued drip.
Pro Tip: After installation, check the valve and discharge line every few hours for the first day, since a fitting that looks tight when dry can still weep slightly under full pressure.
Keep an eye on the area for 24 to 48 hours after the job. Watch for any dripping at the threads, unusual popping or ticking from the tank, or a return of the original symptoms. Note the date, the valve model, and where you bought it, since this record matters if you ever need warranty support on the heater or the valve itself.
Maintenance steps to prevent future TPR valve leaks
A short annual routine keeps most TPR valve problems from happening in the first place.
- Flush the tank once a year to clear sediment before it builds up enough to affect the valve seat or heating element, since sediment buildup is a recurring cause of water heater component wear.
- Test the valve periodically by lifting the lever for a few seconds to confirm water flows freely and the valve reseats without dripping; avoid holding it open for extended periods, since older valves sometimes fail to reseal after prolonged testing.
- Set the thermostat to a moderate temperature around typical safe settings, which reduces both scald risk at the tap and the pressure load that pushes the TPR valve toward its limit.
- Check the expansion tank and pressure-reducing valve at least once a year if your home has a closed plumbing system, since a failed expansion tank is one of the most common hidden causes of repeat leaks.
- Schedule a professional maintenance visit every year or two, since a technician can pressure-test the system, inspect the anode rod, and catch tank corrosion before it becomes a safety issue.
Our water heater maintenance checklist lays out a full annual schedule if you want a reference to follow room by room.
Where DIY ends and a licensed technician should take over
A TPR valve is a small part with an outsized job, and there is a point where testing and troubleshooting should give way to a professional visit. A steady hot discharge, visible corrosion at the tank seam, or an inability to isolate and depressurize the system safely are all signals that the issue has moved past a simple valve swap. Complex pressure regulation problems, where an expansion tank, a pressure-reducing valve, and the water heater all interact, also call for a trained eye rather than a guess. A licensed technician brings pressure testing equipment, ANSI-compliant replacement parts, and documentation that protects your warranty coverage, which is worth the call when the stakes involve a tank under pressure in your home.
— MDTECH
How MDTech Services handles TPR valve and water heater repairs
If you would rather have a licensed technician handle the diagnosis and repair, professional plumbing and water heater repair services cover a wide area including Orange County and Los Angeles County. A technician can pressure-test your system, confirm whether the valve, the expansion tank, or the thermostat is at fault, and install a properly rated replacement with transparent pricing before any work begins.
Steady hot discharge or a tank showing corrosion calls for a same-day response, while a minor drip you’ve already stabilized can be scheduled at a convenient time. You can book an appointment or review the full range of plumbing repair services directly through our site to get a technician on the way.
Codes and guidance worth reading further
- International Plumbing Code, Section 504.4: relief valve requirements and ANSI Z21.22 standard
- Rheem’s guide to water heater noises: what sounds and drips mean
- Rheem on sudden water heater failure: warning signs to watch for
- MDTech Services water heater leak guide: steps for securing a leaking unit
Sources
- 2021 International Plumbing Code (IPC) with New Hampshire Amendments – 504.4 Relief valve.
- The Ultimate Guide to Water Heater Noises: What’s Normal (and What Isn’t) – Rheem Manufacturing Company
- Why Water Heaters Fail Suddenly (Without Warning Signs) – Rheem Manufacturing Company
FAQ
How much does it cost to replace a TPR valve?
The valve itself is typically an inexpensive part, though total cost depends on labor rates and whether related issues like corrosion or an expansion tank need attention. A licensed plumber can give you an exact quote once they’ve inspected your specific water heater and plumbing setup.
How do you get a pressure relief valve to stop leaking?
Start by lifting the test lever briefly to clear any trapped debris, then check whether the leak stops once the valve reseats fully. If it keeps dripping afterward, the cause is usually excess system pressure, a waterlogged expansion tank, or a worn valve that needs replacing rather than a quick fix.
What is the rule for testing pressure relief valves?
Homeowners commonly test a TPR valve by lifting its lever for a few seconds once or twice a year to confirm it opens and reseats cleanly, though exact testing recommendations vary by manufacturer and valve model. Check your water heater’s manual for the specific testing interval and procedure it recommends.
Why is my pressure-reducing valve dripping?
A dripping pressure-reducing valve usually means its internal diaphragm or seal has worn out, which can also push extra pressure downstream toward your water heater and TPR valve. Since a failing PRV can be part of what’s causing a TPR valve to leak in the first place, it’s worth having both checked together by a licensed plumber.