TL;DR:
- Most ice maker failures are caused by frozen fill tubes, water supply restrictions, or clogged filters and can be fixed in under an hour.
- Diagnosing issues starts with verifying freezer temperature and ensuring the power switch and bail arm are in the correct positions; temperature should be between 0°F and 5°F.
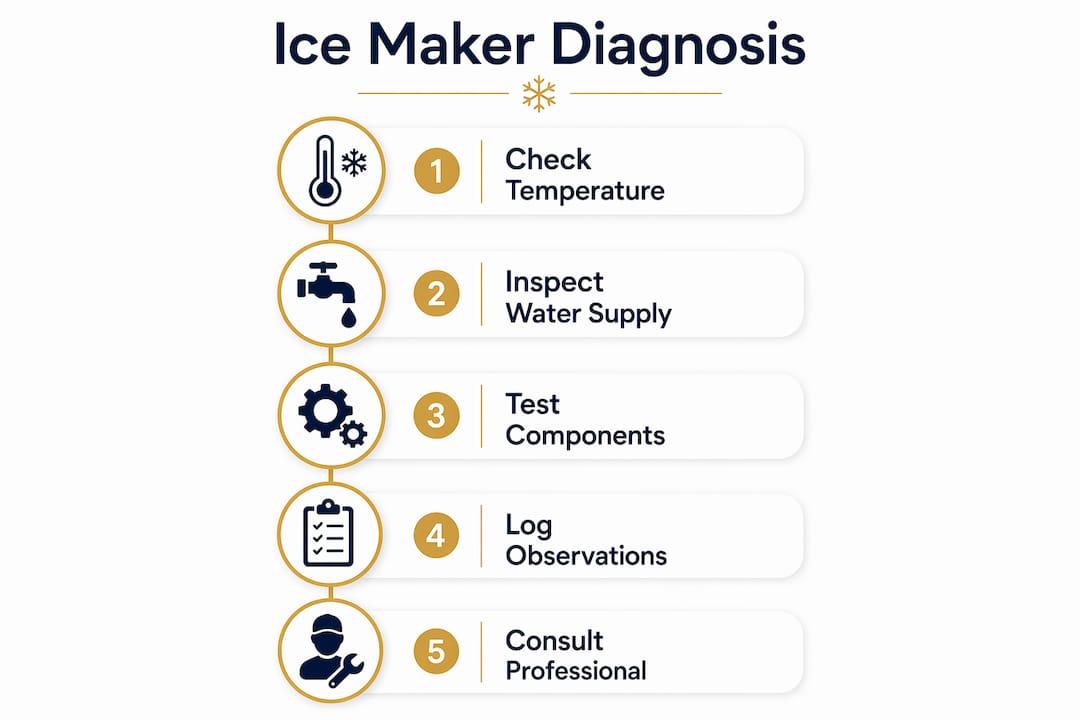
Diagnosing ice maker issues is the process of systematically checking freezer temperature, water supply, and key components to identify why your ice maker stopped working. Ice maker failures fall into four main categories: water supply, fill system, ice maker module, and temperature conditions. The good news is that 80% of non-functioning ice makers result from frozen fill tubes, water supply restrictions, or clogged filters, and most fixes take 30–60 minutes. Brands like Whirlpool and Samsung publish specific specs that make this process straightforward for any homeowner willing to follow a logical sequence.
How to diagnose ice maker issues: start with temperature and power
The freezer temperature is the single most common cause of ice maker failure that homeowners overlook. Whirlpool specifies that freezer temperature must stay between 0°F and 5°F for the ice maker to cycle and harvest ice correctly. If the freezer runs warmer than 10°F, the ice maker will slow down or stop entirely, even though the unit appears to be running fine.
Do not rely on the display panel alone. Place a separate appliance thermometer inside the freezer for two hours and read the actual temperature. Freezer displays can be off by several degrees, especially on older units or after a power surge.
After confirming temperature, check the power status of the ice maker itself. Many homeowners discover the unit was simply switched off accidentally.
- Ice maker power switch: Flip it to the ON position if it was turned off.
- Bail arm position: The bail arm is a wire arm that sits above the ice bin. When the bail arm is in the up position, it shuts off the ice maker completely. Push it down to resume production.
- Ice bin seating: A bin that is not fully seated can trigger a safety shutoff on some models.
- Control board reset: Unplug the refrigerator for 5 minutes, then plug it back in. This clears minor control board glitches without any tools.
- Circuit breaker: Confirm the refrigerator’s breaker is fully on and has not tripped to a middle position.
Pro Tip: After any power reset, give the ice maker a full cycle before assuming the problem persists. On most Whirlpool and Samsung models, one cycle takes roughly 90 minutes.
How to inspect water supply problems affecting ice production
Water supply problems are the second most common reason an ice maker stops working. Samsung requires a minimum water pressure of 30 psi and at least 150ml of flow in 10 seconds for the ice maker to fill correctly. Low pressure means the fill valve cannot open fully, and the ice maker produces small, hollow, or no cubes at all.
Follow these steps in order to check your water supply:
- Locate the shutoff valve. Find the saddle valve or inline shutoff behind or under the refrigerator. Confirm it is fully open. A partially closed valve is a frequent and easy fix.
- Check the supply line for kinks. Pull the refrigerator away from the wall and inspect the plastic or braided steel line. A single sharp bend can cut water flow to nearly zero.
- Test water flow at the line. Disconnect the supply line from the back of the refrigerator and hold it over a bucket. Open the shutoff valve and time the flow. You need at least 150ml in 10 seconds to meet Samsung’s minimum spec.
- Inspect the water filter. A clogged filter is one of the most common causes of reduced water flow. Water filters should be replaced roughly every 6 months. A filter that is past due can drop pressure enough to stop ice production entirely.
- Check the fill tube for ice blockage. The fill tube is the small plastic tube that carries water into the ice mold. It freezes solid more often than most homeowners expect, especially if the freezer runs slightly too cold or the door seal is weak.
- Test the water inlet valve electrically. Use a multimeter set to resistance mode. A healthy inlet valve coil reads approximately 300 ohms. An open circuit reading means the valve has failed and needs replacement.
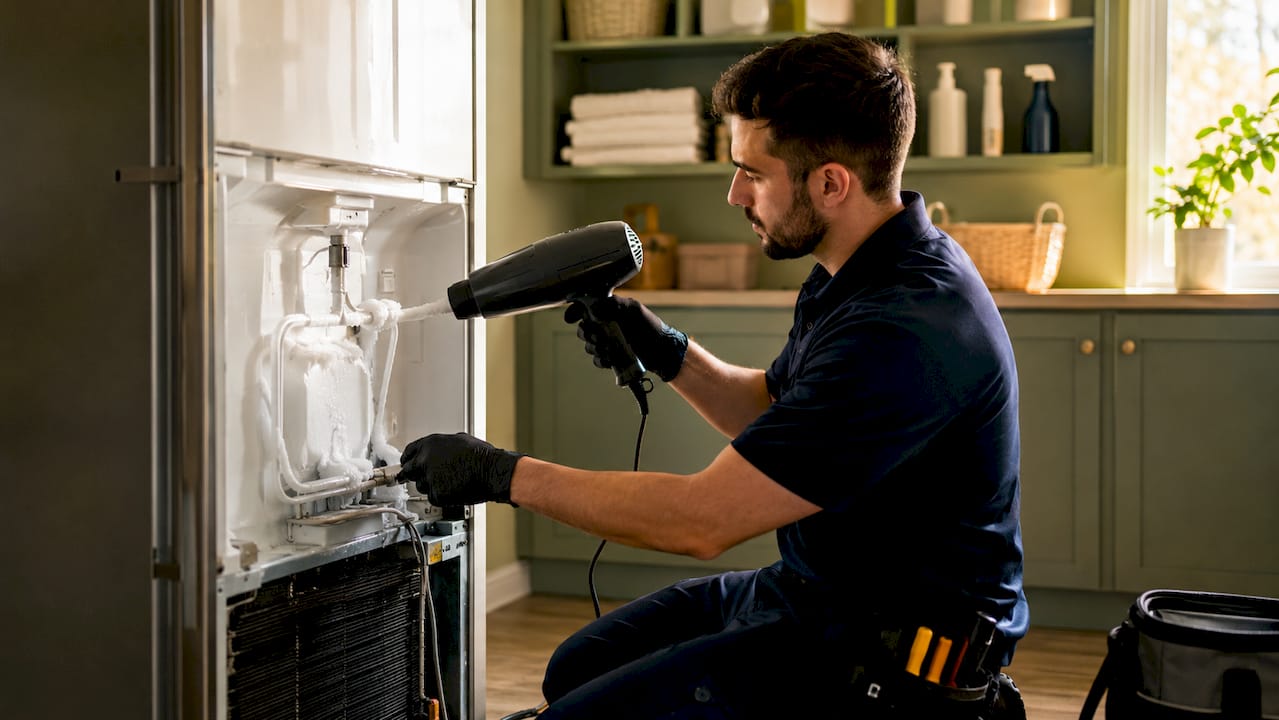
Pro Tip: To thaw a frozen fill tube, use a hair dryer on its lowest heat setting and hold it 6 inches from the tube. High heat deforms plastic components and can cause permanent damage that turns a $10 fix into a $150 part replacement.
| Water supply check | What to look for | Pass condition |
|---|---|---|
| Shutoff valve | Fully open, no partial closure | Valve handle parallel to pipe |
| Supply line | No kinks or sharp bends | Smooth, unobstructed line |
| Water pressure | Minimum 30 psi at the valve | 150ml flow in 10 seconds |
| Water filter | Age and flow restriction | Replaced within 6 months |
| Fill tube | Ice blockage inside tube | Clear, water flows freely |
| Inlet valve coil | Electrical resistance | Approximately 300 ohms |
What mechanical and electrical component tests reveal ice maker faults
Once you confirm temperature and water supply are correct, the problem lives inside the ice maker assembly itself. Ice makers operate as timed electromechanical systems where diagnosis depends on isolating failure to the supply, freeze, or eject stage. Testing each stage in order prevents you from replacing parts that are not actually broken.
Here is what to check and compare:
- Ejector arms: Watch the ejector arms during a cycle. They should rotate in a full arc to push ice out of the mold. No movement at all points to a failed drive motor inside the module.
- Ice maker thermostat: The thermostat tells the module when the ice is frozen and ready to harvest. Test it with a multimeter for continuity while the ice maker is cold. No continuity at freezing temperatures means the thermostat has failed.
- Control module: The module is the brain of the ice maker. It controls timing, motor activation, and the fill valve signal. Module failures are less common than water supply or temperature problems, but they do occur after power surges.
- Inlet valve sound check: Listen for a clicking or humming sound from the inlet valve during the fill cycle. Silence when the valve should activate confirms an electrical or mechanical valve failure.
| Component | Test method | Failure sign |
|---|---|---|
| Drive motor | Visual observation during cycle | Ejector arms do not move |
| Thermostat | Multimeter continuity test when cold | No continuity at freezing temp |
| Control module | Inspect for burn marks; check timing | No cycle initiation after reset |
| Water inlet valve | Multimeter resistance test | Reading far from 300 ohms or open circuit |
| Inlet valve (audible) | Listen during fill cycle | No click or hum when fill is due |
For a deeper walkthrough on testing these parts with common household tools, the refrigerator fix guide from Mdtechservices covers each component test step by step.
What mistakes cause homeowners to misdiagnose ice maker problems?
The most expensive ice maker mistake is replacing parts before finishing the diagnostic steps. Many issues come from simple human errors like the bail arm position or a missed power reset, and these should always be checked first. Skipping the basics and ordering a new module wastes money and time.
Watch out for these specific errors:
- Not waiting long enough after a reset. After replacing a water filter or resetting the ice maker, wait up to 24 hours for the first batch of ice. The system needs several full cycles to refill and refreeze. Homeowners who check after 2 hours and assume the repair failed often call for service unnecessarily.
- Confusing a warm freezer with a failed ice maker. If the freezer temperature is above 10°F, the ice maker will not run. Fix the freezer temperature first and retest before touching any ice maker components.
- Using high heat on frozen fill tubes. A heat gun or open flame melts the plastic fill tube and the surrounding housing. Use only a hair dryer on a low setting, as described above.
- Ignoring the bail arm. The bail arm is the first thing to check and the last thing most homeowners look at. It is a wire arm, not a sensor, and it physically blocks ice from dropping when raised.
- Overlooking power surges. A power surge can lock the control board in a fault state without tripping the breaker. An unplugged reset of 5 full minutes clears most of these states on Whirlpool and Samsung models.
Pro Tip: Keep a simple log of what you checked and when. If the ice maker fails again within a week, the log tells a repair technician exactly where to start, which cuts diagnostic time and your service bill.
For a broader look at common refrigerator faults that overlap with ice maker problems, Mdtechservices has a practical reference covering the most frequent issues homeowners face.
Key Takeaways
Diagnosing ice maker problems correctly requires checking temperature, water supply, and components in order before replacing any parts.
| Point | Details |
|---|---|
| Temperature first | Freezer must read 0°F to 5°F; verify with a separate thermometer, not the display. |
| Check power and bail arm | Confirm the ice maker switch is on and the bail arm is in the down position before anything else. |
| Water pressure matters | Minimum 30 psi and 150ml flow in 10 seconds are required for proper ice production. |
| Test the inlet valve electrically | A healthy coil reads approximately 300 ohms; an open circuit means the valve needs replacement. |
| Wait after repairs | Allow up to 24 hours after a reset or filter change before concluding the repair failed. |
What hands-on repair experience teaches about ice maker diagnostics
After working on residential appliances across Orange County and Los Angeles County, the pattern is clear: most homeowners who call for ice maker service have not checked the bail arm or the freezer temperature. These two checks take under two minutes and resolve a large share of service calls before a technician ever touches a component.
The other thing experience teaches is patience. Homeowners understandably want ice right away after a repair, but the ice maker needs time to complete full cycles. Calling for a second service visit 3 hours after a filter change is one of the most common and avoidable situations we see.
Replacing the full ice maker assembly is rarely the right first move. Frozen fill tubes and supply restrictions account for the vast majority of failures, and both are fixable with basic tools and careful technique. The multimeter tests for the inlet valve and thermostat are straightforward once you know the target values, and they tell you exactly which part to order rather than guessing.
Safety matters throughout this process. Always unplug the refrigerator before touching internal wiring or the ice maker module. Use a multimeter with insulated probes and keep heat sources away from plastic components. Knowing when to stop and call a licensed technician is not a failure. It is the right call when the control board or sealed system is involved.
— MDTECH
When professional ice maker repair makes sense
When your diagnostic steps point to a failed control module, a damaged fill tube housing, or persistent water pressure issues, professional repair saves time and prevents further damage.

Mdtechservices serves homeowners throughout Orange County and Los Angeles County with licensed technicians who carry genuine replacement parts for major brands including Whirlpool and Samsung. Our team handles the full range of ice maker repair needs, from inlet valve replacements to full module swaps, with same-week scheduling available. If your ice maker is still not producing ice after completing the diagnostic steps in this guide, the problem likely requires a hands-on component test that goes beyond DIY tools. For a full overview of what professional appliance repair covers and when it makes sense for your home, Mdtechservices has you covered. Book online or call us directly to get your ice maker back on track fast.
FAQ
What is the first step to diagnose an ice maker not working?
Confirm the freezer temperature reads between 0°F and 5°F using a separate thermometer, and verify the ice maker power switch and bail arm are both in the ON position. These two checks resolve the majority of ice maker problems without any tools.
How do I test water pressure for my ice maker?
Disconnect the water supply line from the back of the refrigerator and time the flow into a measuring cup. You need at least 150ml in 10 seconds to meet the minimum pressure requirement for proper ice production.
How long should I wait after resetting my ice maker?
Wait up to 24 hours after a reset or water filter replacement before expecting ice. The system needs several full cycles to refill, refreeze, and harvest a complete batch.
What does a multimeter reading tell me about my inlet valve?
A healthy water inlet valve coil reads approximately 300 ohms of resistance. An open circuit reading confirms the valve has failed electrically and needs to be replaced.
When should I call a professional instead of repairing it myself?
Call a licensed technician when the control module shows signs of failure, the sealed refrigerant system may be involved, or the problem persists after completing all basic diagnostic steps. Attempting repairs beyond component testing without proper training risks further damage and higher costs.