TL;DR:
- Most common garbage disposal issues can be fixed by homeowners with basic tools and safety precautions.
- Proper understanding of impellers versus blades and regular maintenance significantly extend disposal lifespan.
- Persistent problems, electrical faults, or leaks require professional repair to ensure safe and effective resolution.
A garbage disposal that suddenly stops working is one of those kitchen problems that feels urgent but often has a simple fix. Many homeowners in Orange and Los Angeles County call a technician right away, spending $150 to $400 on a repair that could have taken 20 minutes and cost nothing. The truth is, most common disposal problems, including jams, clogs, and reset issues, are well within reach for a careful DIYer. This guide walks you through everything you need: how your disposal actually works, the right tools, a clear repair process, and honest guidance on when to stop and call a professional.
Table of Contents
- Understanding how your garbage disposal works
- Tools, materials, and safety essentials for DIY repairs
- Step-by-step guide: Fixing common garbage disposal problems
- Troubleshooting, maintenance, and when to call a pro
- Expert perspective: The real secrets of long-lasting garbage disposals
- Need help? Professional repair options in Orange and Los Angeles County
- Frequently asked questions
Key Takeaways
| Point | Details |
|---|---|
| Know your disposal | Understanding how your garbage disposal works is essential for safe DIY repairs. |
| Prep with the right tools | Gather all necessary tools and safety gear before starting any repair. |
| Follow each step carefully | A step-by-step approach prevents mistakes and makes troubleshooting easy. |
| Maintenance matters | Regular cleaning and smart habits keep your disposal running smoothly. |
Understanding how your garbage disposal works
Before fixing anything, it helps to know what makes your disposal tick. Many people assume a garbage disposal works like a blender, with sharp spinning blades chopping food into small pieces. That picture is completely wrong, and the misunderstanding leads to a lot of bad advice.
A disposal actually uses impellers, which are blunt, rotating lugs mounted on a spinning plate called the flywheel. When you turn the unit on, the flywheel spins at high speed and the impellers fling food waste against a stationary grind ring on the inner wall. The grind ring does the actual work of breaking food down into fine particles that wash safely through your drain. There are no sharp blades involved at any point.
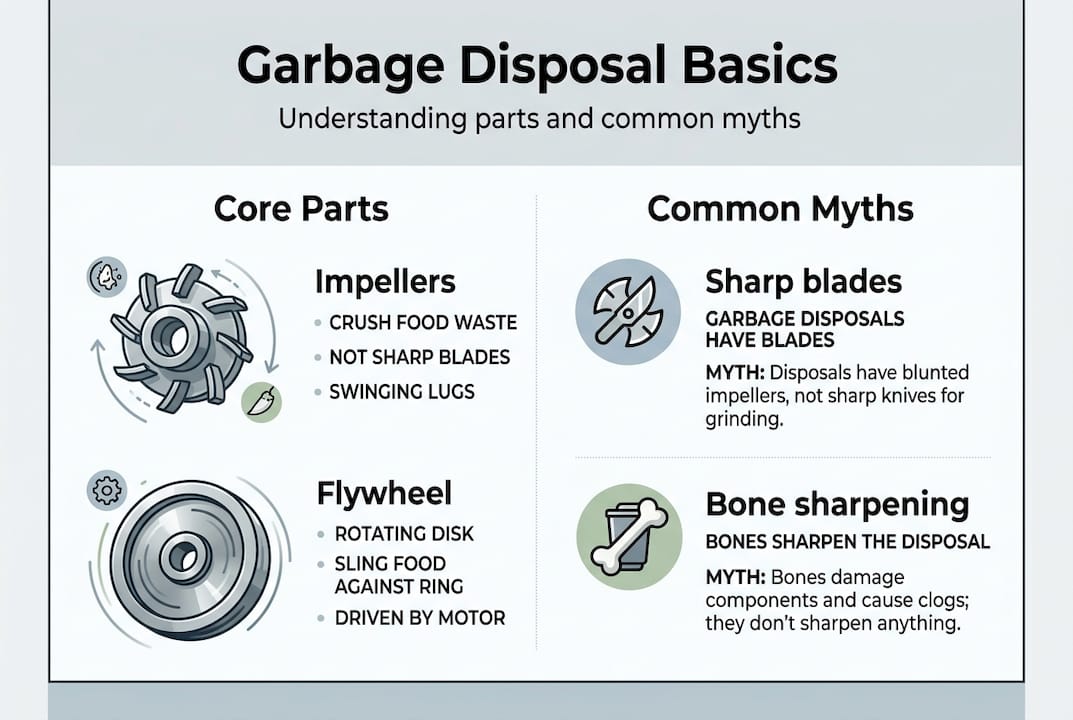
This distinction matters because it changes how you maintain the unit. Ice cleans impellers but does not “sharpen blades” since disposals use impellers, not blades. Running ice through your disposal is a great cleaning method, but it does nothing to restore grinding power if your impellers are worn or your grind ring is damaged.
Common myths about garbage disposals:
- Bones and hard shells sharpen the impellers (they do not; they risk jamming the unit)
- Hot water helps break down grease during use (hot water actually melts grease, which re-solidifies further down the drain)
- A louder disposal is a more powerful one (noise usually signals a problem, not power)
- Citrus peels clean and deodorize effectively (they help with smell but can build up and cause jams)
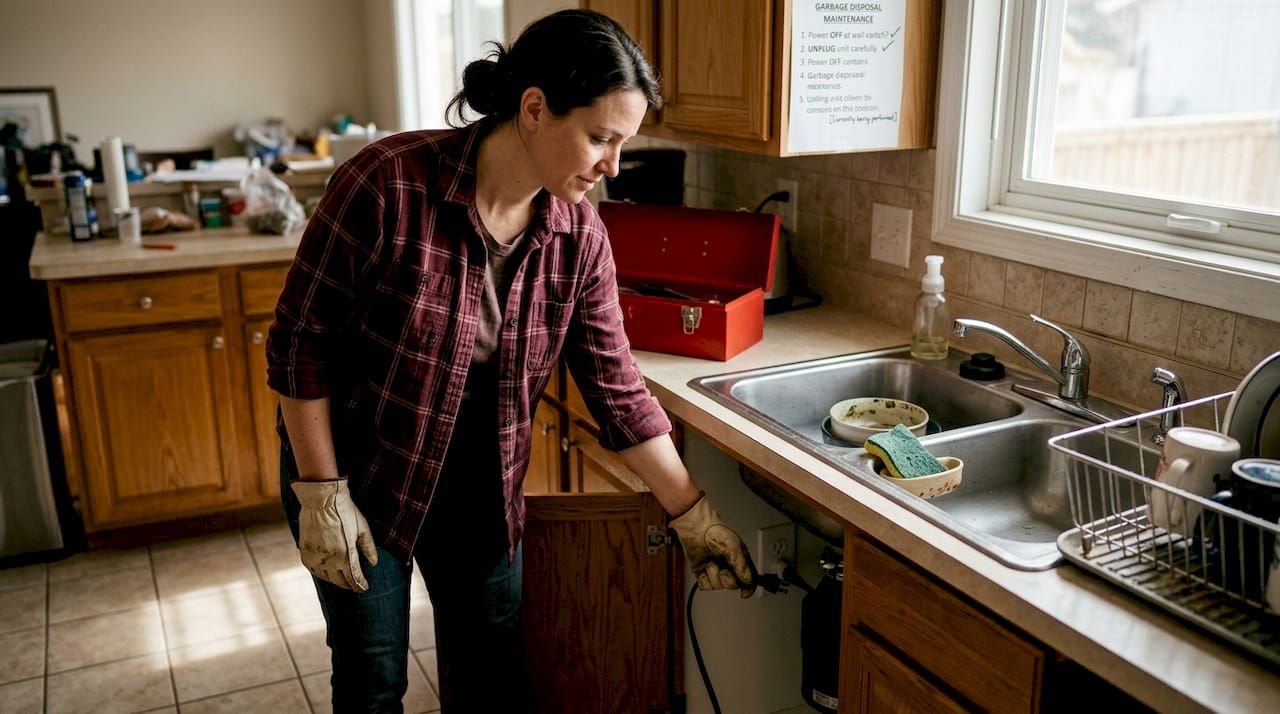
Basic safety rules before any repair:
- Always cut power to the disposal at the wall switch and the circuit breaker
- Never reach into the disposal with your hand, even when the power is off
- Use a flashlight to inspect the interior, not your fingers
- Keep a bucket under the sink to catch water during any disassembly
Pro Tip: If you want to check for quick disposal fixes before taking anything apart, press the reset button on the bottom of the unit first. Many “broken” disposals just need a reset.
| Feature | What people think | What is actually true |
|---|---|---|
| Cutting mechanism | Sharp blades | Blunt impellers |
| Ice cubes | Sharpens blades | Cleans impellers only |
| Bones/hard food | Sharpens the unit | Risks jamming or damage |
| Hot water | Clears grease | Can worsen drain buildup |
Tools, materials, and safety essentials for DIY repairs
With a clear understanding of your disposal, it is time to gather what you will need. Going into a repair without the right tools wastes time and increases the chance of making things worse. Fortunately, most disposal repairs require only basic items you may already own.
Essential tools for garbage disposal repair:
- Hex key (Allen wrench) set: Most disposals have a hex socket on the bottom for manually turning the flywheel when it is jammed. A 1/4-inch hex key fits most brands.
- Adjustable pliers or channel-lock pliers: Useful for loosening drain connections and mounting hardware.
- Flashlight or headlamp: Essential for seeing inside the drain opening and under the sink.
- Bucket: Place this under the P-trap before disconnecting any drain lines to catch standing water.
- Rubber gloves: Protect your hands from debris and cleaning chemicals.
- Dish soap and baking soda: Effective for cleaning the interior and clearing mild odors.
- Plumber’s putty: Needed if you are resealing the sink flange during a leak repair.
Disposals should always be disconnected from power before attempting any repair. This is not optional. Even a brief accidental startup can cause serious injury.
For more detailed garbage disposal repair tips, knowing your specific model helps you find the right hex key size and locate the reset button quickly.
| Tool | Purpose | Why it matters |
|---|---|---|
| Hex key set | Unjam flywheel manually | Clears most jams without disassembly |
| Flashlight | Inspect interior | Avoids blind hand insertion |
| Bucket | Catch drain water | Prevents mess and water damage |
| Rubber gloves | Hand protection | Safety from debris and chemicals |
| Plumber’s putty | Seal sink flange | Stops leaks at the mounting point |
Pro Tip: Before you start, run a quick test with the power off. Insert your hex key into the bottom socket and try turning it both directions. If it moves freely, the flywheel is not jammed and your problem is likely electrical or a clog, not a mechanical jam.
Preparation steps to minimize mess and risk:
- Clear everything out from under the sink for easy access
- Place an old towel on the cabinet floor to absorb drips
- Have your phone or a printed guide nearby so you do not have to stop mid-repair
- Take a photo of all connections before you disconnect anything
Step-by-step guide: Fixing common garbage disposal problems
With everything ready, follow these steps for a smooth repair. Work through them in order, since many problems resolve early in the process.
- Cut the power. Turn off the wall switch and flip the circuit breaker for the disposal. Do not skip this step.
- Press the reset button. Find the small red or black button on the bottom of the disposal unit. Press it firmly until you feel it click. Restore power and test. Many disposals that appear dead simply need this reset.
- Check the circuit breaker. If the reset does not work, check your electrical panel for a tripped breaker. Reset it and test the disposal again.
- Unjam the flywheel. If the unit hums but does not spin, the flywheel is jammed. Cut power again, insert your hex key into the bottom socket, and work it back and forth until the flywheel moves freely. Most disposal jams can be cleared without calling a professional.
- Remove the jam material. Use tongs or needle-nose pliers, never your hand, to remove any food debris visible through the drain opening. Use a flashlight to check thoroughly.
- Clear a clog. If water drains slowly or not at all, disconnect the P-trap under the sink with a bucket in place. Clear any blockage in the trap and the drain line. Reconnect and test.
- Address leaks. Leaks at the sink flange usually mean the plumber’s putty has failed. Loosen the mounting ring, reseal with fresh putty, and remount. Leaks at the drain connection often just need the slip-joint nut tightened.
- Eliminate odors. Pour a mixture of baking soda and white vinegar into the drain, let it sit for 10 minutes, then flush with cold water. This handles most odor problems without chemicals.
For a broader appliance repair guide covering other kitchen appliances, the same safety-first approach applies across the board. If you want to build confidence with DIY appliance repairs, starting with a disposal is a great entry point.
Pro Tip: After clearing a jam, run cold water for 30 seconds before testing the disposal. This flushes any remaining debris through the grind ring and drain line.
Safety red flag: If you smell burning, see scorch marks, or notice the unit is hot to the touch, stop immediately. These signs point to a motor or electrical issue that requires a licensed technician.
Troubleshooting, maintenance, and when to call a pro
Even with good repair skills, ongoing care and wise decisions prevent future problems. Knowing what the sounds and symptoms mean saves you time and money over the long run.
Diagnosing common symptoms:
- Humming with no movement: Flywheel is jammed. Use your hex key.
- Completely silent: Power issue. Check the reset button and breaker.
- Grinding or rattling noise: A foreign object (bottle cap, utensil, pit) is inside. Remove it before running the unit.
- Leaking from the bottom: Internal seals have failed. This usually means the unit needs replacement, not repair.
- Slow draining: Partial clog in the drain line or P-trap.
Preventive maintenance best practices:
- Run cold water before, during, and after each use
- Avoid fibrous foods like celery, artichokes, and corn husks
- Keep grease, oils, and fats out of the disposal entirely
- Clean monthly with baking soda and vinegar or ice and coarse salt
- Never put pasta, rice, or expandable starchy foods in the unit
Routine cleaning prevents most disposal issues and extends appliance life significantly. A five-minute monthly cleaning habit is genuinely the most effective maintenance strategy available.
If your disposal is more than 10 to 12 years old and requires repeated repairs, replacement is almost always more cost-effective. A new disposal installation by a licensed technician ensures proper fit, safe wiring, and a manufacturer warranty.
| Situation | DIY appropriate | Call a professional |
|---|---|---|
| Unit hums, won’t spin | Yes, use hex key | If hex key fix fails |
| Reset button fixes it | Yes | N/A |
| Slow drain or clog | Yes, clear P-trap | If clog is deep in the line |
| Leak at flange | Yes, reseal with putty | If leak persists after resealing |
| Burning smell or sparks | No | Immediately |
| Unit is 10+ years old | Evaluate carefully | Replacement recommended |
Expert perspective: The real secrets of long-lasting garbage disposals
After years of working on appliances across Orange and Los Angeles County, we have seen the same pattern repeat itself. Homeowners spend money on gadgets, special cleaners, and “hacks” they read about online, while the disposals that last the longest belong to people who do one thing consistently: keep it simple.
The biggest myth we encounter is that some suggest bones sharpen impellers, but most experts firmly disagree. Bones stress the motor and risk cracking the grind ring. Ice works well for cleaning, not sharpening, and that distinction matters.
What actually extends disposal life is boring but effective: cold water every single use, no grease ever, and a quick monthly clean. That is it. The disposals we see fail early almost always have a history of overloading or grease buildup. No special product fixes years of neglect, but consistent simple habits prevent the need for disposal repair solutions in the first place. Trust the basics over the tricks.
Need help? Professional repair options in Orange and Los Angeles County
Some disposal problems go beyond what a hex key and reset button can solve. If you have worked through every step in this guide and the unit still is not working, or if you noticed a burning smell or persistent leak, it is time to bring in a licensed technician.

MDTech Services provides responsive, affordable appliance repair across Orange and Los Angeles County. Our licensed technicians handle everything from jammed disposals to full replacements, and we back our work with a commitment to getting it right the first time. Whether you need a quick diagnosis or a full installation, our appliance repair services are available when you need them. You can also review our repair guide to understand your options before booking. Call us or book online today.
Frequently asked questions
What should I do if my garbage disposal won’t turn on at all?
Check the power supply, press the reset button under the disposal, and ensure the circuit breaker is not tripped before beginning any repairs. Most disposal problems can be resolved at home without professional help.
Is it true that ice or bones can sharpen my garbage disposal blades?
No, disposals use blunt impellers rather than sharpened blades, so ice cleans the unit effectively but bones risk damage rather than improving performance.
When should I call a professional for garbage disposal repair?
If home troubleshooting does not solve the problem, if there is a burning smell, or if leaks continue after resealing, contact a licensed expert right away. Professional help is recommended for electrical or persistent issues.
What regular maintenance can prevent garbage disposal problems?
Avoid fibrous foods, always run cold water during use, clean the unit monthly, and keep foreign objects out of the drain opening. Routine cleaning prevents most issues and extends the life of your appliance significantly.
Recommended
- How to fix a leaking dishwasher: step-by-step DIY – MDTech Services
- How to Install Dishwasher for Home Efficiency Success
- Streamline your plumbing repair workflow
- Garbage Disposal Repair: Quick Solutions You Need – MDTech Services
- DIY Pest Control vs. Exterminator Near Me: Hidden Costs & Best Solutions