
If your dishwasher is leaking from the bottom, cancel the cycle, shut off the water supply beneath the sink, and cut power at the breaker if water is near any electrical parts. Leaks that only appear after the cycle ends usually point to a drainage problem, while leaks during the cycle almost always trace back to the door gasket, a hose connection, or the inlet valve and pump seals. Many of these fixes are simple. Cracked tubs and failed pump seals are not, and that’s where you call a professional.
TL;DR:
- Clearing the filter and sump resolves most bottom leaks caused by debris and overflows, often preventing the need for costly repairs.
- Properly inspecting and reseating or replacing the door gasket can stop leaks from door-seal failures or damage.
- Leveling the dishwasher correctly reduces stress on seals and gaskets, significantly decreasing repeated leak issues.
- Diagnosing leaks based on their location helps identify whether the problem stems from the door gasket, pump seal, hoses, or water inlet valve.
- For persistent leaks involving the tub, pump seals, or electrical components, hiring a professional is safer and more cost-effective.
Table of Contents
- How Do You Stop a Leaking Dishwasher Immediately?
- Where Is the Water Coming From? Diagnose by Leak Location
- How Do You Fix a Leaking Dishwasher Yourself?
- Is It a Real Leak or Just Standing Water?
- How Do You Clean Up and Prevent Repeat Leaks?
- When Should You Call a Professional for a Leaking Dishwasher?
- What MDTech Sees Most Often on Dishwasher Leak Calls
- Get Your Dishwasher Leak Fixed Right the First Time
- Sources
How Do You Stop a Leaking Dishwasher Immediately?
Water spreading across your kitchen floor doesn’t wait for you to figure out the cause. Handle safety first, diagnose second.
- Cancel the cycle and don’t restart it, even to “see if it stops.” Restarting can push more water through a failing seal or valve.
- Shut off the water supply valve under the sink, which typically feeds both the sink and the dishwasher’s inlet line.
- If water keeps coming, shut off your home’s main water supply until you can confirm the dishwasher valve actually stopped the flow.
- Cut power at the breaker if water has reached the control panel, wiring, or the area beneath the tub. Water and live electrical components are a dangerous combination, and appliance guidance is consistent on this point: when the leak reaches electronics, stop and get help rather than troubleshoot further.
- Contain the pooling with towels, shallow pans, or a wet/dry vacuum to keep water off cabinets and flooring.
- Photograph the leak location and any visible water trail. If you end up calling a technician, this saves real time.
Pro Tip: Keep a wet/dry vacuum near the kitchen or laundry area year round. It clears standing water faster than towels and prevents water from soaking into cabinet toe-kicks, which is where mold problems usually start.
Where Is the Water Coming From? Diagnose by Leak Location
Where the water shows up tells you almost everything about what’s wrong. Manufacturer troubleshooting resources consistently organize dishwasher leaks this way, and it’s the fastest route to a correct diagnosis without pulling the whole unit apart.
Front or door-corner leaks usually mean:
- A torn, warped, or dirty door gasket that’s no longer sealing
- A latch that isn’t pulling the door fully closed
- Detergent suds pushing past the seal, often from using dish soap instead of dishwasher detergent
- A spray arm hitting the door or misdirecting water toward the seam
Middle or center-bottom leaks usually point to:
- A clogged filter or sump raising the water level higher than it should go
- A failing pump seal letting water escape from underneath
- An overfill caused by a stuck float switch or a faulty water inlet valve
Rear or under-cabinet leaks typically trace back to:
- A failing water inlet valve
- Loose or damaged supply and drain hose connections
- A cracked tub, which is less common but worth checking if hoses and connections look fine
A quick visual check settles most of this. Open the door and run a hand along the gasket, feeling for stiff spots, tears, or gaps where light shows through. Pull the kick plate and look underneath the front of the unit while it runs, watching for drips along the hose runs. If you smell a faint burning or electrical odor near the rear, stop and treat it as a wiring issue, not a plumbing one. The Whirlpool troubleshooting guide lists the door gasket, inlet valve, float, pump seals, and loose connections as the primary suspects behind nearly every leak call, and checking them in that order rarely wastes your time.
How Do You Fix a Leaking Dishwasher Yourself?
Several causes of dishwasher leaks are genuinely within reach for a homeowner with basic tools. Work through these in order, since each one rules out a cause before you move to the next.
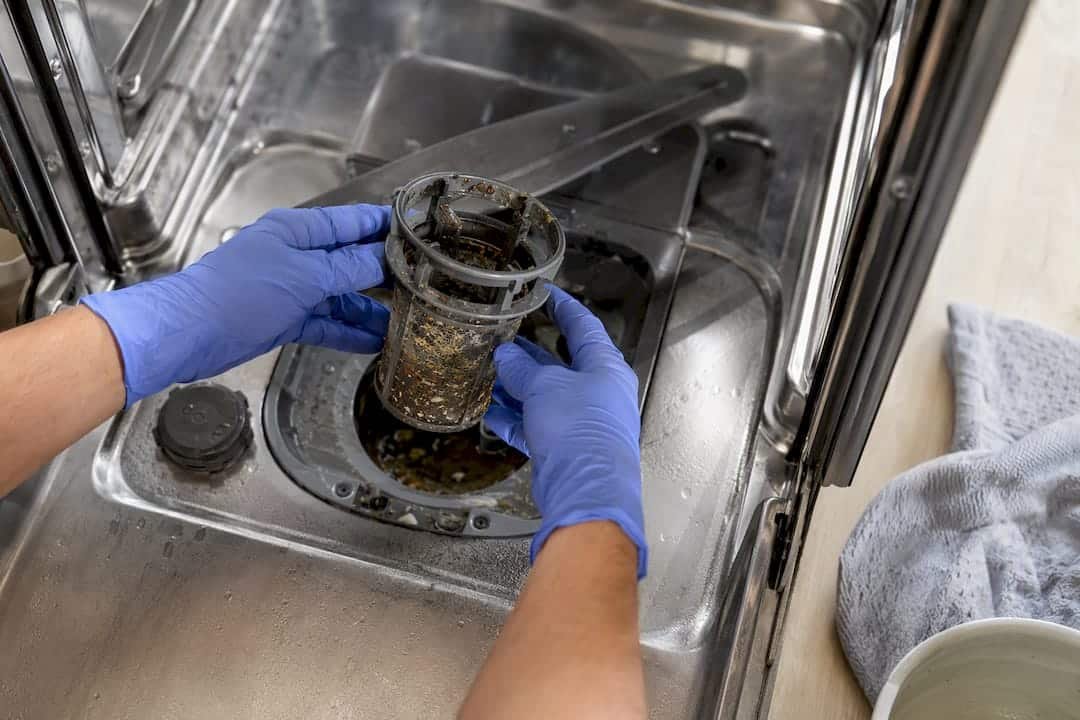
1. Clean the filter and sump.
Pull the lower rack, twist and lift out the cylindrical filter, and rinse it under running water. Food debris trapped here raises the water level inside the tub, and that extra volume finds its way out through the weakest seal. This single step resolves a surprising share of “leak from the bottom” complaints, according to HomeHalo Appliance Repair.
2. Inspect and reseat or replace the door gasket.
Run your fingers around the full perimeter of the gasket, checking for cracks, flattening, or debris buildup. A gasket that’s simply dirty can often be cleaned and reseated into its channel. A torn or brittle one needs replacement, and most replacement gaskets are affordable and can be replaced relatively quickly.
3. Level the dishwasher.
An unlevel unit puts uneven pressure on the door and gasket every single cycle, and that stress wears out seals long before they should fail. Open the lower access panel, use a level placed on the tub’s floor, and adjust the front leveling legs with a wrench until the bubble sits centered both side to side and front to back. The KitchenAid troubleshooting guide notes that correcting the level often stops repeat gasket failures for good, which makes this one of the most overlooked fixes on the list.
4. Check hose clamps and hose condition.
Follow both the water supply line and the drain hose back to their connection points. Clamps loosen over time from vibration, and a hose that’s gone stiff or cracked near a fitting will eventually split.
5. Test the float and float switch.
The float sits inside the tub, usually near the front, and should move freely up and down when you press it by hand. If it’s stuck in place from debris in the well, clean the well and free it. A float that doesn’t rise properly won’t tell the inlet valve to shut off, which leads directly to overfilling and leaks.
6. Switch to the correct detergent.
Dish soap and the wrong dishwasher detergent both cause excessive sudsing, and that foam pushes past the door seal even on a perfectly good gasket. Stick to detergent labeled specifically for dishwashers and measure it according to your model’s guidelines.
Some repairs belong to a technician rather than a Saturday afternoon project. Pump seals sit inside the motor housing and require partial disassembly to reach, and a cracked tub usually means a full tub replacement rather than a patch. If you’ve worked through filter cleaning, gasket inspection, leveling, and hose checks and water still appears, that’s your signal to stop diagnosing and start scheduling.
Pro Tip: Take a photo of the gasket before you remove it. Reinstalling it in the wrong orientation is one of the most common reasons a “new gasket” still leaks.
Is It a Real Leak or Just Standing Water?
Not every puddle at the bottom of your dishwasher is a leak in the traditional sense. Standing water left in the tub after a cycle finishes almost always points to a drainage problem rather than a seal or hose failing under pressure, and Whirlpool’s troubleshooting guide treats this as a separate diagnostic path entirely.
Run a drain-only cycle if your model has one, or run a short cycle and check the tub floor the moment it finishes. Water sitting in the basin means drainage. Water actively appearing on your kitchen floor during the cycle means an active leak.
If drainage is the culprit, check these before assuming anything’s broken:
- The filter and sump for trapped debris
- The air gap on your sink deck, if your model uses one, for blockage
- The drain hose path for kinks or a high loop that’s collapsed
- The garbage disposal knockout plug, which sometimes gets forgotten during a new disposal installation and blocks the drain connection entirely
Drainage issues are inconvenient, but they aren’t the pressurized, spreading emergency an active leak can become. You have time to work through this list at a normal pace, and our dishwasher drainage troubleshooting guide walks through each of these connection points in more detail.
How Do You Clean Up and Prevent Repeat Leaks?
Water that sits under a dishwasher or inside a cabinet toe-kick for more than a day or two starts creating problems that outlast the original leak. Mold and swollen particleboard don’t announce themselves right away.
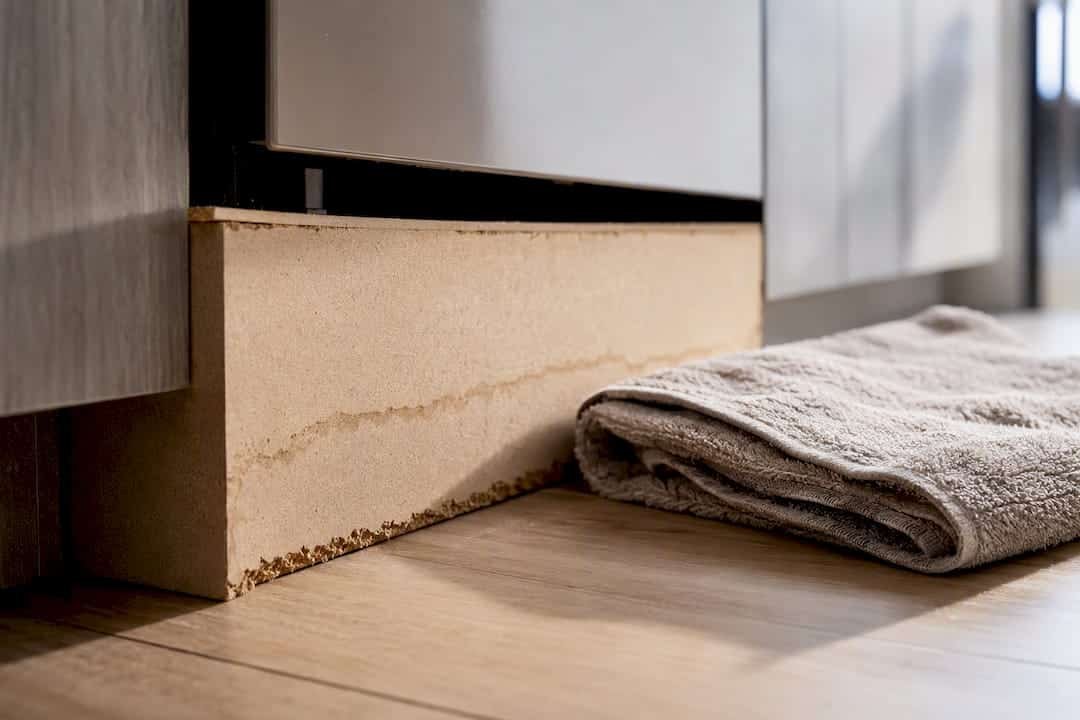
Pull water out fast with a wet/dry vacuum, then run fans across the area for at least 24 hours. If the toe-kick or baseboard soaked through, remove it so the cavity behind it can actually dry rather than trap moisture against the wall. Check the cabinet floor underneath the unit for swelling, delamination, or a soft spot, since particleboard cabinet bases absorb water fast and rarely recover their shape once they do.
A short maintenance routine keeps most leaks from coming back:
- Check and clean the filter monthly
- Inspect supply and drain hoses annually for stiffness, cracking, or loose clamps
- Replace hoses proactively every 5 to 7 years rather than waiting for a failure
- Wipe down the door gasket during your regular kitchen cleaning to prevent buildup that leads to tears
Pro Tip: A water leak detector placed under the dishwasher, paired with an automatic shutoff valve on the supply line, can stop a slow leak before it ever reaches your floor. It’s a small investment against a much larger cabinet or flooring repair.
When Should You Call a Professional for a Leaking Dishwasher?
Some fixes are worth attempting yourself. Others carry enough risk or complexity that a professional visit is the faster, cheaper path overall.
Call a technician when you’re dealing with:
- A suspected pump seal leak, since reaching it means partial disassembly of the motor housing
- A failed water inlet valve that won’t shut off flow even with the door closed
- A cracked or damaged tub
- Overfilling that continues after you’ve confirmed the float moves freely
- Any water that has reached electrical components or wiring
If closing the water supply valve doesn’t actually stop the flow, that’s not a wait and see situation. Treat it as a plumbing emergency and call a plumber or technician right away, since pressurized water behind a stuck valve can keep flowing regardless of the dishwasher’s own controls.
Before your appointment, gather your model and serial number, found on a sticker along the tub frame or door edge, along with photos or a short video of where the water appeared. Note exactly what you’ve already tried. Having this ready shortens diagnostic time considerably, since a technician can skip straight to testing the suspected component instead of repeating the checks you’ve already ruled out. Expect a pump seal or tub repair to involve a pressure test and, in many cases, a part order if the seal isn’t a common stock item.
What MDTech Sees Most Often on Dishwasher Leak Calls
Across service calls in Orange County and Los Angeles County, gasket failures, loose supply or drain hose clamps, and unlevel installations show up again and again as the actual root cause, even when a homeowner initially suspects something more serious like a cracked tub. Correcting the level and clamps often resolves what looked like a recurring pump problem.
We typically bring common parts like gaskets and hose kits to a first visit, but a suspected pump seal or inlet valve failure usually calls for a diagnostic visit first so we can confirm the part before ordering it. Having your model and serial number, along with a couple of photos, ready when you call moves the whole process along faster.
— MDTECH
Get Your Dishwasher Leak Fixed Right the First Time
Working through gaskets, hoses, and leveling on your own can solve plenty of leaks, but pump seals, inlet valve failures, and cracked tubs need tools and parts most kitchens don’t have on hand. Licensed technicians diagnose the leak on-site, replace the failed gasket, hose, or valve, and run a full leak test before they leave your kitchen.

A typical visit starts with confirming the leak location you’ve already narrowed down, checking the suspected part, and either repairing it on the spot or ordering a part if needed. Have your dishwasher’s model and serial number ready, along with any photos or video of the leak, so the technician can move straight into diagnosis instead of starting from scratch. If you’d rather understand the repair scope before booking, our step-by-step homeowner repair guide covers what a typical fix involves. When you’re ready for a technician to handle it, visit our appliance repair services page to book an appointment.
Sources
- Leaking Dishwasher? 6 Common Causes & Fixes | Whirlpool
- Dishwasher Leaking Troubleshooting Guide – Product Help | Whirlpool
- Dishwasher Leaking Troubleshooting Guide – Product Help | KitchenAid
- Dishwasher leaking from the bottom? Common causes | HomeHalo Appliance Repair
- A Dishwasher Leak Is a Pressurized Plumbing Emergency, Not Just an Appliance Issue | Leading Plumbing Services