TL;DR:
- Many homeowners in Orange County and Los Angeles can safely repair common water heater issues themselves by following safety procedures. Regular flushing of hard water tanks prevents sediment buildup that reduces efficiency and shortens tank lifespan. Proper troubleshooting, including electrical checks and leak identification, enables cost-saving maintenance and extends equipment life.
When your morning shower runs cold or you notice a puddle forming beneath your water heater, the instinct is to call a plumber immediately. But a step by step water heater fix is something many Orange County and Los Angeles homeowners can handle safely on their own. This guide walks you through the most common problems, from sediment buildup and tripped breakers to minor leaks, with clear, safety-first instructions that can save you hundreds of dollars and get your hot water back the same day.
Table of Contents
- Essential preparation: tools, safety, and locating your water heater
- Step-by-step water heater flushing and sediment removal
- Troubleshooting and fixing common electric water heater issues
- Fixing water heater leaks: identifying and repairing common leak sources
- Safety, verification, and maintenance tips for lasting water heater performance
- Rethinking water heater fixes: what typical guides miss about local challenges
- Get professional appliance repair support from MDTech Services
- Frequently asked questions
Essential preparation: tools, safety, and locating your water heater
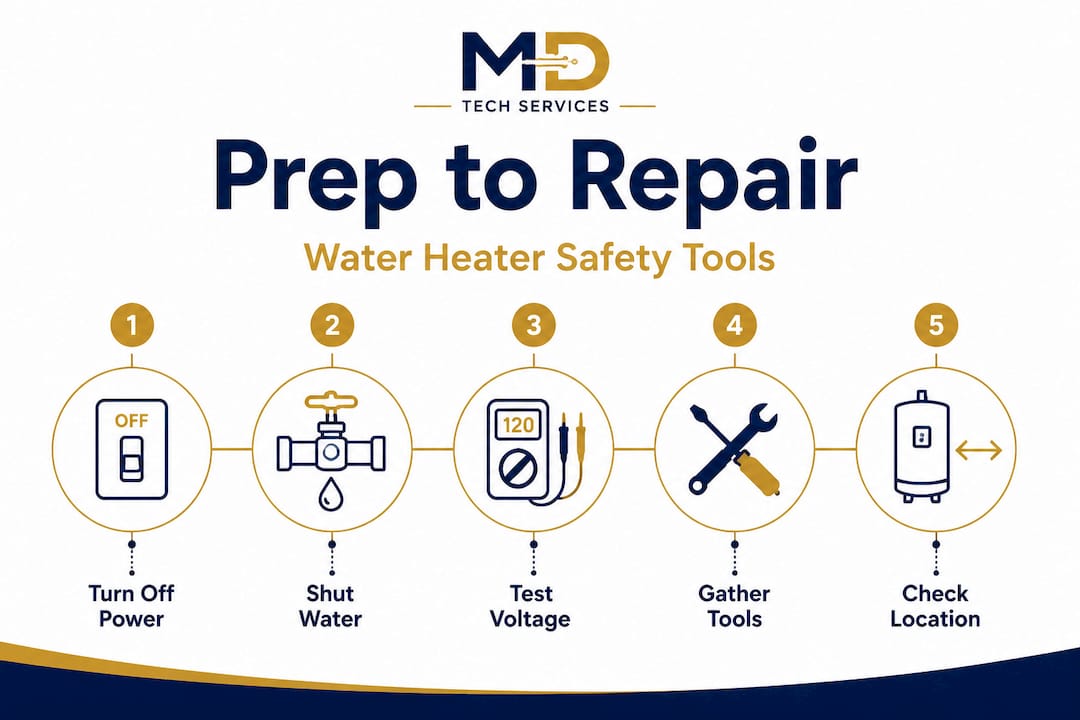
Before you touch anything, preparation is what separates a successful repair from a dangerous one. Gather your tools first so you are not hunting for a wrench mid-repair. Here is what you will need:
- Garden hose (for draining)
- Adjustable wrench and pipe wrench
- Flathead and Phillips screwdrivers
- Non-contact voltage tester
- Towels and a bucket
- Teflon tape (for thread sealing)
- Replacement parts if identified in advance (drain valve, anode rod, thermostat)
Safety comes before every step. Turn off power to your water heater at the breaker box before starting any repair to avoid serious hazards. For gas units, turn the gas valve to the “pilot” position. Then shut off the cold water supply valve, which is typically located directly above the water heater tank.
Once power and water are off, use your non-contact voltage tester near the access panel to confirm zero voltage. Do not skip this step. Many homeowners assume the breaker is enough protection, but testing confirms it.
Identifying your unit and its key components
| Component | Location | Purpose |
|---|---|---|
| Cold water inlet | Top of tank | Brings in fresh water |
| Hot water outlet | Top of tank | Sends hot water to fixtures |
| T&P relief valve | Side near top | Releases pressure if tank overheats |
| Drain valve | Near bottom | Used for flushing and draining |
| Thermostat | Behind access panel | Controls water temperature |
| Anode rod | Top or side | Prevents tank corrosion |
Electric units have one or two heating elements behind metal access panels on the side of the tank. Gas units have a burner assembly at the base and a visible gas line. Knowing which type you have determines every next step in this water heater repair guide.
Pro Tip: Take a photo of your water heater’s model and serial number sticker before starting. You will need it if you have to order parts, and it also tells you the tank age, which affects repair versus replace decisions.
For a broader look at safe step by step appliance repair, reviewing general best practices before diving into specific repairs is always worthwhile.
Step-by-step water heater flushing and sediment removal
With your water heater safe to work on, flushing is often the single most effective DIY fix available. Orange County and Los Angeles County tap water is notably hard, meaning it carries high levels of dissolved minerals, primarily calcium and magnesium. These minerals settle as sediment at the bottom of your tank over time.
Regular flushing removes sediment that reduces efficiency by up to 20 to 30 percent and extends tank life, and it is recommended every 6 to 12 months. A DIY sediment flush takes 30 to 60 minutes and prevents 10 to 20 percent efficiency loss in hard water areas like Orange County. Those numbers translate directly to your utility bill.
Follow these steps in order:
- Turn off power or gas and allow the water to cool for at least two hours to avoid burns from hot water discharge.
- Connect a garden hose to the drain valve at the tank’s base and run the other end to a floor drain, driveway, or utility sink.
- Shut off the cold water inlet valve at the top of the tank.
- Open a hot water faucet somewhere in your home to allow air into the system, which lets water drain freely.
- Open the drain valve by turning it counterclockwise. Water and sediment will flow out through the hose.
- Flush the tank by briefly reopening the cold water inlet valve while the drain valve is still open. This stirs up remaining sediment and pushes it out. Repeat until the water runs completely clear.
- Close the drain valve, disconnect the hose, and close the hot water faucet you opened earlier.
- Refill the tank by reopening the cold water supply valve. Let the tank fill completely before restoring power.
- Bleed air from the lines by opening hot water faucets throughout your home until water flows steadily without sputtering.
Pro Tip: If your drain valve drips after closing, wrap the threads with Teflon tape or replace the valve entirely. A dripping drain valve is a common, inexpensive fix that many homeowners overlook for months.
Keep up with these water heater maintenance tips to stay ahead of sediment-related issues year-round.
Troubleshooting and fixing common electric water heater issues
After maintenance, you might still face heating problems caused by electrical components. This section covers the most common electric water heater fixes, in the order you should check them.
- Check your circuit breaker. Go to your electrical panel and look for a tripped breaker labeled “water heater.” Reset it by switching it fully off and then back on.
- Locate the reset button. Behind the upper access panel, you will find a red button on the high-limit switch. Pressing this reset button after turning off the breaker resolves many no-hot-water problems.
- Confirm power is off. Before touching anything further, test for voltage after the breaker is off, because residual charge can cause electrical shock.
- Check thermostat settings. Remove the access panel, pull back the insulation, and locate the thermostat dial. Set it to no higher than 120°F.
- Assess the heating elements. If the unit heats only partially, one of the two elements may have failed. Testing elements requires a multimeter set to resistance (ohms). A reading of zero or infinity indicates a failed element.
Signs you need a professional for element replacement:
- Both elements test as failed
- Wiring shows signs of burning or melting
- The reset button trips repeatedly within hours
- You are uncomfortable working near live wiring components
Pro Tip: If your reset button trips more than twice in a week, do not keep resetting it. Repeated tripping means a failing thermostat or element is overheating the water. Resetting it without addressing the root cause is a safety risk.
Your complete water heater repair guide can help you understand when a repair is within reach and when to hand it off.
Fixing water heater leaks: identifying and repairing common leak sources
Besides flushing and electrical fixes, leaks are a common issue requiring targeted steps. Not all leaks are equal, and identifying the source before grabbing a wrench saves significant time.
Work from top to bottom when inspecting:
- Inlet and outlet connections at the top: These threaded fittings can loosen over time. Tighten carefully with a pipe wrench, but do not overtighten or you risk cracking the fitting.
- T&P (temperature and pressure) relief valve: A weeping T&P valve may be discharging correctly due to high pressure, or the valve may have failed. If water drips constantly from the discharge pipe, the valve likely needs replacement.
- Heating element gaskets: On electric units, a wet ring around the element cover suggests a failed gasket. This is a DIY repair, but only after confirming power is fully off.
- Drain valve: Slow drips here are common and are often fixed by tightening the cap or replacing the valve.
- Tank bottom: Puddles directly beneath the tank with no visible external source point to internal corrosion. This means replacement, not repair.
Leaks often originate from top connections, T&P valves, drain valves, or element gaskets; some leaks require replacement while others can be sealed or tightened.
| Leak source | DIY fixable? | Action |
|---|---|---|
| Inlet/outlet pipe fittings | Yes | Tighten or reseal with Teflon tape |
| T&P valve | Sometimes | Replace valve if constantly dripping |
| Element gasket | Yes (with care) | Replace gasket after confirming power off |
| Drain valve | Yes | Tighten cap or replace valve |
| Tank body or base | No | Full tank replacement required |
Pro Tip: Place dry paper towels under suspected leak areas and check them after 30 minutes. This confirms whether a leak is active and helps you pinpoint the exact source before you disassemble anything.
For California-specific guidance on water heater leak repairs, local water pressure and pipe material considerations matter more than many general guides acknowledge.
Safety, verification, and maintenance tips for lasting water heater performance
With repairs complete, focus on safety checks and ongoing maintenance for long-term reliability. Rushing the restoration process after a repair is where many homeowners create new problems.
Complete these steps before calling the repair done:
- Confirm the tank is fully refilled and air is bled from all hot water lines before restoring power or relighting the pilot
- Set thermostats no higher than 120°F to avoid scalding and to protect your unit’s warranty
- Inspect all connection points you worked on for drips 24 hours after repair
- Bleed air from hot faucets after flushing to prevent sputtering and to protect heating elements from running dry
Ongoing maintenance schedule:
- Every 6 to 12 months: Flush the tank to remove sediment
- Once a year: Test the T&P relief valve by lifting the lever briefly to confirm it releases water and reseals
- Every 3 to 5 years: Inspect and replace the anode rod, a sacrificial metal rod that prevents tank corrosion from the inside out
- As needed: Check pipe insulation on the first 3 feet of both inlet and outlet pipes to reduce heat loss
Pro Tip: If your water heater is over 10 years old and you are facing recurring issues, a repair might not be the best investment. Tank life in hard water areas like Southern California often runs shorter than the national average of 8 to 12 years due to mineral stress on the tank lining.
Stay consistent with these water heater upkeep tips and you will dramatically extend the life of your unit while keeping energy costs lower.
Rethinking water heater fixes: what typical guides miss about local challenges
Most step by step heater repair guides are written for a general American audience. They assume average water hardness, standard usage patterns, and typical home setups. If you live in Orange County or Los Angeles County, that assumption works against you.
Southern California water is among the hardest in the country. That means sediment accumulates faster than the “flush once a year” advice accounts for. In practice, many local homeowners benefit from flushing every four to six months, especially if their unit is older or their household uses above-average hot water. Sediment buildup causes about 70 percent of no hot water complaints, making flushing the most effective DIY fix available.
Another gap we see frequently: homeowners follow repair steps correctly but skip air bleeding after refilling the tank. Running an electric element in a partially air-filled tank causes it to burn out within days. It is a repair that undoes the repair, and it is entirely preventable.
There is also the question of when not to DIY. Replacing a gas valve, repairing a venting system, or addressing tank corrosion are jobs where professional help is not optional, it is the safer and more cost-effective choice. A botched gas valve repair carries risks that no amount of savings justifies.
One upgrade worth adding during any major repair: isolation valves on both the cold water inlet and the hot water outlet. These quarter-turn valves let you service the water heater in the future without shutting off water to the entire house. Most homes in our area were not built with these, and adding them costs less than a service call.
Finally, consult appliance repair insights specific to California homes when you are deciding whether a repair makes financial sense versus a full replacement.
Get professional appliance repair support from MDTech Services
When your water heater issues go beyond a flush or a reset button, MDTech Services is here to help Orange County and Los Angeles homeowners get reliable hot water back quickly. Our licensed technicians specialize in residential appliance repair and have direct experience with the water quality and home plumbing setups common throughout Southern California.

If you want to understand the full repair process before calling, our repair appliances homeowner guide explains what to expect at each stage. For a broader look at what appliance repair involves, the modern appliance repair overview gives you a clear picture. When you are ready for hands-on help with your water heater, our water heater repair California service covers the repairs, inspections, and replacements that keep your home running safely. Contact us today to schedule an appointment.
Frequently asked questions
How often should I flush my water heater to prevent problems?
You should flush your water heater every 6 to 12 months, though homes in hard water areas like Orange County may benefit from flushing every four to six months. Sediment removal every 6 to 12 months prevents efficiency losses of up to 20 to 30 percent.
What safety measures should I take before attempting water heater repairs?
Always turn off the power or gas supply, shut off the cold water inlet, and use a non-contact voltage tester to confirm power is off before beginning work. Turning off power and testing before repairs is essential to prevent electrical shock.
Why does my water heater make popping or rumbling noises?
Those sounds almost always point to sediment sitting at the bottom of the tank, where it traps water that overheats and bubbles underneath the layer. Sediment buildup causes popping by overheating water, and a thorough flush typically resolves the noise.
Can I fix a leaking water heater drain valve myself?
Yes, a dripping drain valve can often be fixed by tightening the cap or replacing the valve, provided you follow proper safety steps and shut off power and water first. However, tank corrosion leaks require replacement and are not a DIY repair.
What temperature should I set my water heater for safety and efficiency?
Set your thermostat to no more than 120°F. Thermostats above 120°F increase scalding risk, raise energy costs, and can void your unit’s warranty.