TL;DR:
- Replacing a water heater involves disconnecting the old tank and installing a new one following safety and code guidelines. Proper preparation, tool gathering, and permitting are essential to avoid costly errors and hazards. Always fill the tank before activating the power or gas supply to prevent damage and ensure safety.
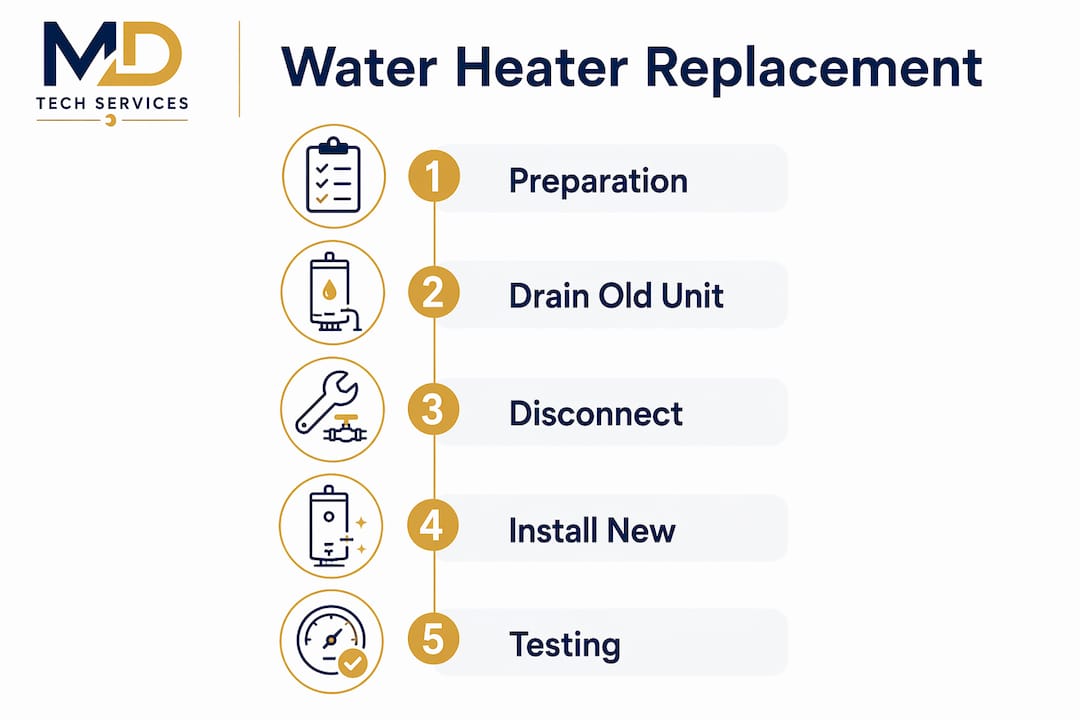
Water heater replacement is the process of disconnecting an old tank unit and installing a new one while safely managing water, gas or electric connections, and local code requirements. A confident DIYer can complete the job in 4–6 hours, though gas units and complex plumbing add time. Residential water heaters last 7–15 years, and leaking or consistently underperforming units are the most common replacement triggers. Knowing how to replace a water heater correctly from the start prevents costly water damage, failed inspections, and dangerous gas or electrical hazards. This guide walks you through every stage, from gathering tools to final safety checks.
What tools and materials do you need before starting?
Preparation separates a smooth replacement from a frustrating one. Gather everything before you shut off a single valve, and the project stays on schedule.
Required tools
- Pipe wrench and adjustable wrench
- Pipe cutter or hacksaw
- Voltage tester (for electric units)
- Screwdrivers, flat and Phillips
- Garden hose for draining
- Appliance dolly for moving the old unit
- Teflon tape and pipe joint compound
Required materials
- New water heater (matched to fuel type and tank size)
- Temperature and Pressure relief valve (T&P valve) if not pre-installed
- Flexible braided water connectors
- Pipe insulation for hot water outlet pipe
- Dielectric unions (if connecting copper to steel)
- New gas flex connector or wire nuts (depending on fuel type)
Pro Tip: Photograph your wiring and plumbing before disconnecting anything. Those photos cut reassembly time significantly and eliminate guesswork on connection order.
Permits and code compliance
Most jurisdictions require a permit for water heater replacement. That means a licensed inspector will verify your work meets local safety codes. Call your city or county building department before you start. Skipping this step can void your homeowner’s insurance and create problems when you sell the house.
Safety equipment
Keep a fire extinguisher rated for both electrical and gas fires accessible throughout the entire project. A voltage tester confirms power is off before you touch any wiring. Never rely on a breaker label alone.
Before you touch any connections, shut off the cold water supply to the heater, turn off the gas at the shutoff valve or flip the dedicated circuit breaker for electric units, and let the tank cool for at least an hour.
How do you safely drain and remove the old water heater?
Removing the old unit is the most physically demanding part of the project. Work methodically and never rush the draining step.
- Shut off power or gas. For gas units, turn the gas valve to the “pilot” position, then close the supply shutoff. For electric units, switch off the dedicated breaker and confirm with a voltage tester.
- Connect a garden hose to the drain valve. Run the other end to a floor drain, utility sink, or outside. Open the drain valve fully.
- Open a hot water faucet in the house. This breaks the vacuum inside the tank and lets water flow freely. A standard tank drains at roughly 5 minutes per 10 gallons, so a 50-gallon unit takes about 25 minutes.
- Disconnect the water lines. Use a pipe wrench on the cold inlet and hot outlet connections. Have a bucket ready for residual water.
- Disconnect the gas line or electrical connections. For gas, unscrew the union fitting on the flex connector. For electric, remove the access panel and disconnect the wires after confirming power is off.
- Remove the vent pipe (gas units only). Unscrew the sheet metal screws holding the vent collar to the draft hood. Set the vent sections aside carefully.
- Move the old unit. Slide an appliance dolly under the tank and tilt it back. Water heaters weigh 100–150 pounds empty. Get a second person to help navigate stairs or tight spaces.
Pro Tip: Drain sediment-heavy tanks slowly. If the drain valve clogs with sediment, insert a thin screwdriver to break it loose. Forcing the valve open wider can crack it.
What are the steps to install the new water heater correctly?
Setting the new unit correctly from the start prevents leaks, failed inspections, and safety hazards. Follow these steps in order without skipping ahead.
- Position the new unit. Place it in the same location as the old one, leaving at least 6 inches of clearance on all sides for ventilation and service access. Check that it sits level.
- Install the T&P relief valve. Thread it into the designated port with Teflon tape. The discharge pipe must run downward to within 6 inches of the floor. Never cap or plug this pipe.
- Connect the water lines. Attach the cold water inlet (usually marked in blue) and hot water outlet using flexible braided connectors. These connectors handle minor alignment differences and reduce stress on the fittings. Wrap all threaded connections with Teflon tape before tightening.
- Fill the tank completely. Open the cold water supply valve and let the tank fill. Keep a hot water faucet open in the house. When water flows steadily from that faucet, the tank is full and air-free.
- Connect gas or electrical supply.
For gas units:
- Reconnect the gas flex connector to the gas valve using a new connector if the old one shows any wear.
- Tighten all fittings snugly but do not overtighten.
- Test every gas connection with soapy water after turning the gas back on. Bubbles mean a leak. Shut the gas off immediately and retighten.
For electric units:
- Connect wires per the wiring diagram on the unit. Typically, black to black, white to white, and green or bare copper to ground.
- Replace the access panel and restore power at the breaker.
- Reinstall the vent pipe (gas units only). Reconnect each vent section, starting at the draft hood and working toward the flue. Secure every joint with sheet metal screws.
- Restore power or gas and light the pilot. Follow the manufacturer’s lighting instructions exactly. Never turn on power or gas to an empty tank. Dry-firing destroys heating elements instantly and voids most warranties.
Pro Tip: Wrap the first 6 feet of the hot water outlet pipe with foam pipe insulation. This simple step reduces standby heat loss and lowers your energy bill year-round.
Choosing the right unit before installation matters as much as the installation itself. Evaluating fuel type, tank size, and efficiency rating before you buy can reduce your long-term operating costs. A heat pump water heater, for example, uses significantly less electricity than a standard electric resistance model.

How do you complete final testing and troubleshoot common issues?
The job is not finished when the last connection is tightened. A thorough check now prevents a callback in the middle of the night.
- Confirm steady hot water flow. Run a hot water faucet for 2–3 minutes. Sputtering or air pockets are normal at first and clear on their own.
- Check every connection for drips. Run your hand along each fitting after 10 minutes of operation. Even a slow drip will worsen over time.
- Verify the T&P valve discharge pipe is clear. Nothing should block or cap the end of this pipe. It is your primary safety device.
- Monitor the first heating cycle. Listen for normal operation. Popping or rumbling sounds often indicate sediment in a new tank, which usually settles.
- Check the thermostat setting. The U.S. Department of Energy recommends 120°F as the default setting. This prevents scalding and reduces mineral buildup.
When to call a licensed plumber: If you smell gas after testing, see water pooling at connections you cannot stop, or the unit fails to heat after two full cycles, stop and call a professional. DIY replacement carries real risks from high-voltage electricity and natural gas, and those situations require licensed expertise.
Pro Tip: Flush the tank every 6–12 months by attaching a hose to the drain valve and running water until it clears. This removes sediment and extends the life of the unit significantly. Read more about water heater maintenance to protect your investment.
For ongoing reliability, review the plumbing safety tips that apply to your home’s full system, not just the water heater.
Key takeaways
Replacing a water heater safely requires the right tools, a full tank before powering up, and a permit from your local building department before you start.
| Point | Details |
|---|---|
| Permit before you start | Most jurisdictions require a permit; skipping it risks insurance and resale issues. |
| Fill before powering up | Never turn on gas or electricity to an empty tank; dry-firing destroys heating elements. |
| Test gas connections | Apply soapy water to every gas fitting after reconnecting; bubbles signal a leak. |
| Use flexible connectors | Braided connectors handle minor alignment issues and reduce stress on fittings. |
| Know when to call a pro | Persistent leaks, gas smell, or failure to heat after two cycles require a licensed technician. |
What I’ve learned after years of water heater installations
After handling water heater replacements across Orange County and Los Angeles County, the pattern is clear. Homeowners who run into trouble almost always skipped one of two things: they did not photograph the existing connections before removing anything, or they powered up the unit before the tank was completely full.
The dry-firing mistake is the most expensive. A heating element destroyed in the first 30 seconds of operation is not covered under most warranties, and the homeowner ends up buying a second unit. That single step, waiting for steady flow from a hot water faucet before restoring power, costs nothing and saves everything.
The other thing I see consistently is underestimating the permit process. Many homeowners assume a permit is optional or that nobody checks. In California, inspectors do check, and an unpermitted water heater installation can delay a home sale for weeks. Pull the permit. It protects you legally and confirms the installation was done correctly.
DIY replacement is a reasonable choice for an experienced homeowner who is comfortable with both plumbing and either gas or electrical work. If you are confident in only one of those two areas, the safer call is to handle what you know and bring in a licensed technician for the rest. There is no award for doing it all yourself if the result is a gas leak or a flooded utility room.
— MDTECH
Mdtechservices is here when the job gets complicated
Water heater replacement goes smoothly for prepared homeowners. When it does not, having a licensed, experienced team on call makes all the difference.

Mdtechservices serves homeowners across Orange County and Los Angeles County with professional appliance installation, plumbing repairs, and HVAC services. Our licensed technicians handle the connections, permits, and safety checks that give you confidence the job is done right. If you hit a wall mid-project or want a professional to handle the full installation, our appliance repair and installation guide walks you through what to expect. For homeowners weighing repair against full replacement, our repair vs. replacement resource helps you make the right call for your home and budget.
FAQ
How long does it take to replace a water heater?
A confident DIYer typically completes a standard tank replacement in 4–6 hours. Gas units and complex plumbing configurations add time.
Do I need a permit to replace a water heater?
Yes, in most jurisdictions. Permits are required to confirm the installation meets local safety codes, and skipping them can affect your insurance and home resale.
How long does a residential water heater last?
Residential water heaters last 7–15 years on average. Leaking, inconsistent heating, and visible rust are the clearest signs it is time to replace.
What happens if I turn on the heater before the tank is full?
Dry-firing destroys electric heating elements instantly and voids most manufacturer warranties. Always wait until water flows steadily from a hot water faucet before restoring power or gas.
How do I check for gas leaks after installation?
Apply soapy water to every gas fitting and connection. Bubbles confirm a leak. Shut the gas off immediately and retighten the fitting before testing again.