TL;DR:
- Converting from LP to natural gas in California requires careful parts selection, code compliance, and professional verification. Proper adjustment of orifices, pressure regulators, and venting ensures safe, efficient appliance operation. Expert installation and thorough testing are crucial to prevent hazards like gas leaks or carbon monoxide buildup.
Switching from LP (liquid propane) to natural gas is one of the most practical upgrades a homeowner in Orange County or Los Angeles County can make. Natural gas is often more affordable, consistently available through the utility line, and cleaner burning than propane. But the conversion process is not simply swapping a hose and calling it done. The steps involve specific parts, code compliance, and careful testing, and skipping any of them puts your household at real risk. This guide walks you through everything you need to know, from preparation through verification, so you can move forward with confidence.
Table of Contents
- What to know before converting your gas appliance
- Tools, materials, and required safety checks
- Step-by-step process for converting an LP appliance
- How to verify conversion success and avoid common pitfalls
- What experts know: Why every conversion is unique
- Book safe appliance conversion or expert troubleshooting
- Frequently asked questions
Key Takeaways
| Point | Details |
|---|---|
| Check compatibility first | Not every appliance can be safely converted—verify your model and code requirements. |
| Gather proper tools and kits | Manufacturer-approved conversion kits and proper tools are a must for safe and effective work. |
| Follow step-by-step process | Carefully follow shutoff, adjustment, installation, and leak-checking procedures for peace of mind. |
| Always verify operation | Test for safe, efficient combustion and be alert for common warning signs after conversion. |
| Expert help is safest | For compliance and safety, consulting a professional makes the conversion worry-free. |
What to know before converting your gas appliance
Before you touch a single connection, it helps to understand why LP and natural gas are not interchangeable. Propane is stored under pressure and has a higher energy content per cubic foot than natural gas. That means appliances built for LP use smaller orifices (the tiny openings that control gas flow) and operate at different pressures. Natural gas requires larger orifices and a different pressure regulator setting to achieve proper combustion. If you simply connect an LP appliance to a natural gas line without making these changes, the burner will run rich, produce carbon monoxide, and likely shut down or fail.
Understanding appliance conversion basics before you start prevents costly mistakes. Most major manufacturers offer certified conversion kits specifically designed for their models. These kits include the correct orifices, regulator adjustment instructions, and sometimes new burner components. Using anything other than an approved kit voids most warranties and may violate California codes.
Not every appliance is a candidate for conversion. Older units, appliances near the end of their service life, or models without an available manufacturer kit should not be converted. Always pull your appliance model number and cross-reference it with the manufacturer’s documentation before purchasing any parts.
| Feature | LP (propane) | Natural gas |
|---|---|---|
| Pressure at appliance | 10 to 11 inches water column | 3.5 to 7 inches water column |
| Orifice size | Smaller (higher pressure) | Larger (lower pressure) |
| Energy per cubic foot | Higher (~2,500 BTU) | Lower (~1,000 BTU) |
| Conversion kit needed? | Yes | Yes |
| Typical cost savings | Baseline | Generally 20 to 40% lower |
Research confirms that combustion performance benchmarks are appliance-specific and gas-specific, meaning you cannot apply one set of performance numbers to every situation. Each setup must be tested individually to confirm safe operation.
Here is what California law requires for this type of work:
- A licensed contractor must perform or supervise the conversion in most jurisdictions.
- A permit from your city or county building department is typically required.
- An inspection is needed to confirm code compliance before the appliance is returned to regular use.
- Homes in Orange County and Los Angeles County are subject to local amendments to the California Fuel Gas Code, so requirements may vary by city.
Review safe gas appliance upgrades in California to understand what applies to your address specifically. Compliance protects you legally and keeps your homeowner’s insurance intact.
Important: An unpermitted conversion may not only create safety hazards, it can complicate home sales and insurance claims. Always operate within your local regulatory framework.
Tools, materials, and required safety checks
Knowing what you need ahead of time makes the actual work go more smoothly and safely. Gather every item before you start so you are not searching for parts mid-process with the gas off.
| Tool or material | Purpose |
|---|---|
| Manufacturer-approved conversion kit | Provides correct orifices, regulator cap, and instructions |
| Adjustable wrench and open-end wrenches | Removing and reinstalling orifices and fittings |
| Combustible gas detector | Detecting leaks before and after conversion |
| Liquid leak detection solution | Confirming no gas leaks at fittings |
| Phillips and flathead screwdrivers | Accessing burner components and panels |
| Flashlight or work light | Visibility inside burner compartments |
| Safety glasses and work gloves | Personal protection during disassembly |
| Appliance manual and conversion kit instructions | Model-specific guidance throughout |
Pre-conversion safety checks are just as important as having the right tools. Do not skip any of these:
- Confirm the appliance model is listed as convertible in the manufacturer documentation.
- Locate and test your gas shutoff valve to make sure it closes completely.
- Verify the conversion kit matches your specific model number, not just the brand.
- Ensure the work area has adequate ventilation before and during the process.
- Clear the area of flammable materials, including cleaning cloths and aerosol cans.
- Confirm no other gas appliances in the home will be affected by shutting off the supply line.
- Have a fire extinguisher accessible and know where your main gas shutoff is located.
The conversion installation process also requires attention to venting. Natural gas combustion produces byproducts, and proper venting during conversion must be confirmed before the appliance is operated. Poor venting leads to carbon monoxide accumulation, which is colorless and odorless.
Research demonstrates that each conversion requires testing and verification because results vary significantly by appliance design and the specific natural gas composition delivered to your home. This is not a process where one method fits every situation.
Pro Tip: Keep the original manufacturer instructions and the conversion kit documentation together in a folder with the appliance. This record is valuable if an inspector visits or if you need service later.
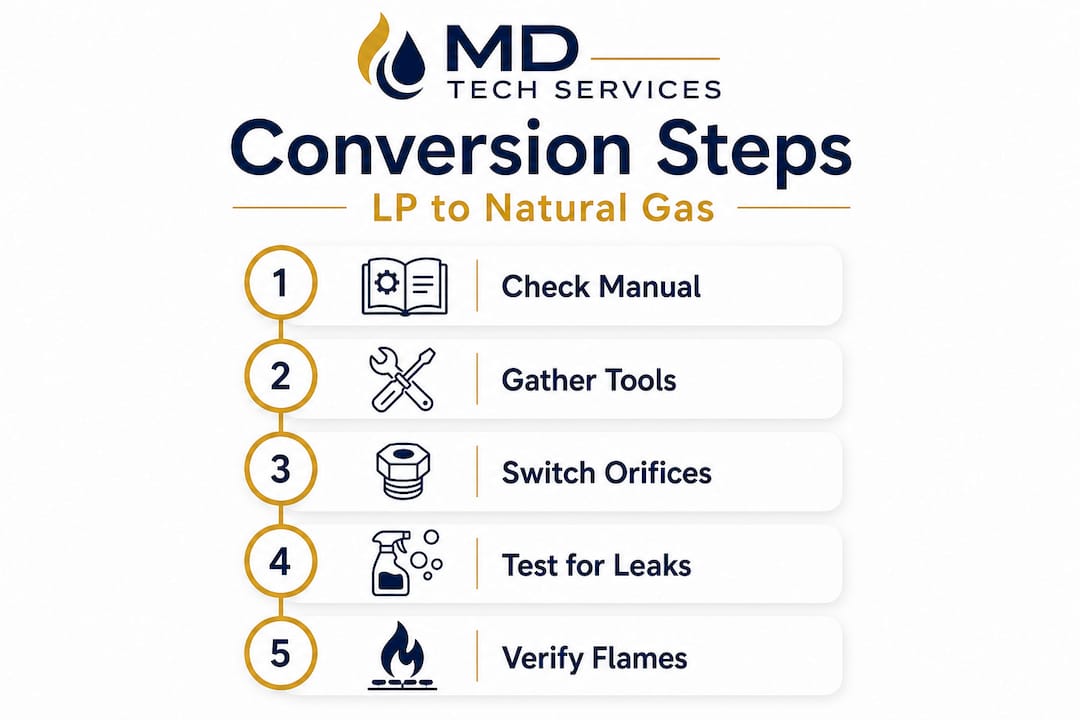
Step-by-step process for converting an LP appliance
With everything in place, follow these steps in order. Do not skip steps or reorder them. Each one builds on the previous for a safe outcome.
-
Shut off the gas supply. Close the shutoff valve at the appliance and at the main line if needed. Wait five minutes to allow residual gas to dissipate before opening any connections.
-
Disconnect the power source. Unplug electric ignition systems or disconnect the appliance from power. Gas and electricity together create unnecessary risk during disassembly.
-
Access the burner orifices. Remove the grates, burner caps, and burner heads as directed by the manufacturer. The orifices are the small threaded fittings at the base of each burner tube.
-
Remove LP orifices and install NG orifices. Using the correct wrench, carefully unscrew each LP orifice. Thread in the natural gas orifices from your conversion kit by hand first, then snug them with a wrench. Do not overtighten, as orifices are typically brass and can crack.
-
Adjust the pressure regulator. Most conversion kits include a regulator cap or adjustment screw. Follow the kit instructions to reconfigure the regulator for natural gas pressure. This step is critical and cannot be guessed.
-
Adjust air shutters. The air shutter controls the air-to-gas mixture at each burner. Natural gas requires a different air mixture than LP. Refer to the kit instructions for the correct position for each burner.
-
Reassemble all components. Replace burner heads, caps, and grates in the reverse order of removal. Confirm every component is seated properly before reconnecting gas.
-
Reconnect the gas supply and check for leaks. Open the gas valve slowly and apply liquid leak detection solution to every fitting and connection you touched. Watch for bubbles, which indicate a leak. A combustible gas detector adds a second layer of verification.
-
Test for proper operation. Light each burner and observe the flame. A properly converted burner on natural gas should show a steady, predominantly blue flame. Adjust air shutters slightly if the flame appears yellow or too high.
-
Document each step. Note the orifice sizes installed, the regulator adjustment position, and any observations from the flame test. This record is useful for inspectors and for future reference.
As noted in published combustion research, proper adjustment and verification are essential because there are no universal steps that work for every appliance. Your specific unit and your local gas blend both influence the outcome.
“Never skip verification. Testing post-conversion prevents dangerous leaks and ensures your family is safe from the start.”
If you are uncertain about any step, professional conversion help is available from licensed technicians who perform these conversions regularly. Specific guidance for oven units is also available through oven conversion specifics if your project involves a range or wall oven.
Pro Tip: Take photos of each burner before disassembly and after orifice installation. Visual documentation helps confirm correct reassembly and provides evidence for permitting inspections.
How to verify conversion success and avoid common pitfalls
Completing the steps is only part of the job. Verification is where you confirm that everything works correctly and safely. Do not assume the conversion succeeded without running through this checklist.
- Check every burner for a steady, blue flame at all heat settings from low to high.
- Let the appliance run for five to ten minutes and confirm no gas odors develop in the room.
- Apply leak detection solution to all fittings once more after the appliance has been running.
- Verify the appliance cycles on and off normally through its thermostat or controls if applicable.
- Confirm the ventilation path is clear and that exhaust is exiting the home as designed.
Watch for these warning signs that indicate the conversion was incomplete or incorrect:
- Yellow or orange flames rather than the expected steady blue color
- Gas odors during or after operation
- Carbon or soot buildup around burner ports or on cookware
- Burner shutoffs that occur without apparent cause
- Unusual sounds such as popping or lifting at the burner during ignition
Any one of these signs means you should stop using the appliance immediately and call a licensed technician. Do not attempt to troubleshoot a suspected gas leak on your own.
Published data confirms that combustion performance is highly sensitive to fuel composition and adjustment, making post-conversion verification not optional but essential for safety and efficiency.
For cooktops specifically, cooktop conversion tips provide model-specific guidance that helps you interpret what you are seeing during the flame check. If your stove is showing unexpected behavior after conversion, stove conversion troubleshooting can help you identify whether the issue is with orifices, air mixture, or something else entirely.
A note on carbon monoxide: CO is the most serious risk associated with improper conversions. It is invisible and odorless. Install a CO detector near any gas appliance as a permanent safety measure, regardless of how confident you are in the conversion outcome.
What experts know: Why every conversion is unique
We have seen hundreds of gas appliance conversions across Orange County and Los Angeles County. Here is something most guides do not say plainly: two identical appliances in two different homes can behave differently after conversion. The natural gas delivered through your utility line is not always exactly the same composition from month to month, and local pressure can vary by street, let alone by neighborhood.
Your appliance’s age matters too. Worn burner ports, slightly corroded orifice threads, and aging regulators all affect how well the new gas type combusts. A brand-new range with a fresh conversion kit will behave differently than a ten-year-old unit with the same kit installed. Research shows that performance benchmarks vary between appliances, meaning no research result substitutes for hands-on testing done in your specific home.
A printed checklist is a starting point. It is not a guarantee. The variables in your home, including the venting path, the cabinet enclosure around the appliance, the distance from the meter, and the local gas pressure, all combine in ways that a step-by-step guide cannot fully anticipate.
The professionals at professional-grade safety checks bring calibrated equipment, experience across dozens of appliance brands, and the code knowledge to confirm the work is not just complete but compliant. When we say “no two conversions are the same, and testing every detail is our gold standard,” we mean it literally. There is no shortcut for that kind of verification.
DIY conversions often look successful on the surface. Flames appear blue, the appliance runs, and everything seems fine. What a homeowner cannot easily detect is a slightly mis-set regulator that causes elevated carbon monoxide output over weeks, or a micro-leak at an orifice fitting that slowly builds up in a cabinet. These are the hidden risks that make expert involvement worth every dollar.
Book safe appliance conversion or expert troubleshooting
Converting your gas appliances from LP to natural gas is a smart, long-term investment in your home’s efficiency and your family’s comfort. But as this guide makes clear, the process demands precise parts, strict code compliance, and thorough verification at every stage.

MDTech Services provides expert LP to natural gas conversion for homeowners throughout Orange County and Los Angeles County. Our licensed technicians carry manufacturer-approved conversion kits, calibrated gas detection equipment, and the hands-on experience to handle any appliance brand or model. We manage the permitting process, perform every required safety check, and leave you with full documentation of the completed work. If your appliance is showing problems after a prior conversion, our appliance conversion pros can diagnose and correct the issue quickly. You can also visit our appliance repair guidance page for broader support with your home’s appliances. Book your appointment online or call us today.
Frequently asked questions
Can I convert any gas appliance from LP to natural gas?
Not all appliances are convertible. Always check the manufacturer manual and verify local codes before purchasing a conversion kit or starting work.
What risks are associated with improper gas appliance conversion?
Improper conversion can cause gas leaks, elevated carbon monoxide levels, and dangerous combustion conditions. Verification is required because combustion performance is highly sensitive to fuel type and adjustment settings.
Why does the conversion process require testing and adjustment?
Each appliance responds differently to a new gas type, so testing confirms safe combustion. Efficiency and combustion results are not universal and must be confirmed individually for every unit.
Do I need a permit or inspection for gas appliance conversion in Orange County or Los Angeles?
Permits and inspections are typically required under California law. Check with your city or county building department before beginning any conversion work to confirm local requirements.
What are the signs of a successful conversion?
A steady blue flame on all burners, no gas odors during operation, and reliable on-and-off cycling are the key indicators that a conversion was completed correctly.