
A jammed garbage disposal usually hums when you flip the switch but the blades do not turn. In most cases you can clear it in about ten minutes: cut the power, turn the grinding plate by hand with a hex wrench, remove whatever caused the jam, wait for the motor to cool, and press the red reset button. If the unit leaks from its body, trips the breaker repeatedly, or jams again within days, it is time to call a licensed technician. Below you will find each step, the safety rules that matter, and how to tell a simple jam from a failing unit.
TL;DR
- Turn off the wall switch and unplug the unit or switch off its breaker before you do anything else. Never put your hand in the disposal, even when it is off.
- A humming unit that will not spin is usually blocked, not dead. Work a hex wrench in the bottom socket back and forth until the plate turns a full rotation.
- Remove the object with tongs or pliers, wait for the motor to cool, then press the reset button on the bottom of the unit.
- Leaks from the body of the unit, repeated jams, or a dead motor with no hum point to repair or replacement. We handle both across Orange County and Los Angeles County.
Table of Contents
- Jam or electrical fault: what your disposal is telling you
- What you need before you start
- How to clear a jammed garbage disposal, step by step
- Check the power cord and strain relief clamp
- When the jam keeps coming back
- When to stop and call a professional
- Repair or replace: what the numbers look like
- Our perspective: why a quick jam fix still deserves a second look
- Need help in Orange County or Los Angeles County?
- FAQ
- Sources
Jam or electrical fault: what your disposal is telling you
Before you reach for a tool, figure out what kind of problem you have. Repair professionals separate a jam, which is a mechanical blockage, from an electrical fault, where the unit has no power at all. The fix is different for each.
| What you notice | Most likely cause | First move |
|---|---|---|
| Humming, blades will not turn | Something is wedged in the grinding chamber | Steps below: hex wrench, remove object, reset |
| Total silence, no hum | Tripped overload protector, tripped breaker, or a power problem | Press the reset button, then check the breaker |
| Starts, then stops after a few seconds | Overheating from a partial jam or overload | Let it cool, clear the chamber, reset |
| Water under the sink | Loose drain connection, or failed internal seals | Check where the water comes from before using it again |
| Bad smell but it runs | Food buildup in the grind chamber | Clean it, no repair needed |
A humming sound is the one people misread most often. Many homeowners assume a hum means the motor has failed and the whole unit needs replacing. In reality, a hum often means the motor is getting power while the grinding chamber is physically blocked. That is good news, because a blocked chamber is usually a quick, inexpensive fix. If humming is your main symptom, our guide to stopping a humming garbage disposal covers it in more detail.
What you need before you start
Gather these first so you are not hunting for tools with the power half off:
- A flashlight
- A 1/4-inch hex (Allen) wrench, or the small wrench that came with your disposal
- Long-handled tongs or needle-nose pliers
- A wooden spoon handle, for gently pressing on the blades’ edge if needed
- A bucket or towel, in case water sits in the sink
A note on the wrench. Many InSinkErator units come with a dedicated wrench designed to bend before the disposal’s internal parts take damage, as the manufacturer explains. A generic hex key does not give you that protection, so turn it with steady pressure and never force it. If you still have the original wrench, look for it in the cabinet under the sink or in a kitchen drawer.
How to clear a jammed garbage disposal, step by step
1. Cut the power completely
Turn the wall switch off. Then go further: unplug the cord from the outlet under the sink, or switch off the circuit breaker if the unit is hardwired. A wall switch alone is not enough when your fingers or tools will be near the blades. The manufacturer’s guidance says that if you have a push-button air switch, you must also unplug the unit while it cools.
2. Look inside with a flashlight
Shine the light down the drain opening. Common culprits are bottle caps, fruit pits, small pieces of silverware, glass fragments, and tightly packed fibrous scraps. Do not reach in with your fingers. The standard safety rule from service professionals is to never place your hand inside a disposal, even when it is powered off. Use tongs or pliers for anything you can see and grab.
3. Free the blades with the hex wrench
Look underneath the unit for a small hex-shaped socket in the center of the bottom plate. Insert the wrench and work it back and forth. You are aiming for a full rotation of the plate. Expect some resistance at first, then a sudden release as the obstruction shifts. Roto-Rooter, InSinkErator and other makers all describe the same method, because it works on most residential units.
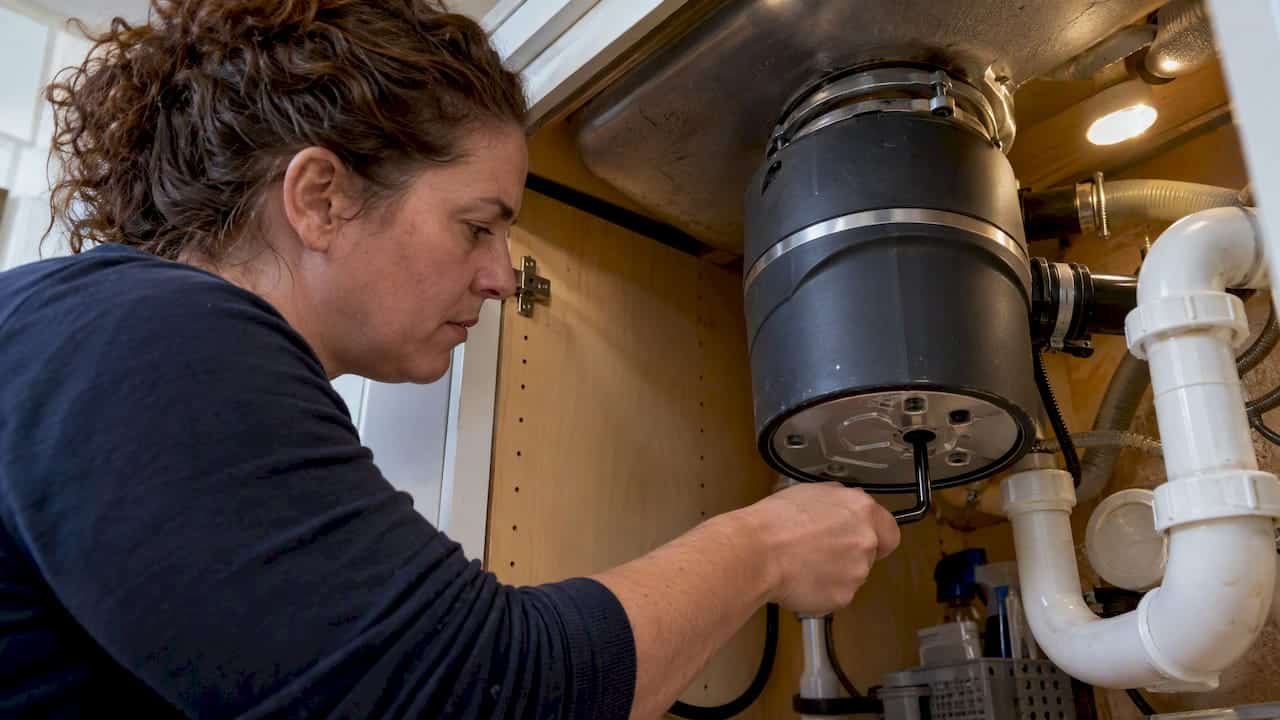
If your unit has no socket on the bottom, some models allow you to push a wooden spoon handle against a blade from above to rock the plate free. Only do this with the power physically disconnected.
4. Remove the debris
Once the plate turns freely, check the chamber again with the flashlight. Pull out anything that dropped loose with tongs. If you hear something rattling and cannot see it, run the water briefly after the reset step and listen for it. Persistent rattling means an object is still stuck.
5. Let the motor cool and press reset
A jam makes the motor work hard against a blockage, and the built-in overload protector shuts it down to prevent damage. The red reset button on the bottom of the unit pops out when this happens. According to InSinkErator, if the motor is still dead after you clear the jam, allow up to 20 minutes to cool before you press the reset. Pressing it too early often just trips it again.
6. Restore power and test with water
Plug the unit back in or turn the breaker on. Run a steady stream of cold water, then flip the switch. If it runs smoothly, let it run for 15 to 30 seconds with water flowing so any loosened debris clears the drain line.
If the reset button will not stay in, or the motor hums again right away, stop. Repeated attempts can burn out the motor. Go to the section on when to call a professional below.
Check the power cord and strain relief clamp
While you are under the sink with the power off, take a minute to look at where the power cord exits the disposal housing. That opening has sharp edges, and the strain relief clamp holds the cord so those edges cannot cut into it. Vibration from regular use can loosen the clamp. The San Diego County Housing and Community Development inspection checklist notes that the sharp edges at the cord opening are a concern when the clamp is missing or loose. A damaged cord creates a shock and short-circuit risk that people overlook during a routine jam clearance.
If the clamp is loose, or the cord insulation looks nicked or frayed, do not run the disposal. This is the kind of electrical detail we ask landlords and property managers to check at every service visit, and it is a good reason to have a technician look at the unit rather than patch it yourself.

When the jam keeps coming back
One jam is an event. Three jams in a month is a pattern. Recurring jams usually come from one of these causes:
- Fibrous food. Celery, corn husks, and potato peels wrap around the grinding components. Service pros point to improper diet as a frequent cause of jams.
- Grease. Fat solidifies in the drain line and slows everything down.
- Too little water. Running cold water during and after grinding helps waste move all the way through the plumbing.
- An aging unit. Worn parts and weakened motors struggle with loads they once handled.
A few habits cut the odds of another jam:
- Feed scraps in small amounts rather than a full load at once.
- Run cold water before, during, and for about 15 seconds after grinding.
- Keep fibrous scraps, bones, pits, and grease out of the sink.
- Clean the chamber regularly. The manufacturer’s care manual says an odor is usually a sign of food buildup, so cleaning solves it before it becomes a clog.
When to stop and call a professional
Do-it-yourself clearing is reasonable for a simple jam. It is not reasonable for everything. Call a licensed technician in these situations:
- The unit leaks from its body. Leaks at the hose connections are often a simple fix, but according to repair professionals, a leak from the disposal body itself almost always means internal seals have failed, and replacement is the safe long-term answer. See our page on leaking garbage disposal repair for what to expect.
- The breaker trips when you restore power, or you notice a burning smell, sparks, or a damaged cord.
- The blades will not turn even after you apply steady pressure with the wrench. Stop before you damage the unit.
- Metal or glass is lodged where you cannot see or safely grab it.
- It jams again within days of a clean reset.
- Water backs up into the second sink basin or the dishwasher, which points to a clog beyond the disposal.
If you rent, you may not be allowed to authorize repairs. Let your landlord or property manager know, because the cost and the decision usually belong to the property owner.
Repair or replace: what the numbers look like
Costs depend on the problem, so treat published numbers as ranges rather than quotes. ConsumerAffairs reports that disposal repair can run from under $100 to $200 or more, and that a jam typically costs less than other repairs. For replacement, one California cost guide puts a new disposal installed by a plumber at $150 to $500, with horsepower and brand driving most of the spread.
The same guide notes that technicians tend to recommend replacement over repair when a unit has persistent jams or leaks, because repairing seals or replacing a motor can approach the price of a new, more reliable unit. That is most true for older disposals. A reasonable rule of thumb:
| Situation | Usually makes sense |
|---|---|
| First jam, unit runs normally after reset | Clear it yourself, no repair needed |
| Occasional jam on a newer unit | Clear it, change habits |
| Frequent jams on an older unit | Compare repair and replacement quotes |
| Leak from the unit body | Replace |
| Motor dead, no hum, reset does nothing | Diagnose first, then decide |
We lay out the decision in more depth in our guides to garbage disposal repair or replace options and what to budget for replacement.
Our perspective: why a quick jam fix still deserves a second look
We repair and install household appliances, and plumbing and HVAC work, for homeowners, landlords, and property managers in Orange County and Los Angeles County. A jammed disposal is one of the most common kitchen calls we hear about, and many of them need nothing more than a wrench and a reset.
We tell customers that, because it is true and because an honest answer builds trust. If you can clear it safely, do it. But the jam itself is often a symptom. A disposal that jams repeatedly may have worn parts, a loose cord clamp, a slow drain line behind it, or a motor that is on its way out. When we are on site, we look at the whole setup: the unit, the mounting, the electrical connection, the drain, and the dishwasher hookup.
Our approach is simple. We explain what we found, give you the options with upfront pricing, and favor long-term, warranty-safe solutions over a repair that gets you through the weekend. If replacement is the better value, we say so. If a ten-minute fix will do, we say that too.
— MDTECH
Need help in Orange County or Los Angeles County?
If the wrench and reset did not work, or you would rather not work near blades and wiring at all, our licensed technicians can diagnose and fix or replace the disposal. We handle kitchen appliance repair, appliance installation, and plumbing repair for homeowners, landlords, and property managers. You can read more about our emergency garbage disposal repair or go straight to appliance repair services to book an appointment online.
Another option when a jam is only one of several kitchen problems: ask us to look at the dishwasher, sink plumbing, and disposal in the same visit, so you deal with one appointment instead of three.
FAQ
Why is my garbage disposal humming but not spinning?
The motor is receiving power, but the grinding plate is blocked. Turn off and unplug the unit, then work a hex wrench back and forth in the bottom socket until the plate rotates fully. Remove any object with tongs, wait for the motor to cool, and press the reset button.
Can I use a regular Allen wrench to unjam a disposal?
Often yes, if it fits the socket on the bottom of the unit, and a 1/4-inch hex key is the size commonly described. The manufacturer’s own wrench is designed to bend before internal parts are damaged, so apply steady, gentle force with a generic one. Never use it with the power connected.
How long should I wait before pressing the reset button?
If the motor stays dead after you clear the jam, InSinkErator says to let it cool for up to 20 minutes before pressing reset. If the unit uses a push-button air switch, unplug it during that time. Pressing reset too soon usually trips it again.
What can I pour down a disposal to unclog it?
Cold running water is the safest first step, and a clog in the drain line needs different treatment than a jam in the grinder. Avoid pouring grease down the sink, and do not put your hand in to clear it. If water backs up into the other basin, call a plumber to check the drain line.
Is it worth repairing an old jammed disposal?
It depends on the age and the problem. A single jam usually needs no repair. For an older unit that jams often or leaks, replacement can cost about the same as a major repair and gives you a more reliable unit.
Sources
- InSinkErator: Fixing a Jammed Garbage Disposal
- InSinkErator: Installation, Care and Use Manual
- Garbage Disposal Repair and Replacement Cost in California
- ConsumerAffairs: How Much Does It Cost to Repair a Garbage Disposal?
- San Diego County: Inspections, Strain Relief Clamp