
If your freezer is rock solid but your fridge feels more like a cooler than a refrigerator, the compressor is almost certainly running fine. The real problem is nearly always airflow: a blocked vent, a stuck damper, a frost-clogged evaporator coil, or a dead evaporator fan that can’t push cold air from the freezer into the fridge compartment. Full sealed-system failure (the compressor itself) is the least likely explanation when one side is still working.
Before you do anything else, take three quick, safe actions. Check that nothing inside the fridge or freezer is blocking the vents between compartments. Open the freezer and listen for a small fan running while the compressor hums. If your fridge is reading above 40°F, move milk, meat, and leftovers to a cooler with ice or a neighbor’s fridge while you troubleshoot.
- Check vents in both compartments for boxes, bags, or ice buildup blocking airflow
- Listen for the evaporator fan running behind the freezer’s rear panel while the compressor is on
- Move perishables to a backup cooler if the fridge is above 40°F
Pro Tip: Unplugging the unit for a manual defrost can clear hidden ice and restore airflow within hours, but only do this if you’re comfortable working around the appliance and can safely dry up any melted water.
A cold freezer paired with a warm fridge points to an airflow or defrost issue in the vast majority of cases. If you hear the compressor running but the freezer isn’t blowing air toward the fridge, the fault sits somewhere between the evaporator fan and the damper, not in the sealed refrigerant system.
If you see heavy ice buildup behind interior panels, hear grinding or scraping instead of a smooth fan hum, or smell anything electrical, stop troubleshooting and call a technician.
Key Takeaways
A cold freezer paired with a warm fridge is almost always caused by blocked airflow, a failed evaporator fan, frost on the coil, or a stuck damper, not a broken compressor.
| Point | Details |
|---|---|
| Airflow first, compressor last | Rule out blocked vents, a stuck damper, and a silent evaporator fan before suspecting sealed-system failure. |
| Frost hides behind panels | Remove the freezer’s rear panel to check for ice buildup that mimics a bigger, more expensive problem. |
| Protect food early | Move perishables to a cooler if the fridge climbs above 40°F while you troubleshoot. |
| Clean coils twice a year | Dusty condenser coils quietly raise cabinet temperature over weeks and are the easiest fix to prevent. |
| Call Mdtechservices when stuck | A licensed technician can diagnose fans, dampers, and defrost components on-site, often within one 30 to 60 minute visit. |
Manufacturer And Model-Specific Resources
For instructions specific to your unit, use your model and serial number to pull the correct manufacturer service bulletin rather than relying on generic advice.
- Whirlpool’s service pointer on evaporator frosting for detailed defrost diagnostics
- Mdtechservices’ essential refrigerator troubleshooting tips for a homeowner-friendly overview
- Your appliance’s owner’s manual for the exact vent and damper locations on Samsung, LG, and KitchenAid models, which vary by design
Table of Contents
- Fridge Warm Freezer Cold: A Step-By-Step Diagnostic Checklist
- What Causes A Fridge Not Cooling But Freezer Works
- How To Fix A Fridge Not Getting Cold Yourself
- Quick Decision Rules For Your Next Step
- When To Call A Refrigerator Repair Technician
- Get A Professional Diagnostic From Mdtechservices
- Sources
Fridge Warm Freezer Cold: A Step-By-Step Diagnostic Checklist
Work through these checks in order. Each one takes just a few minutes, and doing them in sequence saves you from tearing into panels before ruling out the easy stuff.
- Confirm settings and power. Check that the fridge thermostat wasn’t bumped to a warmer setting and that the unit is fully plugged in. This takes 30 seconds and needs no tools.
- Check vents and food placement. Look inside both compartments for anything blocking the small vent openings, usually located near the back wall or top of the fridge section. Overpacking the freezer is one of the most overlooked reasons cold air stops flowing.
- Listen for the evaporator fan. With the freezer door open, most models stop the fan automatically, so gently hold or tape down the door switch to simulate a closed door and listen. A steady hum means the fan works. Silence, or a scraping or clicking sound, points to a failing fan motor or a fan blade caught on ice, which is one of the most common causes behind a refrigerator clicking but not cooling.
- Inspect the freezer’s rear interior panel for frost. Unplug the unit first. If you’re comfortable removing a few screws, pull the rear panel and look for a thick layer of frost or solid ice coating the evaporator coil. This is the most frequently misdiagnosed cause of a warm fridge, since it can mimic a failed compressor.
- Clean the condenser coils. These sit underneath or behind the unit, not inside the freezer. Unplug the fridge, vacuum or brush off dust and pet hair, and clear anything blocking airflow around the base.
- Check the door seals and thermostat. Run a dollar bill test on the gaskets (close the door on it and pull; if it slides out easily, the seal is worn) and confirm the thermostat dial isn’t stuck between settings.
- Tools needed: Phillips screwdriver, flashlight, vacuum with brush attachment
- Time estimate: 15 to 30 minutes for the full checklist, longer if you need to fully defrost
- What to photograph: the vent openings before you touch anything, and the evaporator coil once the rear panel is off, so you have a before-and-after reference
If you want a more detailed walkthrough with photos for each of these steps, Mdtechservices has a full step-by-step refrigerator fix guide built for homeowners working through this exact problem.
What Causes A Fridge Not Cooling But Freezer Works
Four mechanical issues account for almost every case of a fridge that stays warm while the freezer stays cold, and a fifth (sealed-system failure) is worth ruling out last, not first.
The airflow path is broken. Your freezer’s evaporator coil generates the cold air for the entire unit. A fan pushes that air through ducts and a damper (an electronically or mechanically controlled flap) into the fridge compartment. When the damper sticks closed or its control motor fails, the fridge gets zero cold air even though the freezer is working perfectly. On many newer models, thermistors and control boards manage the damper automatically, so a bad sensor reading can hold it shut even when the mechanical parts are fine.
The evaporator fan has failed. This fan sits directly behind the freezer’s rear panel, right next to the coil. Because it’s so close to the coil, the freezer often stays cold for a while even after the fan quits, since cold air still radiates locally. But without the fan pushing air through the ducts, the fridge compartment gets nothing. Listen for the fan; silence or grinding is your clue.
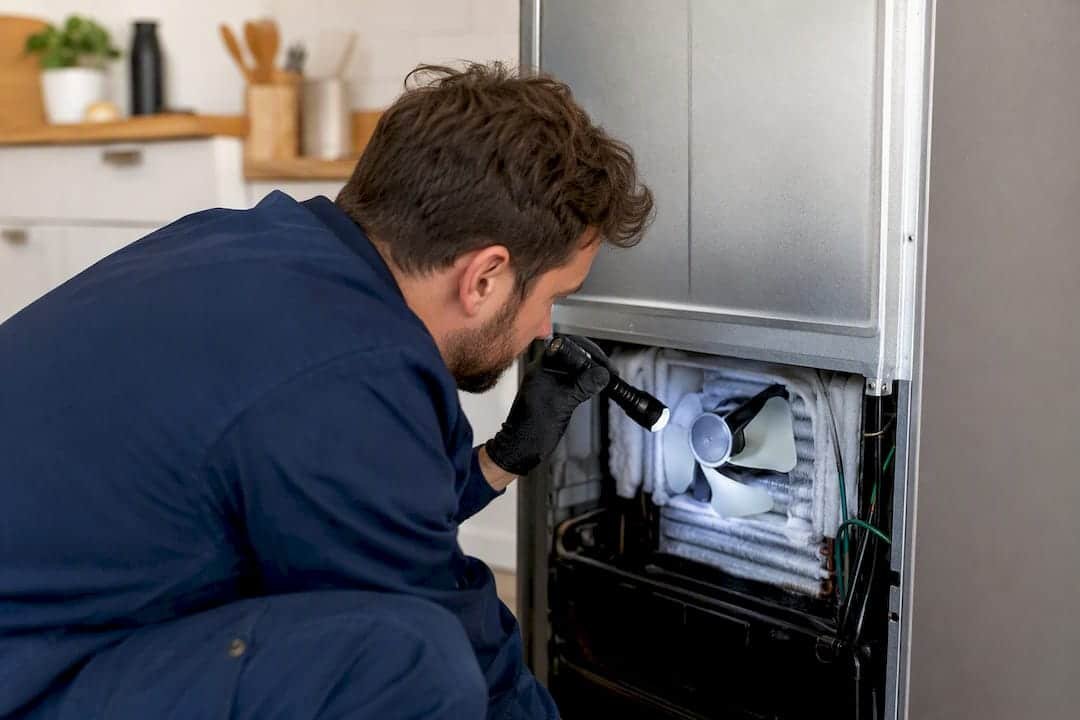
Frost has blocked the evaporator coil. Defrost-system failures (a bad defrost heater, timer, thermostat, or control board) let frost accumulate on the coil until it physically blocks airflow. This tends to show up as gradual warming over several days, not a sudden change, and the ice is often hidden behind the rear panel where you can’t see it without removing screws.
The condenser coils are dirty. These live outside the cold compartments, usually underneath the unit. When they’re coated in dust, the whole system rejects heat less efficiently, and cabinet temperatures creep up over weeks or months. This is a slower, subtler cause than the others, and it’s also the easiest to fix yourself.
The sealed system has failed. This includes the compressor, start relay, or a refrigerant leak. Sealed-system failure usually causes both the freezer and fridge to warm up together. If your freezer is still genuinely cold, this is the least likely explanation.
Technicians who work on this problem daily follow a simple rule: if the freezer is cold, the compressor and refrigerant system are probably fine, so airflow and defrost components get checked first, and sealed-system work only gets considered once those come back clean.
- Airflow blocked by vents, food, or a stuck damper
- Evaporator fan silent or making noise
- Frost or ice hidden behind the freezer’s rear panel
- Dirty condenser coils reducing overall cooling
- Sealed-system failure, only when both compartments are warm
For a broader rundown of failure patterns across different appliance types, Mdtechservices covers common refrigerator problems and their fixes in more depth.
How To Fix A Fridge Not Getting Cold Yourself
Once you know where the problem likely sits, these are the fixes you can attempt safely, without specialized tools.
- Do a full manual defrost. Move all perishable food to a cooler first. Unplug the fridge completely, then prop both doors open. You can speed things up with a hair dryer on low heat held a safe distance from plastic parts, or towels soaked in warm water laid against the frosted area. Never chip at ice with a screwdriver or knife, since it’s easy to puncture a coil and cause a refrigerant leak.
- Remove the rear freezer panel if you’re comfortable. This gives direct access to the evaporator coil and fan. Confirm every trace of frost is gone before reassembling. Manufacturer guidance is explicit that partial defrosting causes the problem to return within days, so don’t rush this step.
- Clean the condenser coils. With the unit unplugged, vacuum or brush the coils and the surrounding floor area, including the condenser fan intake. This is worth doing twice a year even when nothing’s wrong, since it’s the single easiest way to protect overall cooling.
- Clear vent passages of small ice buildup. A turkey baster filled with warm water works better than any metal tool for melting ice in narrow vent openings without risking damage.
- Reassemble, plug in, and monitor. Give the unit 4 to 6 hours to reach normal temperature before declaring the fix successful or not.
- Maintain roughly 20 to 25 percent open space in the fridge and freezer so air can actually circulate around food
- Never use a metal tool near the evaporator coil
- Reassemble panels fully before plugging back in
If you’re technically minded, a start relay can be tested with a multimeter for continuity, and it’s a cheap part, typically $15 to $40. A basic thermistor check involves comparing its resistance reading against the manufacturer’s chart at a known temperature. Beyond that, though, control-board diagnostics and refrigerant work call for a licensed technician.
Pro Tip: If your fridge has warmed gradually over several days rather than overnight, put your money on a defrost-system issue. Sudden warming, especially paired with a silent freezer fan, points more toward a fan or control failure.
Quick Decision Rules For Your Next Step
Once you’ve run the checklist, use these rules to decide what happens next.
- Vents were blocked: clear them, wait 2 to 4 hours, and recheck the fridge temperature.
- Heavy frost was found: complete a full manual defrost, reassemble, and monitor for 6 hours before judging results.
- Compressor runs but the fan stays silent: this is very likely a fan or control failure. Order a replacement fan or schedule a repair.
- Compressor isn’t running and both compartments are warm: this suggests a sealed-system problem. Stop DIY work and call a technician.
- Symptoms are intermittent or the fridge makes unusual noises: call a pro rather than guessing.
Keep the 40°F danger zone in mind the whole time. Perishable food sitting above that temperature for more than 4 hours should be discarded, according to standard food-safety guidance, regardless of how the repair is going.
When To Call A Refrigerator Repair Technician
Some symptoms mean it’s time to stop troubleshooting and pick up the phone. Call a technician if you find heavy ice hidden behind panels that returns quickly after defrosting, if the evaporator or condenser fan is seized or grinding, if you smell anything electrical, if the compressor won’t run at all, or if you’re simply not comfortable removing interior panels yourself.
A technician arriving for this complaint typically checks the compressor and start relay, both fans, the defrost heater, thermostat, timer, and control board, the damper motor, and the thermistors, adding a leak check only if the airflow components all test clean.
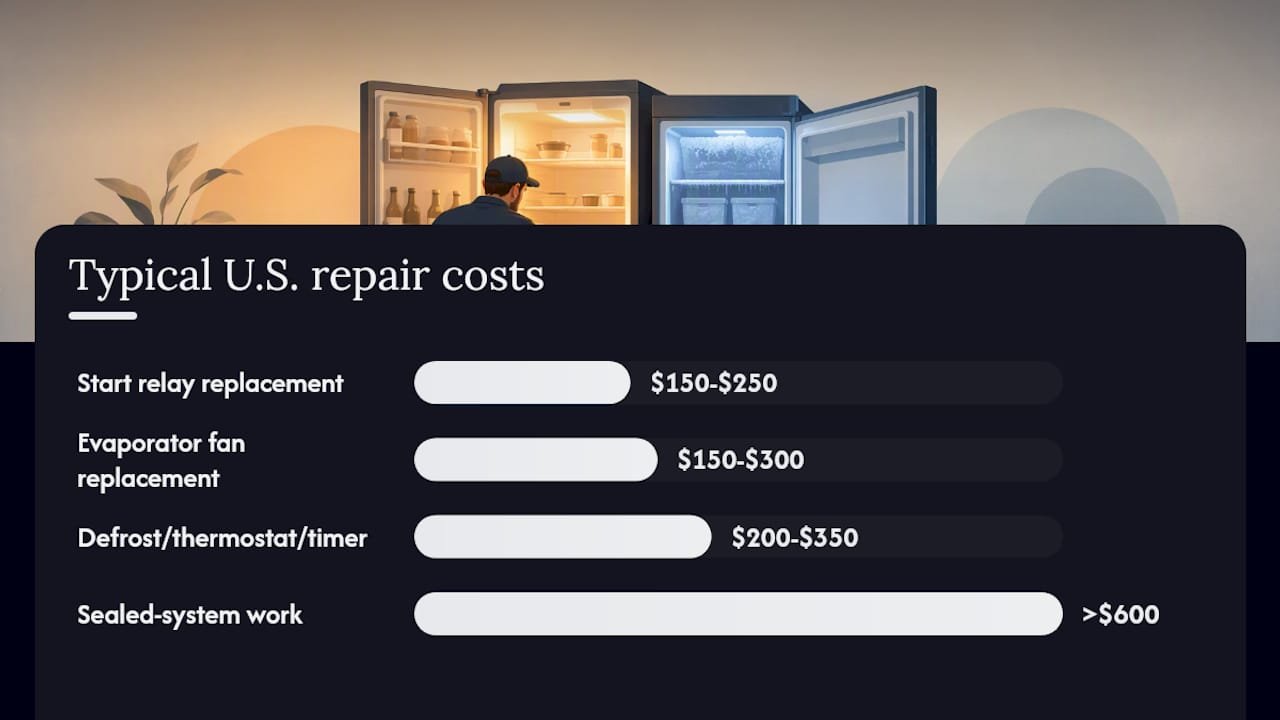
Typical U.S. repair cost ranges:
- Condenser coil cleaning: often free or low cost if done yourself, minimal labor if included in a service call
- Evaporator fan replacement: roughly $150 to $300 including labor
- Defrost heater, thermostat, or timer replacement: roughly $200 to $350
- Start relay or compressor relay replacement: roughly $150 to $250
- Sealed-system work (evacuate and recharge, or compressor replacement): several hundred dollars, sometimes exceeding $600
Before your appointment, move remaining food to a cooler, write down exactly how long the fridge has been warm and any noises you noticed, have your model and serial number ready, and list every DIY step you’ve already tried. Technicians report that intermittent failures are the hardest to diagnose quickly, so specific details about timing and conditions genuinely speed things up.
How A Licensed MDTech Services Technician Diagnoses This
When Mdtechservices responds to a “fridge cold, freezer works, but the fridge won’t cool” call, our technicians follow a consistent process rather than jumping straight to parts.
- Confirm the exact complaint and how long it’s been happening
- Observe temperatures and listen for noises with both doors closed
- Test the evaporator fan and damper operation directly
- Check for hidden ice under interior panels
- Measure thermistor readings against expected values
- Review the defrost cycle and control board before considering sealed-system tests
Most diagnostic visits run 30 to 60 minutes, and you’ll get a clear explanation of findings along with next steps before any repair work begins.
Pro Tip: Have your appliance’s model and serial number ready before the technician arrives. It lets us pull the exact service bulletin for your unit instead of troubleshooting blind.
What Our Techs Wish Every Homeowner Knew
We see the same mistakes on repeat visits: chipping ice with a metal tool, skipping a full defrost after a repair, letting condenser coils go years without cleaning, and stacking large containers against the vents. The single best habit is writing down exactly when the fridge first warmed up and any odd sounds beforehand, since that detail alone often cuts diagnostic time in half. If ice comes back within days of a defrost, it’s almost always a failed defrost component, not bad luck.
Get A Professional Diagnostic From Mdtechservices
Running through vents, fans, and a manual defrost yourself is worth trying, but if the problem returns or you’d rather skip the guesswork entirely, Mdtechservices gives Orange County and Los Angeles County homeowners a same-visit diagnostic backed by licensed technicians who work on Whirlpool, Samsung, LG, KitchenAid, and other major appliance brands every week.

On the first visit, our technicians diagnose the cause, handle minor part replacements and condenser coil cleaning on the spot, and let you know upfront if a specific part needs to be ordered for a follow-up appointment. We prioritize safety on every job, from proper handling around refrigerant lines to making sure electrical work is done to code. Before we arrive, pull together your model and serial number and jot down when the fridge first started running warm. You can review our full appliance repair services or book online through our appliance repair page whenever you’re ready to get it fixed right the first time.
Sources
- Refrigerator freezer is cold but refrigerator is warm
- Refrigerator not cooling: complete diagnostic guide
- Diagnosing refrigerator evaporator fan problems (SearsPartsDirect DIY article)
- Why is my refrigerator warm but the freezer cold? (Beacon Saves)