TL;DR:
- Proper ice machine installation requires a dedicated water supply with correct pressure, proper drainage with slope and an air gap, and a separate electrical circuit sized to the machine’s specifications. Level placement and correct utility connections ensure reliable ice production and prevent damage or failure. Proper site selection, utility setup, and commissioning help avoid costly repairs and ensure warranty coverage.
Installing an ice machine means connecting a dedicated water supply, proper drainage, and a dedicated electrical circuit according to current industry standards. Knowing how to install an ice machine correctly from the start prevents costly repairs, code violations, and voided warranties. This guide covers every step of the ice maker setup process, from water pressure and drain slope to electrical breaker sizing and commissioning, so you get reliable ice production from day one.
What water and drainage setup is required for ice machine installation?
Water supply is the foundation of any successful ice maker setup. Inlet water pressure must stay between 20 and 80 PSI. Pressure above 80 PSI damages internal valves and requires a pressure-reducing valve installed upstream before the machine.
A dedicated potable water line with a nearby, accessible shutoff valve is non-negotiable. That shutoff valve lets you cut water fast during maintenance or emergencies without shutting down your whole home supply. Water filtration with a scale inhibitor filter protects the evaporator plates and internal components from hard water damage. Hard water scale is the leading cause of premature ice machine failure.
Drainage is where most homeowners run into trouble. Key drainage requirements include:
- Minimum drain slope: 1/4 inch per foot of run toward the floor drain. Flat or uphill sections cause water backup and contamination.
- Air gap: The drain outlet must terminate above the floor drain with a visible air gap. This prevents backflow contamination and is required under the FDA Food Code for commercial settings and strongly recommended for residential installs.
- Drain line diameter: Use the diameter specified in your machine’s manual. Undersized lines restrict flow and cause overflow.
- Gravity drainage: The machine must sit high enough for water to flow downhill to the drain. If your drain is at floor level and the machine sits low, you may need a drain pump or a platform.
Pro Tip: Install the water filter within 6 feet of the machine’s inlet valve. Longer filter runs reduce pressure and can drop you below the 20 PSI minimum.
Gravity-fed drainage is frequently underestimated. Many homeowners discover mid-installation that their chosen location does not allow the required slope. Measure the drain path before you commit to a spot. Relocating a machine after connections are made costs time and money.
How to prepare electrical connections for your ice machine
Electrical preparation is the step that most DIY homeowners get wrong. Modular ice machines producing 500–2,000 lbs per day require a dedicated 208-230V single-phase circuit with a 20–30 amp breaker. Residential under-counter units typically need 115V at 15–20 amps, but always confirm with your specific model’s data plate.
A dedicated circuit means nothing else runs on that breaker. Shared circuits with other high-draw appliances cause voltage sag, which stresses the compressor and leads to premature failure. Manufacturers treat shared-circuit damage as user error, which voids the warranty.
Critical electrical requirements to verify before installation:
- Breaker size: Match the breaker amperage to the machine’s nameplate rating. Never upsize a breaker to stop tripping. Tripping is a symptom, not the problem.
- Wire gauge: Use the correct gauge for the amperage and run length. Undersized wire overheats.
- GFCI protection: Many local codes require GFCI protection for appliances near water sources. Check your local building code.
- Voltage verification: Use a multimeter to confirm actual outlet voltage before plugging in. Low voltage from a long wire run damages the compressor.
Hiring a licensed electrician for this step is the right call for most homeowners. Electrical work near water carries real risk, and a licensed electrician provides documentation that protects your warranty and satisfies local inspection requirements. The cost of one service call is far less than replacing a compressor.
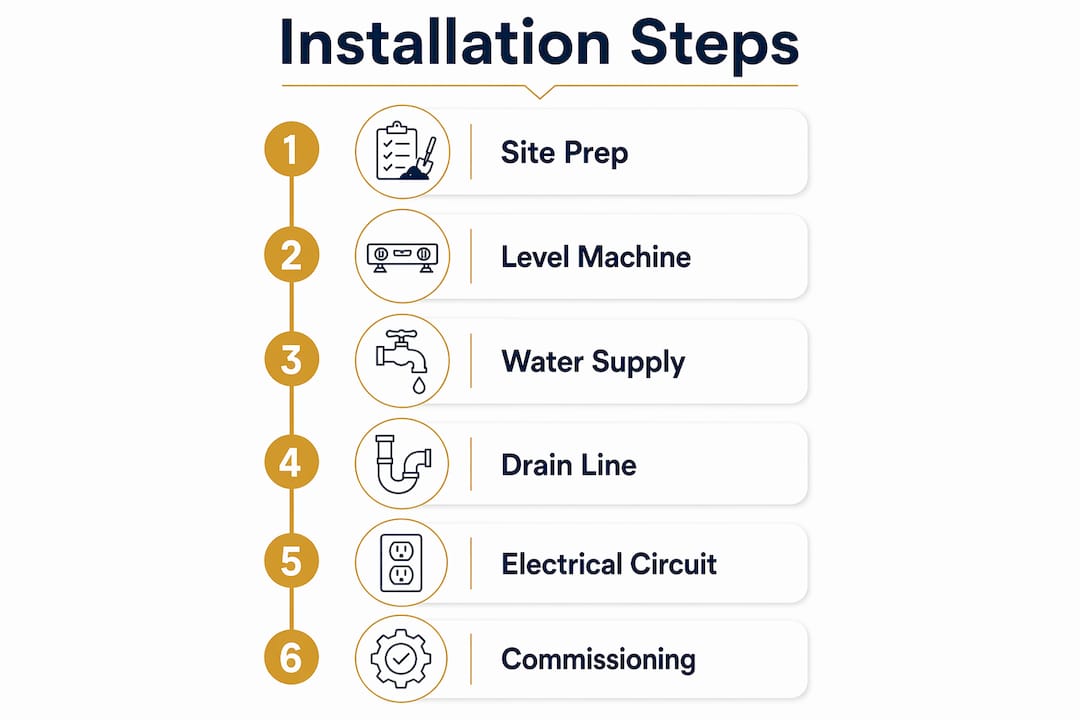
Steps to install and position your ice machine correctly
Correct positioning sets up every other step for success. Follow this sequence to complete your ice machine installation guide from site selection through first ice production.
1. Choose and prepare the installation site
Select a location with ambient temperatures between 50°F and 100°F. Avoid areas near ovens, dishwashers, or direct sunlight. Air-cooled units require at least 6 inches of clearance on each side and 12 inches at the rear. Hot exhaust air must not recirculate back into the intake. Recirculation causes the machine to overheat and reduces ice output significantly.
2. Level the machine
Place a bubble level on top of the machine and adjust the feet until it reads perfectly level front to back and side to side. Even a slight tilt disrupts water flow across the evaporator plates, producing ice of uneven thickness and triggering ice bridging, which stops production entirely. Leveling takes five minutes and prevents hours of troubleshooting later.
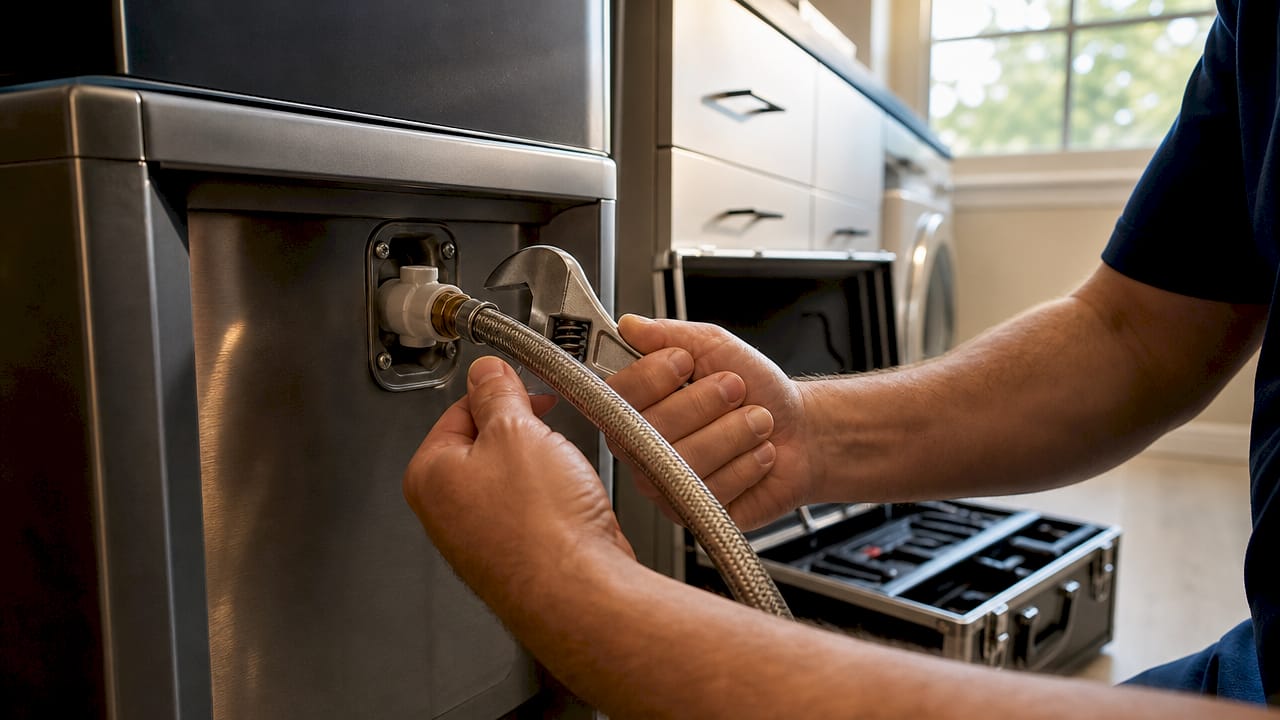
3. Connect the water supply
Turn off the water at the shutoff valve. Connect the supply line to the machine’s inlet valve using the fittings specified in your manual. Hand-tighten first, then use a wrench for a quarter turn more. Do not overtighten. Turn the water back on slowly and check every connection for drips before proceeding.
Pro Tip: Use braided stainless steel supply lines instead of plastic tubing. They resist kinking, handle pressure spikes better, and last significantly longer.
4. Connect the drain line
Run the drain line from the machine’s drain outlet to the floor drain, maintaining the 1/4 inch per foot slope throughout the entire run. Secure the line with pipe clamps every 24 inches to prevent sagging. Confirm the air gap is visible at the floor drain end.
5. Connect the electrical circuit
Plug the machine into the dedicated outlet or have your licensed electrician make the hardwired connection. Do not power on yet.
6. Commission the machine
Turn on the water supply and electrical power. Run two full freeze cycles before consuming any ice. This flushes the system and confirms all connections hold under operating conditions. Log the date, ambient temperature, water pressure reading, and cycle times. That log supports warranty claims and helps a technician diagnose issues faster if problems arise later.
| Commissioning check | What to verify |
|---|---|
| Water pressure | 20–80 PSI at inlet |
| Drain flow | Water exits freely with correct slope |
| Leveling | Bubble centered front-to-back and side-to-side |
| Electrical | Breaker holds through two full cycles |
| Ice quality | Uniform thickness, no bridging |
Common installation mistakes and how to troubleshoot them
Most post-installation problems trace back to one of five errors made during setup.
- Incorrect drain slope or missing air gap. Water backs up into the drain pan, creating a contamination risk and triggering overflow sensors. Re-run the drain line with the correct slope and add the air gap at the floor drain.
- Improper electrical setup. A breaker that trips repeatedly signals an undersized circuit or a shared load. Do not reset and ignore it. Have a licensed electrician verify the circuit before the compressor sustains damage.
- Machine not level. Uneven ice or frequent ice bridging almost always points to a leveling problem. Re-check with a level and readjust the feet.
- Overheating from poor ventilation. If the machine runs constantly but produces little ice, check clearances. Blocked sides or rear panels trap heat and force the condenser to work harder than designed.
- Scale buildup from unfiltered water. White deposits on evaporator plates reduce efficiency quickly. Install a water filter rated for your local water hardness and replace it on the manufacturer’s recommended schedule.
“Homeowners often underestimate the plumbing complexity for ice makers, especially gravity-fed drains that may require professional modifications.” This is the single most common reason a DIY installation stalls or fails.
For ongoing reliability after installation, regular ice machine maintenance prevents the majority of these issues from developing into serious repairs. If you do run into problems after setup, the ice maker repair guide from Mdtechservices walks through the most common fixes step by step.
Key takeaways
Successful ice machine installation depends on meeting three non-negotiable requirements: correct water pressure, proper drain slope, and a dedicated electrical circuit sized to the machine’s nameplate rating.
| Point | Details |
|---|---|
| Water pressure range | Maintain 20–80 PSI at the inlet; install a pressure-reducing valve above 80 PSI. |
| Drain slope requirement | Run drain lines at a minimum 1/4 inch per foot slope with a visible air gap at the floor drain. |
| Dedicated electrical circuit | Use a 20–30 amp breaker on a circuit shared with no other appliances. |
| Level the machine | Even a slight tilt causes uneven ice and bridging; check level before connecting utilities. |
| Commission before use | Run two full freeze cycles and log pressure, temperature, and cycle times for warranty records. |
What I’ve learned after years of ice machine installs
After handling ice machine installations across Orange County and Los Angeles County, the pattern is clear: the jobs that go wrong are almost never about the machine itself. They are about the site. Homeowners pick a convenient spot and then try to make the plumbing and electrical fit around it. That is backwards.
The right approach is to pick the site based on where a proper drain slope is achievable, where a dedicated circuit already exists or can be added cleanly, and where ventilation clearances are easy to maintain. The machine goes last in that decision chain, not first.
The other thing I see regularly is homeowners skipping the commissioning log. It feels like paperwork. But when a machine fails eight months later and the manufacturer asks for proof of correct installation, that log is the difference between a warranty repair and a full replacement bill. Professional installers provide that documentation automatically. DIY installs rarely do.
Partial professional help is a smart middle ground. Handle the site prep and positioning yourself, then bring in a licensed plumber for the drain line and a licensed electrician for the circuit. You save money on labor while protecting the warranty and meeting code. That combination works well for most homeowners who want to stay involved without taking on the full risk.
— MDTECH
Professional ice machine installation support from Mdtechservices
Getting the water, drainage, and electrical connections right the first time saves you from expensive repairs down the road. Mdtechservices specializes in residential appliance installation across Orange County and Los Angeles County, with licensed technicians who handle code-compliant ice machine setups from site assessment through commissioning.

If you run into problems after a DIY install or want a professional to handle the full setup, the residential appliance troubleshooting guide from Mdtechservices is a practical starting point. For hands-on help, contact Mdtechservices directly to schedule an installation or inspection appointment. Our team brings the tools, the code knowledge, and the documentation your warranty requires.
FAQ
What tools are needed to install an ice machine?
You need a bubble level, adjustable wrench, pipe cutter, multimeter, and braided supply line fittings. A drill and pipe clamps are required for securing the drain line at the correct slope.
What water pressure does an ice machine need?
Inlet water pressure must stay between 20 and 80 PSI. Pressure above 80 PSI requires a pressure-reducing valve installed on the supply line before the machine’s inlet valve.
Does an ice machine need its own electrical circuit?
Yes. Ice machines require a dedicated circuit because sharing a breaker with other appliances causes voltage sag and compressor failure, and voids most manufacturer warranties.
What is an air gap and why does it matter for ice machine drainage?
An air gap is a visible open space between the drain outlet and the floor drain that prevents backflow contamination. The FDA Food Code mandates air gaps in commercial settings, and they are strongly recommended for all residential ice machine installs.
How do I know if my ice machine is level enough?
Place a bubble level on top of the machine and check both front-to-back and side-to-side. The bubble must sit centered in both directions. Even a small tilt disrupts water flow over the evaporator plates and causes uneven ice or bridging.