
Most gas appliances can convert from propane to natural gas (or the reverse), but only if the manufacturer says so and an approved conversion kit exists for that exact model. Your first move is simple: check the appliance rating plate and owner’s manual for a conversion listing, then call a licensed technician to swap parts, adjust the regulator, and run a combustion test. Skip the manual or the technician, and you’re gambling with carbon monoxide and fire risk. Manufacturer instructions, rating plate guidance, and a licensed installer are the three checkpoints that matter before anything gets touched.
Key Takeaways
A safe, code-compliant gas conversion depends on manufacturer-approved parts, correct pressure settings verified by a manometer, and a licensed technician handling installation and testing.
| Point | Details |
|---|---|
| Check the rating plate first | Confirm the appliance is listed as convertible before buying any parts or kits. |
| Use manufacturer-specific kits only | Generic or universal kits don’t match exact orifice sizing and can cause CO hazards. |
| Follow the eight-step workflow | Shutoff, part swap, pressure adjustment, leak test, and combustion check happen in that order. |
| Budget for hidden costs | Kits run $20 to $150 and labor runs $100 to $400 per appliance, with permits adding more for service-line work. |
| Hire Mdtechservices for installation and testing | Licensed technicians handle kit installation, pressure verification, permits, and relabeling for California conversions. |
Where to Find Manufacturer Conversion Details
- Whirlpool’s LP conversion instructions for range-specific steps and pressure targets
- Navien’s NPE gas conversion guide for tankless water heater models
- Alaska DEC’s liquefied gas conversion chart for orifice and BTU reference data
Always confirm details against your own appliance’s manufacturer instructions before relying on any general chart.
FAQ
Can every gas appliance be converted between natural gas and propane?
No. Only appliances the manufacturer explicitly lists as convertible, with an approved kit available for that exact model, should be converted. Others need replacement instead.
How much does a typical single-appliance conversion cost?
Kits generally run $20 to $150, with labor adding $100 to $400 per appliance, though larger jobs involving piping or meter work cost significantly more.
Is it legal to convert a gas appliance myself?
In most jurisdictions, no. Regulator adjustment, orifice replacement, and combustion testing require licensing, and unpermitted work can void your insurance or appliance warranty.
How long does a gas conversion take?
A single appliance conversion often finishes in a day or two. Whole-home service-line work involving utility meters or new piping can take weeks depending on permitting.
What happens if a conversion is done incorrectly?
Improper conversions cause flame lifting, sooting, incomplete combustion, and carbon monoxide production, along with fire risk and premature appliance failure.
Table of Contents
- What Does a Gas Appliance Conversion Actually Involve?
- How Do You Check If Your Appliance Can Be Converted?
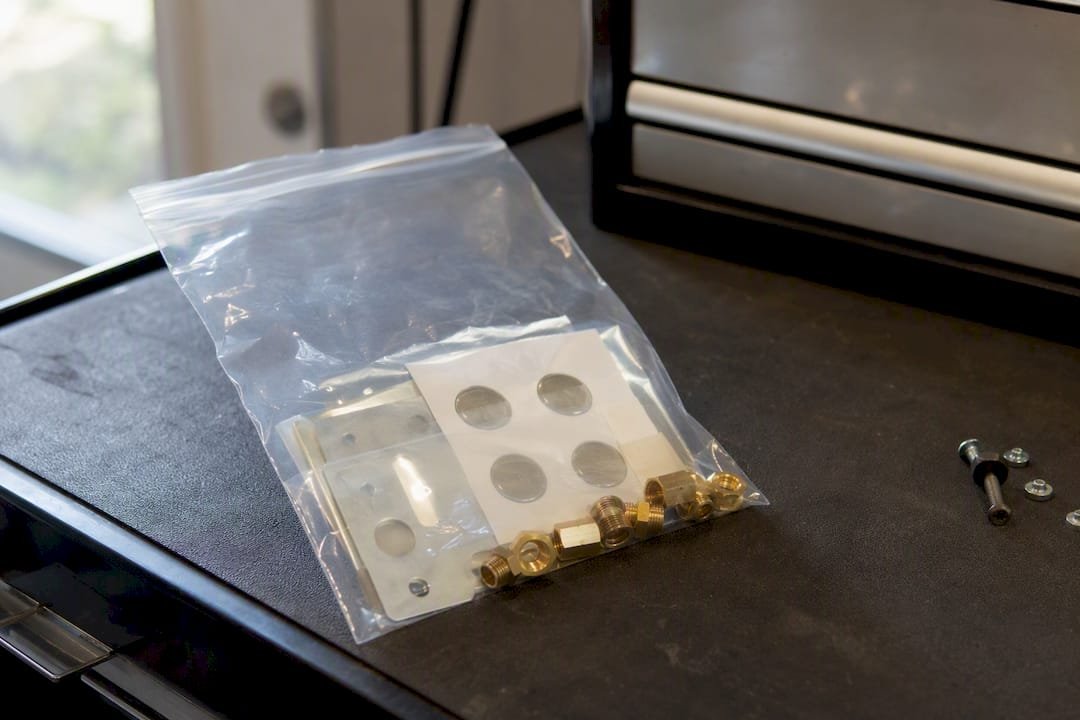
- What’s Inside a Conversion Kit?
- What Are the Steps in a Professional Gas Conversion?
- Why Do Improper Conversions Create Real Risk?
- How Much Does a Gas Conversion Cost and How Long Does It Take?
- How Do You Verify a Conversion Was Done Correctly?
- Sources
What Does a Gas Appliance Conversion Actually Involve?
Natural gas and propane burn differently. Propane packs roughly 2.4 to 2.5 times the BTU content per cubic foot of natural gas, which means the same burner needs a completely different fuel volume to produce a safe, steady flame. That difference drives everything else in a conversion.
Three hardware systems typically change:
- Orifices — smaller for propane, larger for natural gas, sized to match BTU output
- Regulator or regulator spring — adjusts supply pressure to the appliance’s manifold
- Air shutters and sometimes burners or venting — recalibrated so combustion stays clean and complete
Appliances that qualify for conversion are explicitly listed as convertible by the manufacturer, with orifices, regulators, and occasionally venting replaced as a set.
Pro Tip: Keep the original natural-gas orifice set and rating plate sticker in a labeled bag after conversion. If you sell the home or switch fuels again down the road, having the original parts on hand saves a technician from ordering replacements from scratch.
How Do You Check If Your Appliance Can Be Converted?
Before you spend a dollar on parts, verify convertibility with a short checklist:
- Read the rating plate for a gas type code (NAT for natural gas, LP for propane) and check whether a conversion is listed
- Open the owner’s manual to the conversion section, if one exists
- Look up your model number on the manufacturer’s website for kit availability
- Confirm a manufacturer-approved kit actually exists for your specific model
If the rating plate or manual says “non-convertible,” or no kit exists, stop there. Universal or generic kits don’t match the exact orifice geometry your unit needs, and mismatched parts create real safety hazards. Manufacturer PDFs, like Navien’s conversion guide for its NPE tankless units, are the correct reference, not a general internet search.
What’s Inside a Conversion Kit?
A genuine manufacturer conversion kit is model-specific, and it typically includes:
- A set of burner orifices sized for the target fuel
- A broil or oven orifice, on ranges and ovens
- A regulator, conversion cap, or spring that resets manifold pressure
- Air shutter jigs for recalibrating the air-to-fuel mix
- A new rating plate or sticker documenting the converted fuel type
- Written installation instructions from the manufacturer
Each part does one job. Orifices control how much fuel reaches the burner. The regulator sets the pressure feeding that orifice. Air shutters balance combustion air so the flame burns clean instead of sooting. Whirlpool’s own LP conversion instructions walk through this sequence with specific manifold pressure targets for each fuel type.
Pro Tip: Have your technician document every part number used during the conversion. It’s a five-minute step that makes warranty claims and future reconversions far less of a headache.
What Are the Steps in a Professional Gas Conversion?
A licensed technician follows a set sequence when converting a gas appliance:
- Confirm convertibility using the rating plate, manual, and manufacturer kit availability
- Shut off gas supply and isolate the appliance from the line
- Remove burner components to access orifices and regulator
- Install new orifices and regulator per the manufacturer kit’s specifications
- Adjust air shutters and pilot jets for the new fuel type
- Reconnect the appliance and perform a leak test at every fitting
- Run a combustion test and check for carbon monoxide output
- Apply the new rating label documenting the fuel conversion
For a single appliance like a range, dryer, or water heater, this process usually wraps up in a single visit. Whole-home service-line conversions, where a utility needs to run new piping, set a meter, or a propane tank needs removal, run longer. Those jobs often stretch across multiple days or weeks once permitting and utility scheduling enter the picture.
Pro Tip: Before your technician arrives, have your appliance’s model number ready, clear access to the gas shutoff valve, and a clean workspace around the unit. It shaves real time off the visit.
Why Do Improper Conversions Create Real Risk?
Get orifice sizing or regulator pressure wrong, and the consequences show up fast: over-firing, flame lifting off the burner, sooting on cookware or heat exchangers, and incomplete combustion that produces carbon monoxide. Damaged heat exchangers and fire risk follow close behind. This is exactly why service technicians point to safety as the core reason conversions are restricted to licensed professionals in most jurisdictions.
Code compliance adds another layer. Many areas require a permit, a pressure test, and a formal relabeling of the appliance once conversion is complete. Skipping permits can void your insurance and your appliance warranty.
Here’s the line homeowners should know: you can check the rating plate, read the manual, and observe flame color after commissioning. You should not touch the regulator, resize orifices, or run a combustion analysis yourself.
- Homeowner-observable: rating plate, flame color, unusual odors, gas leak signs
- Licensed-technician-only: regulator adjustment, orifice replacement, combustion analysis, pressure testing
Pro Tip: Test your smoke and carbon monoxide detectors immediately after a converted appliance is commissioned, then again a few days later once it’s run through normal use cycles.
How Much Does a Gas Conversion Cost and How Long Does It Take?
Costs vary by appliance and region, but rough ranges hold across most single-appliance jobs:
- Kit cost: typically low cost depending on the appliance and manufacturer
- Labor: a moderate additional amount per appliance for parts swap, adjustment, and testing
- Larger jobs: utility meter work, trenching, yard restoration, propane tank removal or abandonment, and permitting fees can add substantially more
Fuel cost per BTU is usually the deciding factor. Because propane carries more energy density per cubic foot than natural gas, many homeowners find that switching to natural gas pays for itself over time if a utility line already reaches the property, since natural gas is commonly priced lower per unit of delivered energy in most markets.
Timeline-wise, appliance-only conversions typically finish same day to within two days. Service-line and meter work, by contrast, often runs weeks once permitting and utility scheduling factor in, since that part of the job usually takes longer than the appliance swap itself.
How Do You Verify a Conversion Was Done Correctly?
A licensed technician confirms safe operation through a specific sequence, not a visual glance:
- Leak test every reconnected fitting with a soap solution or an electronic gas detector
- Manifold pressure check using a manometer, since eyeballing pressure isn’t reliable
- Flame inspection for a steady blue cone with no yellow tipping or lifting
- Combustion and CO test to confirm complete, clean burning
- Final relabeling of the appliance with the new fuel-type rating plate
For reference, natural gas manifold pressure typically runs around 3.5 to 5 inches water column, while propane manifold pressure runs closer to 10 to 11 inches water column. These numbers are guidance only. A technician needs an actual gauge reading, not a guess, to confirm your appliance is within spec.
Keep the invoice, part numbers, and any inspection sign-off. That paperwork matters for warranty claims and shows up in home sale disclosures too.
When Should You Call a Licensed Technician for Conversion?
Mdtechservices technicians handle the full scope: model verification, manufacturer-kit installation, regulator and manifold pressure testing, combustion analysis, permit coordination, and final relabeling.
Call in help when:
- You’re unsure whether the rating plate allows conversion
- No approved kit is available for your model
- The job involves regulator replacement, meter work, or new piping
- You need permit or inspection coordination handled for you
If any of that sounds like your situation, scheduling an assessment gets you a written estimate before any parts get touched.
Our Take on Gas Conversions
Verify the rating plate first, always favor a manufacturer-approved kit over a generic one, and let a licensed technician handle installation and pressure testing. For most homes where natural gas service already reaches the property, conversion pays off, provided the appliance is genuinely convertible to begin with.
How Mdtechservices Handles Your Conversion
Mdtechservices gets you a compliant, tested conversion without the guesswork of sourcing parts or reading manufacturer PDFs yourself. Where a generic online kit risks the wrong orifice size for your exact model, our licensed technicians pull the correct manufacturer kit, handle permits where required, and finish with a combustion test before signing off.
Booking starts with a site assessment: a technician checks your appliance’s rating plate and model number, confirms kit availability, and gives you a written quote before any work begins. From there, installation, regulator and manifold pressure testing, and final relabeling happen in one visit for most single appliances. If your project involves piping or meter changes, we coordinate the permitting so you’re not chasing inspectors on your own. Schedule your gas appliance conversion assessment and get a written quote for your specific appliance before committing to anything.
Sources
- Converting Gas Appliances – Propane and Natural Gas Appliance Conversions
- PDF LP Gas Conversion Instructions – Whirlpool
- PDF LIQUEFIED GAS CONVERSION CHART
- Propane to Natural Gas Conversion: A Complete Guide
- AOG portable conversion kits / portable conversion kit guidance