
An AC compressor that won’t start usually points to one of four problems: a tripped breaker or bad power connection, a failed start capacitor or contactor, a low refrigerant charge tripping a safety cutout, or restricted airflow from a dirty filter or coil. Start with the safe checks first: confirm the thermostat is set to cool, check the breaker and outdoor disconnect, and look for debris around the outdoor unit. Stop there. Refrigerant, capacitors, and internal wiring require a certified technician.
TL;DR:
- Most compressor no-start issues are caused by electrical problems, control wiring errors, refrigerant safety cutouts, or airflow restrictions, not the compressor itself.
- Basic safe checks include verifying the thermostat, inspecting the circuit breaker and outdoor disconnect, and clearing debris from the outdoor unit, which homeowners can do without tools.
- Replacing a failed compressor is expensive; most underlying causes like dirty filters, faulty capacitors, or tripped safety switches are simpler and cheaper fixes.
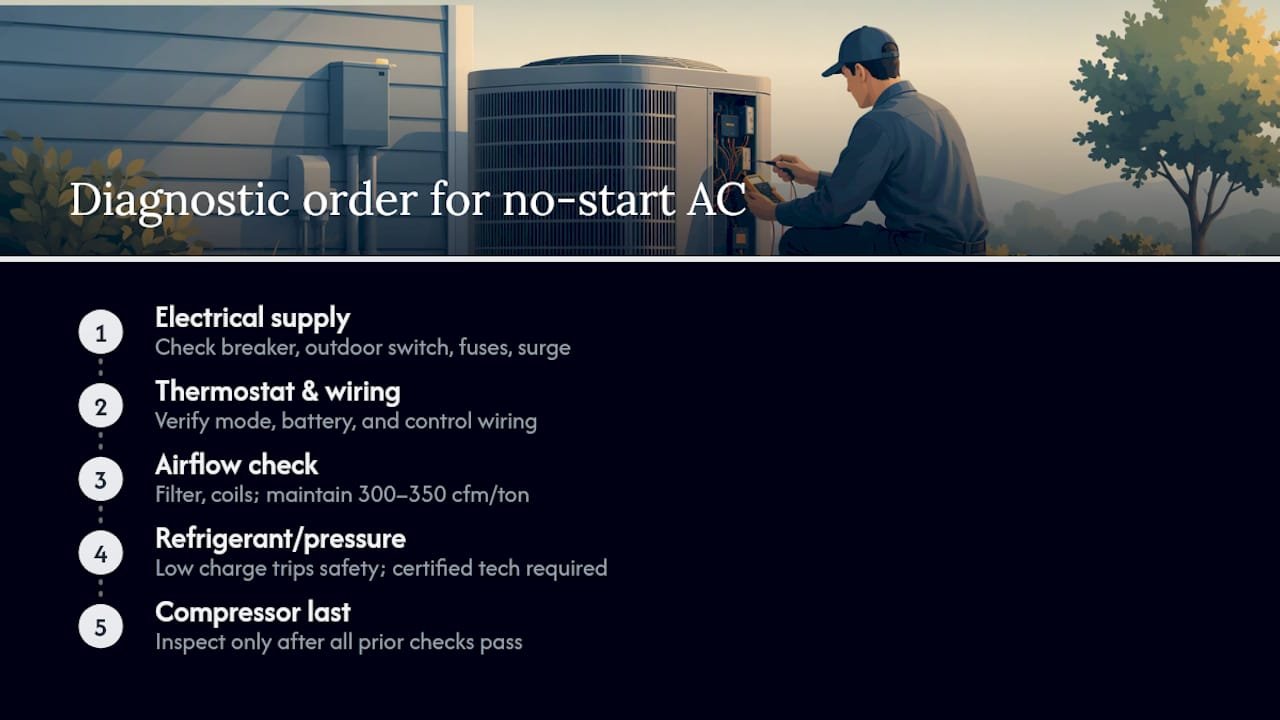
- Technicians follow a specific diagnostic order, focusing first on electrical supply, then control signals, airflow, refrigerant, and only then the compressor itself, to avoid unnecessary costly parts replacement.
- Homeowners should avoid handling refrigerant, capacitors, or internal wiring due to safety and legal restrictions and should call licensed technicians for sealed-system work or refrigerant repairs.
Table of Contents
- Common Causes That Stop an AC Compressor From Starting
- Safe Checks Homeowners Can Try Right Now
- What You Must Not Do: Safety, EPA Rules, and High-Risk Repairs
- When to Call a Pro and What to Prepare
- How MDTech Triages a No-Start Compressor Call
- A Short Note on Minimizing Downtime and Cost
- Book a Safe, Code-Compliant HVAC Diagnostic
- Sources
- FAQ
Common Causes That Stop an AC Compressor From Starting
Most no-start calls trace back to the system around the compressor, not the compressor itself. Field data backs this up: compressor failures are usually the end result of system stress, where a dirty condenser coil, restricted airflow, or the wrong refrigerant charge forces the unit to overheat until it shuts down or fails outright. That distinction matters for your wallet, because replacing a compressor costs far more than fixing the actual fault feeding it.
1. Electrical supply problems. A tripped breaker, a disconnected outdoor safety switch, a blown fuse, or a recent power surge can all cut the current the compressor needs to start. If the outdoor unit is completely silent and the indoor blower still runs, this is often where the trouble sits.
2. Failed start capacitors and contactors. The start capacitor gives the compressor motor the jolt it needs to overcome inertia. When it weakens or fails, you’ll hear humming, clicking, or a hard start that never quite catches. A worn contactor, the relay switch that feeds power to the compressor, produces similar symptoms: power reaches the unit, but nothing engages.
3. Thermostat and control wiring errors. Sometimes the compressor was never told to start. A thermostat stuck in “heat” mode, a dead battery, or loose control wiring between the thermostat and the outdoor unit will leave the compressor waiting for a signal that never arrives.
4. Refrigerant charge and pressure safety cutouts. Low refrigerant trips a low-pressure safety switch designed to protect the compressor from running dry. This is one of the most common and most misdiagnosed causes. Refrigerant charge problems are widespread across residential systems, with many units found to be undercharged, a condition that stresses the compressor and can trigger the exact cutout that stops it from starting again. Refrigerant work also falls squarely under EPA Section 608, which restricts charging and leak repair to certified technicians.
5. Restricted airflow. A clogged filter, an ice-covered evaporator coil, or a condenser coil packed with dirt and leaves all choke the heat exchange the system depends on. Building science research shows airflow below 300 to 350 cfm per ton of cooling capacity can throw off standard diagnostic readings entirely, which is why a technician always checks airflow before assuming a refrigerant or compressor failure.
6. Condenser fan or motor faults. If the outdoor fan isn’t spinning, the condenser coil can’t shed heat, and many systems will shut the compressor down to protect it. A seized fan motor, a bent fan blade catching on the housing, or a fallen branch jamming the blades can all produce this exact symptom.
Manufacturer guidance from brands like Carrier and Trane recommends a specific diagnostic order for a reason: electrical supply first, then controls, then airflow, then refrigerant, and only then does anyone look hard at the compressor itself. Skipping that order is how homeowners end up paying for a new compressor when the real problem was a $15 filter.
Safe Checks Homeowners Can Try Right Now
Before calling anyone, walk through these steps. None of them require tools beyond a screwdriver, and none of them put you near dangerous voltage.
- Check the thermostat. Confirm it’s set to “cool,” the setpoint is a few degrees below room temperature, and the display is responding when you press buttons. A dead thermostat battery causes more no-start calls than most people expect.
- Check the breaker. Open the electrical panel and look for a breaker that’s fully flipped to “off” or sitting in a middle position. A true trip usually needs to be pushed firmly to off, then back to on. If it trips again immediately, stop and call a technician; that’s a sign of a short, not a fluke.
- Confirm the outdoor disconnect. Most outdoor units have a small disconnect box mounted nearby with a pull-out block or a switch. Make sure it’s fully seated and in the “on” position.
- Inspect the outdoor unit visually. Look for leaves, grass clippings, a fallen branch, or anything blocking the fan or coil fins. Clear debris by hand; don’t reach inside the housing.
- Replace a dirty filter. A clogged filter is one of the easiest fixes available to you, and it’s also one of the most common causes of restricted airflow. Manufacturer guidance notes that a clean filter alone can lower energy use by 5 to 15 percent on top of restoring proper airflow.
- Power-cycle the system. Turn the thermostat off, flip the breaker off for 60 seconds, then turn everything back on. Some control boards lock up after a power blip, and a full reset clears that without any risk to you.
While you’re outside, take a look, but not a touch, at the capacitor near the compressor. A healthy capacitor is a smooth cylinder. If it’s bulging, dented on top, or has an oily residue around the base, that’s a strong sign of failure. Photograph it and step away.
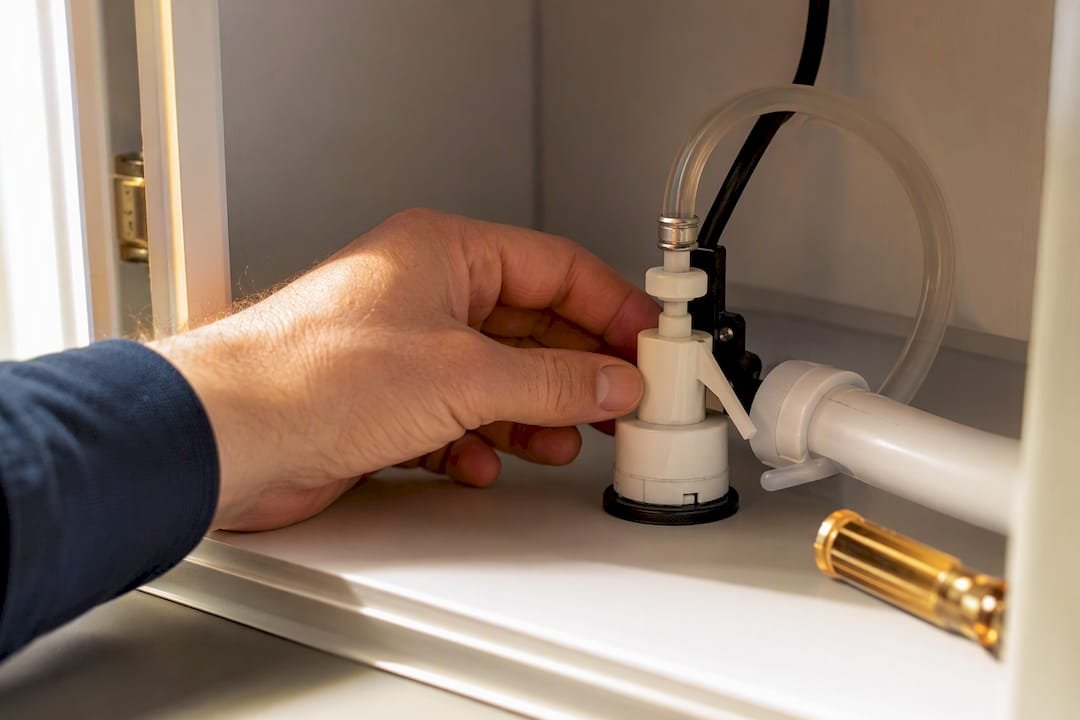
Pro Tip: A clogged condensate drain float switch is an overlooked culprit. If your outdoor unit seems completely dead but everything checks out electrically, ask your technician about the drain float switch. It’s designed to cut power when a drain line backs up, and a simple interior drain clean sometimes restores operation with no outdoor repair at all.
What You Must Not Do: Safety, EPA Rules, and High-Risk Repairs
Some repairs cross a legal and physical safety line, and it’s worth knowing exactly where that line sits before you pick up a screwdriver.
- Never touch refrigerant. EPA Section 608 makes it illegal for anyone without certification to add or remove refrigerant, attach gauges, or open a sealed refrigerant circuit. Venting refrigerant carries real environmental consequences and real penalties.
- Never open or discharge a capacitor. Capacitors store high-voltage charge even after the power is off, and mishandling one can cause a serious electric shock.
- Never work inside the electrical compartment. Internal wiring, contactors, and control boards carry line voltage that can injure or kill someone without proper training.
- Never assume a warranty covers DIY damage. Most manufacturer warranties are voided the moment an unlicensed person opens a sealed system or electrical compartment, turning a covered repair into a full out-of-pocket replacement.
When to Call a Pro and What to Prepare
Certain symptoms mean stop troubleshooting and call a technician immediately: any smell of smoke or burning, a breaker that trips repeatedly after reset, visible oil around the refrigerant lines, ice buildup on the coil or lines, or loud grinding coming from the outdoor unit.
Capacitor replacement, refrigerant leak detection and repair, compressor testing, and any sealed-system work belong to a licensed technician, not a homeowner with a multimeter.
Before the technician arrives, gather a few details to speed up the visit:
- What you observed and when it started (system dead, humming but not starting, short-cycling)
- Any recent power outages, surges, or storms
- How the thermostat is responding
- Photos of the outdoor unit, the filter, and the capacitor if visible
A diagnostic visit typically includes an electrical test, a check of the capacitor and contactor, a look at airflow and coil condition, and a refrigerant pressure check if the earlier steps don’t turn up an obvious cause. Diagnostic fees and repair costs vary by the actual fault found, which is exactly why an accurate first visit matters more than a fast guess. If the issue turns out to involve gas-fired equipment elsewhere in the home, vetting a qualified specialist follows the same logic: credentials first, price second.
How MDTech Triages a No-Start Compressor Call
We start every no-start call with the same order manufacturers recommend: electrical, then controls, then airflow, then refrigerant, and only then the compressor itself. That order exists because a dead compressor is often the last domino to fall, not the first one pushed. A dirty coil or a failing capacitor can look exactly like a dead compressor to an untrained eye.
Before we arrive, a few photos speed things up considerably: the control board, the filter, and the area around the outdoor unit.
- Technicians handle electrical and refrigerant tasks on-site
- Online booking allows scheduling of service visits
- The service area includes Orange County and Los Angeles County, California
- All refrigerant work follows EPA Section 608 handling requirements
A compressor that won’t start is rarely the whole story. In most cases, something upstream, electrical, mechanical, or refrigerant-related, forced it to shut down to protect itself. Fix that, and the compressor often works exactly as it should.
A Short Note on Minimizing Downtime and Cost
Before a technician shows up, do three things: swap the filter if it’s dirty, snap a few photos of the outdoor unit and breaker panel, and confirm the breaker hasn’t tripped again. Those minutes save diagnostic time and, often, money. Beyond the immediate fix, annual maintenance is the cheapest insurance against compressor stress. A clean coil and a properly charged system rarely fail without warning.
— MDTECH
Book a Safe, Code-Compliant HVAC Diagnostic
If your outdoor unit still won’t start after the safe checks, MDTech Services handles the parts of this job that shouldn’t be DIY: capacitor and contactor replacement, sealed-system troubleshooting, and EPA-compliant refrigerant work, all from licensed technicians serving Orange County and Los Angeles County.
Every visit follows the same order outlined above, electrical first, refrigerant last, so you’re not paying to replace a compressor that a $200 capacitor could have saved. Customers can expect a technician who explains the failure and repair needed. Sending photos of your control board, filter, and outdoor unit ahead of time, the same ones described earlier, helps our team arrive prepared and often shortens the visit. Ready to get it fixed? Book your Air Conditioning Repair today and describe your symptoms when you schedule.
Sources
Read safety guidance first, then diagnostic steps, in that order.
FAQ
What Can Cause an AC Compressor to Not Kick On?
The most common causes are a tripped breaker or disconnected power switch, a failed start capacitor or contactor, a thermostat set incorrectly, low refrigerant triggering a safety cutout, or restricted airflow from a dirty filter or coil. A compressor failure is more often a symptom of one of these issues than a standalone problem.
How Do You Force Start an AC Compressor?
You shouldn’t try to force-start a compressor manually. Bypassing safety switches or capacitors can damage the unit further or cause injury, so the safe path is checking the breaker, thermostat, and filter, then calling a certified technician if the unit still won’t run.
What Can I Do if My AC Compressor Isn’t Turning On?
Check the thermostat settings, reset the breaker, confirm the outdoor disconnect is engaged, and clear any debris around the outdoor unit. If none of those safe steps restore operation, schedule an HVAC repair visit rather than opening the electrical compartment yourself.
Is It Okay to Run the AC if the Compressor Isn’t Working?
Running the system with a non-starting compressor won’t cool your home, and repeatedly cycling power in an attempt to force a start can damage the contactor or capacitor further. Turn the system off and address the underlying cause before running it again.
How Much Does It Cost to Diagnose a Compressor No-Start?
Diagnostic pricing depends on what’s found during the visit, since a capacitor swap costs far less than sealed-system refrigerant repair. Current diagnostic and repair pricing for Air Conditioning Repair is available when you book your service.